Affiliate links on Android Authority may earn us a commission. Learn more.
How to create an Android game with Stencyl
The User Interface
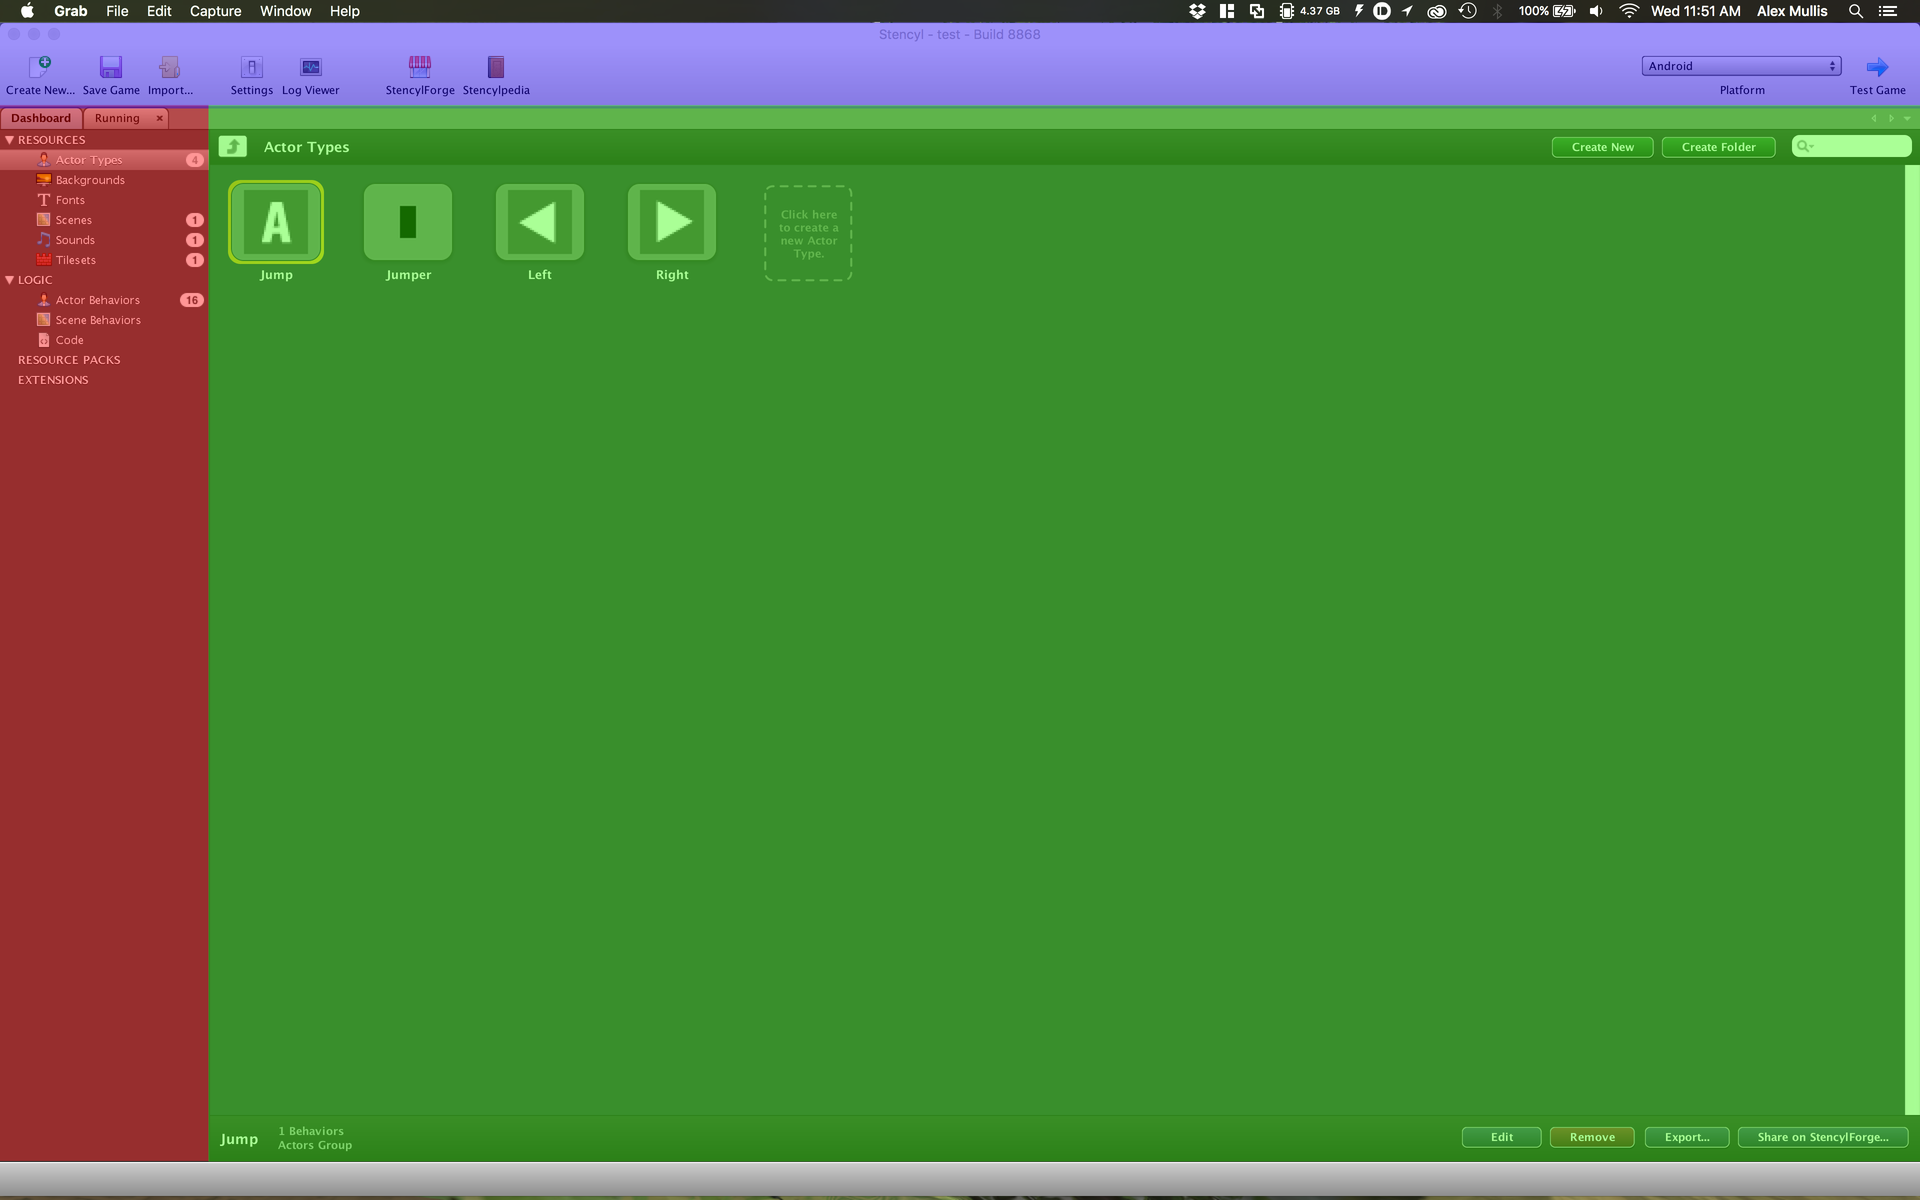
The user interface is split into three main parts, which are colored for demonstration purposes. Starting with the blue panel on the top, this is where some quick shortcuts are spread out. This includes the ability to create a new resource, save the game, change platform and test the game. Next is the green section, this is where all of the options will appear when working with a particular resource. In the picture above this space is being used to display all of the actor types in the game. Finally, there is the red panel, this is a lot more complicated than the other panels. This is where all of the resources and their respective options are held, as well as logic pieces like code. Here is a breakdown of each part:
- Actor Types – Anything that can move or be interacted with is considered an Actor. This page includes the sprites, name, and any animations that are included with that particular instance. There are also options for collision boxes on a per sprite basis as well as physics control.
- Backgrounds – Just like the name suggests, this is where any background images would go.
- Fonts – This is a really nice feature. This option allows you to make a certain font, including type, size and color, that way you can just import a given font preset into a scene without having to configuring it over and over again.
- Scenes – This is where you can make levels or “scenes” in this case. Here you can add any tiles, enemies, players and anything else to make the game run. You will need to name the scene and also define it’s size. Note: the size does not need to be the same as the dimensions defined for the game, with a fixed camera the scene can easily be bigger making a scrolling effect.
- Sounds – This is where you can import sounds, supported formats are MP3 (for Flash) and OGG (for everything else). There is the option to pay the sound as well as edit the sound in an external editor of your choice, like Adobe Audition.
- Tilesets – This is a collection of tiles that can be used in the scenes screen. Here you can figure notes for each tile as well as its collision configuration.
- Actor Behaviors – If you click on this in Stencyl and click on any of the listed behaviors, you will see a bunch of options that can be set. This includes everything necessary to make the game work. Most are self explanatory and with some messing around you will quickly understand the ins and outs of the drag and drop system.
- Scene Behaviors – These can include ways to spawn enemies, coins or the like. These are configured the same way as actor behaviors.
- Code – This includes any scripts that may be needed. Scripts can do almost anything to the game and can prove to be quite helpful. This tutorial does not use scripts, however.
Drag and drop
Creating a simple game
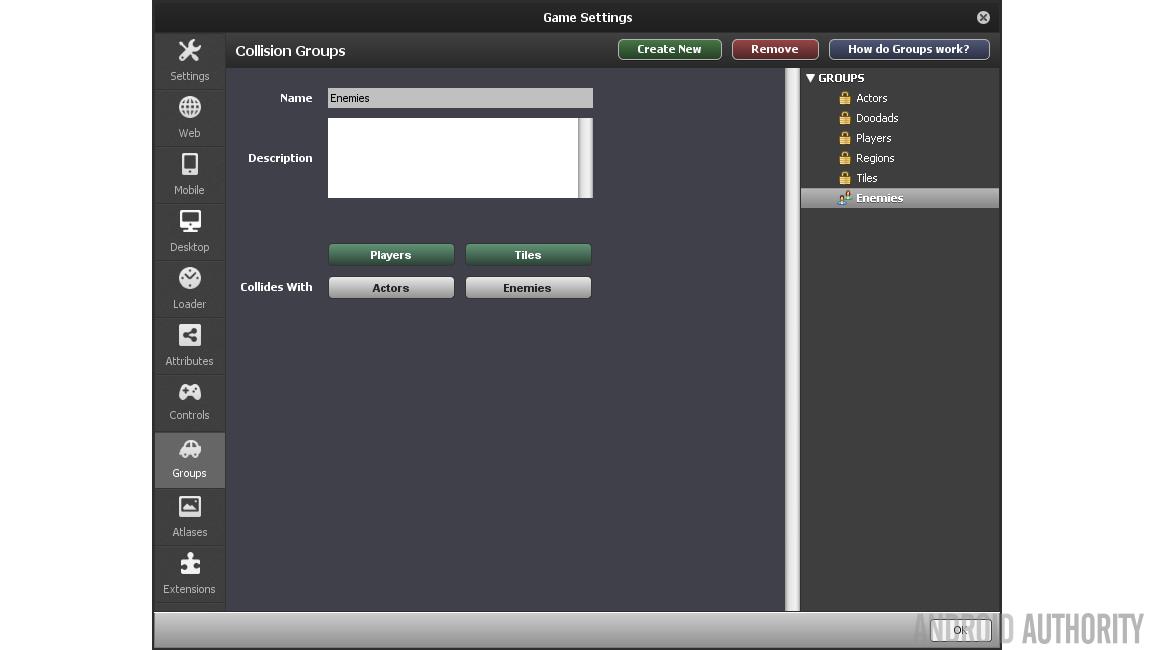
Now you need to make groups, this will allow for collisions. The first thing to do is to open up the settings pane. This is in the blue panel labeled in the first picture. Then click on “Groups” on the left side. Click on “Create New” to make a new group, name it “Enemies” and make sure it collides with “Players” and “Tiles” (they will turn green if they are selected). Click OK.
Now it is time to give the actors some behaviors. This will bring more life into the game and add some animations as well. What you need to do is go into the specific actor screen for “Noni” and “Clown” then select “Behaviors” on the top middle of the screen. Click in the middle of the screen and add the walking animation for Noni. Once added a screen will be presented that is asking for some animations. They are self explanatory and clicking them will enable you add the corresponding animations. Repeat this step (by clicking on “Add Behavior” on the bottom left) but now with jumping, make sure to add the key as “action1” to make the player jump and to add the jump sound from the drop down as well. We are not quite done yet as there are a few more behaviors we need to add, namely “Die in pit and reload” and “Stomp on enemies”. For “Stomp on enemies” choose the stompable group to “enemies” and the jump key to “action1”. The last one is “Die in pit and reload”, but there is nothing to configure.
Now moving on to the “Clown”. To find the “Clown” click on the Dashboard tab and make sure that “Actor Types” is selected.
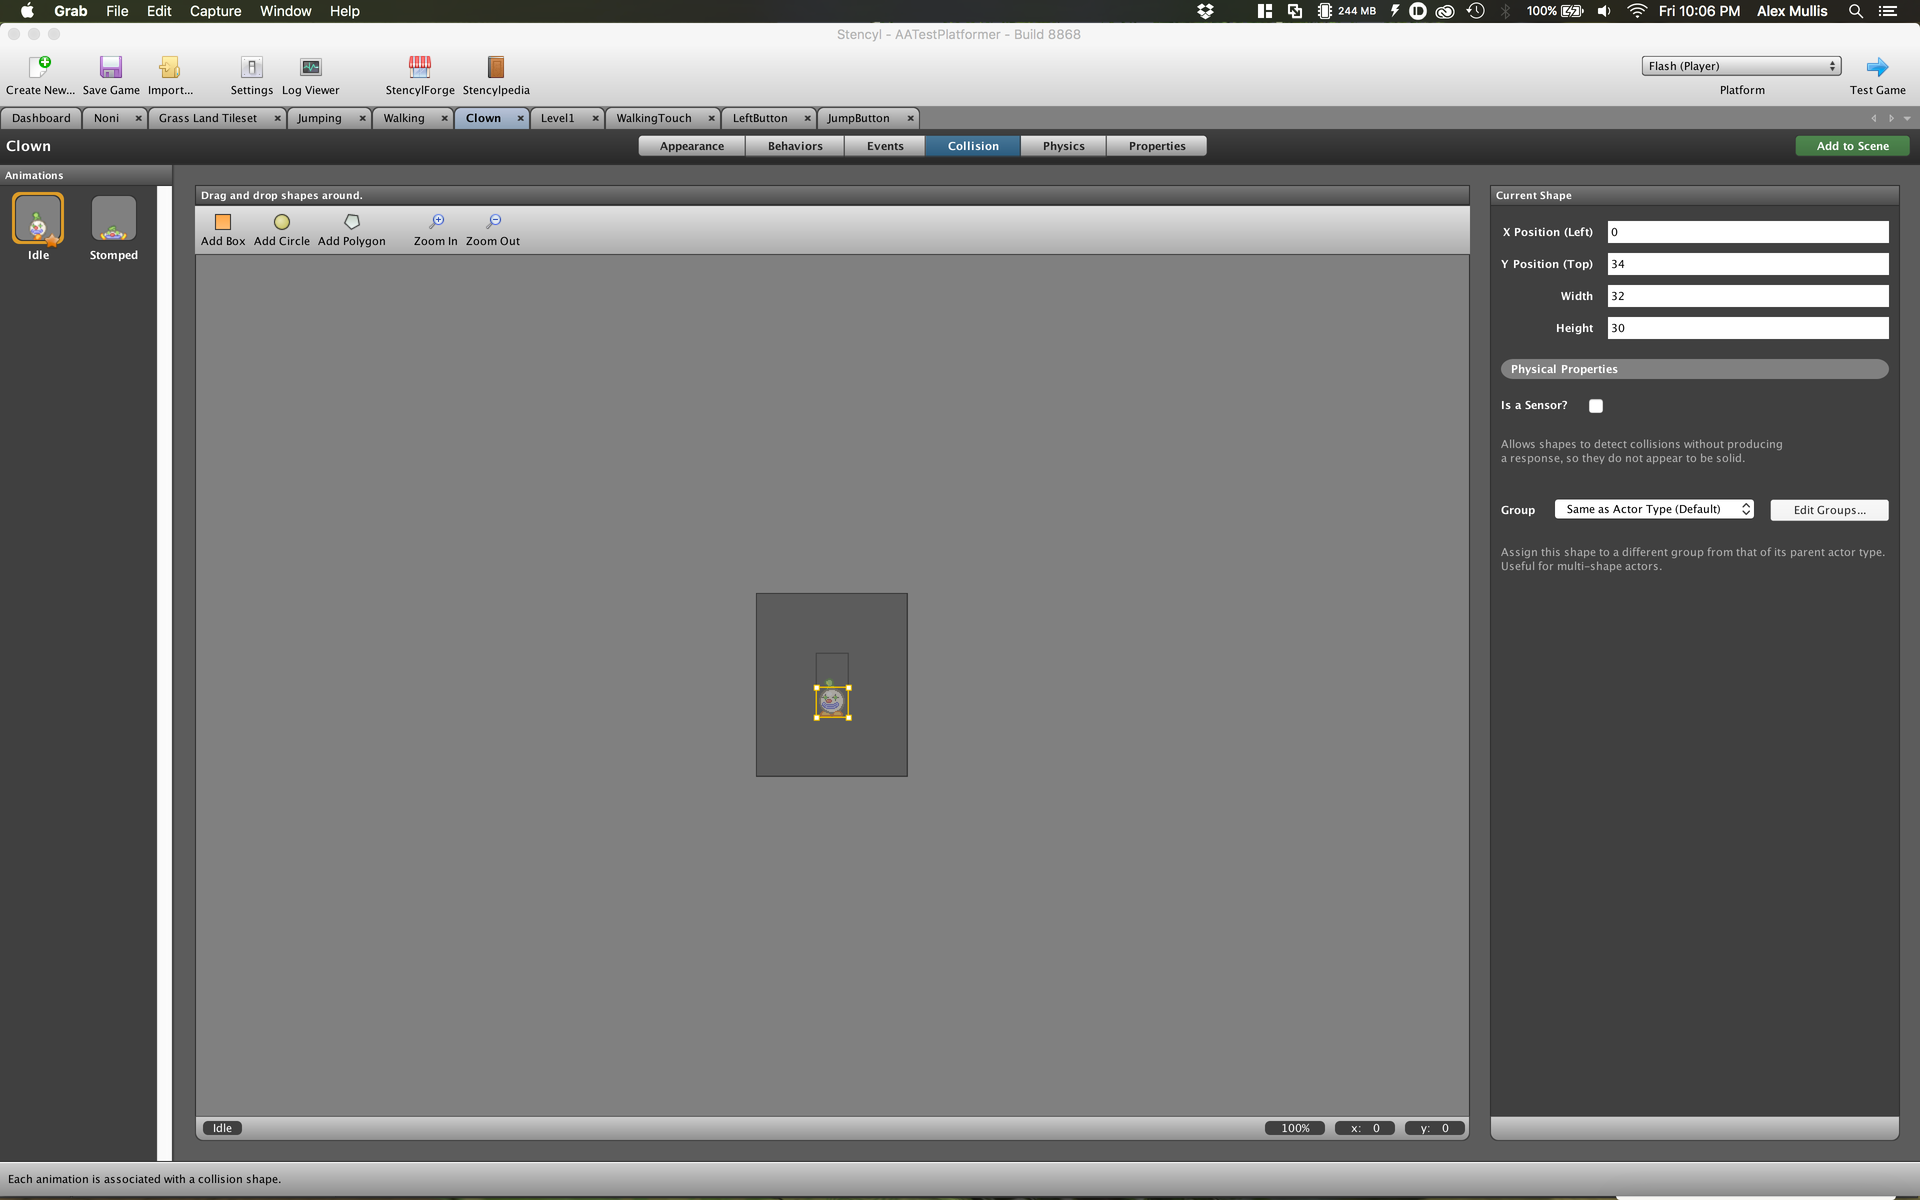
The “Clown” is a lot easier to configure, with just two steps. Go to the “properties” tab in the “Clown” tab and change the group to “Enemies”. Next, go to the “Behaviors” tab and add the “stompable” behavior. From here, add the “Stomped” animation and add the “Stomp” sound. That’s it for the player and enemies!
The last Actors that need to be created are the buttons that will enable the player the be controlled by touch. These can be any design, but I opted for two arrow buttons and jump button. If you don’t want to design your own images then go to the StencylForge and download the “Virtual Mobile Button” pack under the “Actor Types” section.
The first thing to do is set up three new actors, “LeftButton”, “RightButton” and “JumpButton”. Go to the Dashboard tab, then “Actor Types” and finally click on the dotted box to “create a new Actor Type.”
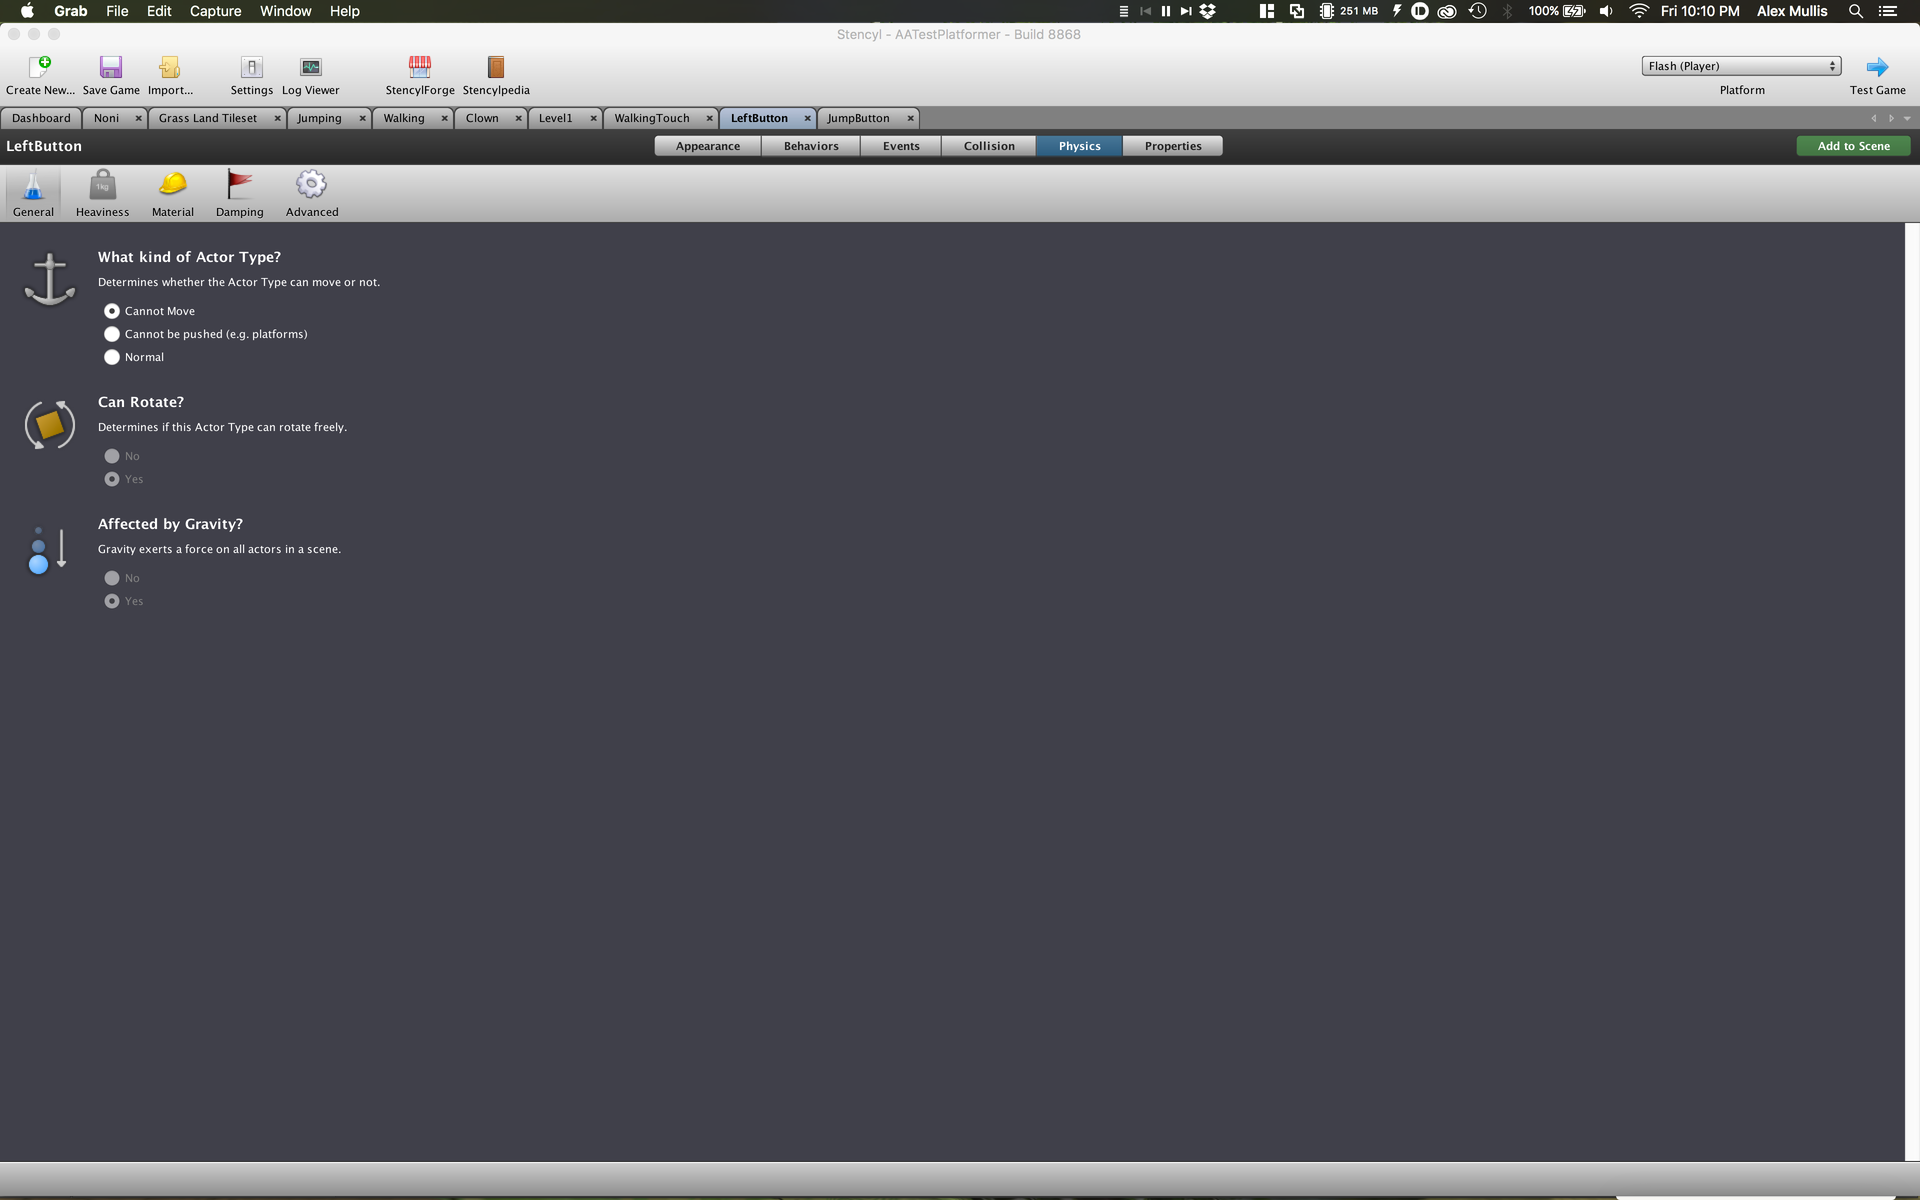
Go to the “Virtual Mobile Button” click on the “Left” arrow and then click “Copy Frame” in the grey toolbar towards the bottom of the “Frames” section. Now go to the “LeftButton” tab, click the dotted box to “add an animation” and click “Paste Frame.” Staying on the “LeftButton” tab go to the “Physics” section and click the radio button that says “Cannot move”. This will make the button immune to the effects of the scene gravity. Repeat these steps for the right and jump buttons.
Go to “Attributes” on the upper right of the screen (near Flow, Scene, Numbers & Text) and click on “Game Attributes” just below that. Once there create a new game attribute. We actually need to make three, name them “move_left”, “move_right” and “jump”. Click on boolean for all three and set them to false by default.
You will see that there are three “Boolean Setter”. These are actions blocks that can be added to events to make things happen. The set move_left setter is used to set the flag (boolean) move_left to either true or false. What we want to do is set the appropriate boolean when once of the arrow icons is touched.
For the “LeftButton” take the two boolean setters for “set move_left to…” and “set move_right to…” and drag them into the brownish block and make a sandwich with the purple setters in between. Set “move_left” to true and the other to false. This means that when the left arrow is touched the flag move_left is set to true.
Make one more event and to the exact same thing as last time except this time make it when the mouse is released on and make both “move_left” and “move_right” false. This is the opposite of the event we create above. This time when the button is no longer being touched the move_left flag will be set to false. With these two events the flag move_left will be depending on whether the left arrow button is being touched.
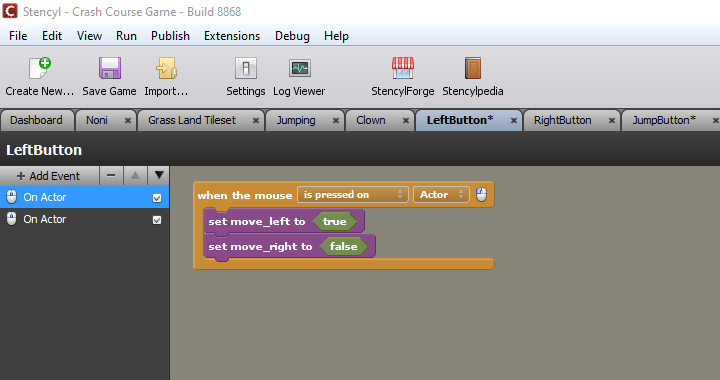
Now do the same thing for “RightButton” except make “move_right” true and “move_left” false for the mouse click. For “JumpButton” you will need to repeat these steps but you just need one variable, “jump”, set it equal to true when the mouse is clicked and “false” when the mouse is released.
That’s it as far as the button are concerned, now we need to modify the existing “Walking” and “Jumping” actor behaviors.
Open “Walking” under “Actor Behaviors” and click on the “Updated” event. This may seem a little overwhelming, but we only need to change part of two lines. The good news is that there are comments to help us out. Just under the comment “Walk Right” you will see an if statement. Just drag the condition (the green section) out of the if statement and delete it by right clicking and clicking “remove”.
Go under “flow” on the right side and look towards the bottom for “anything = anything” and drag that back into where the part you just deleted came from. Make sure you align it perfectly, it will snap into place f in correctly. Once in the correct spot, click the drop down and navigate to Boolean>Game Attributes>move_right click it. Next, move to the other drop down and navigate to Boolean>Comparison>true and click it. Do the same for “move_left” under the comment “move left” doing the exact same method.
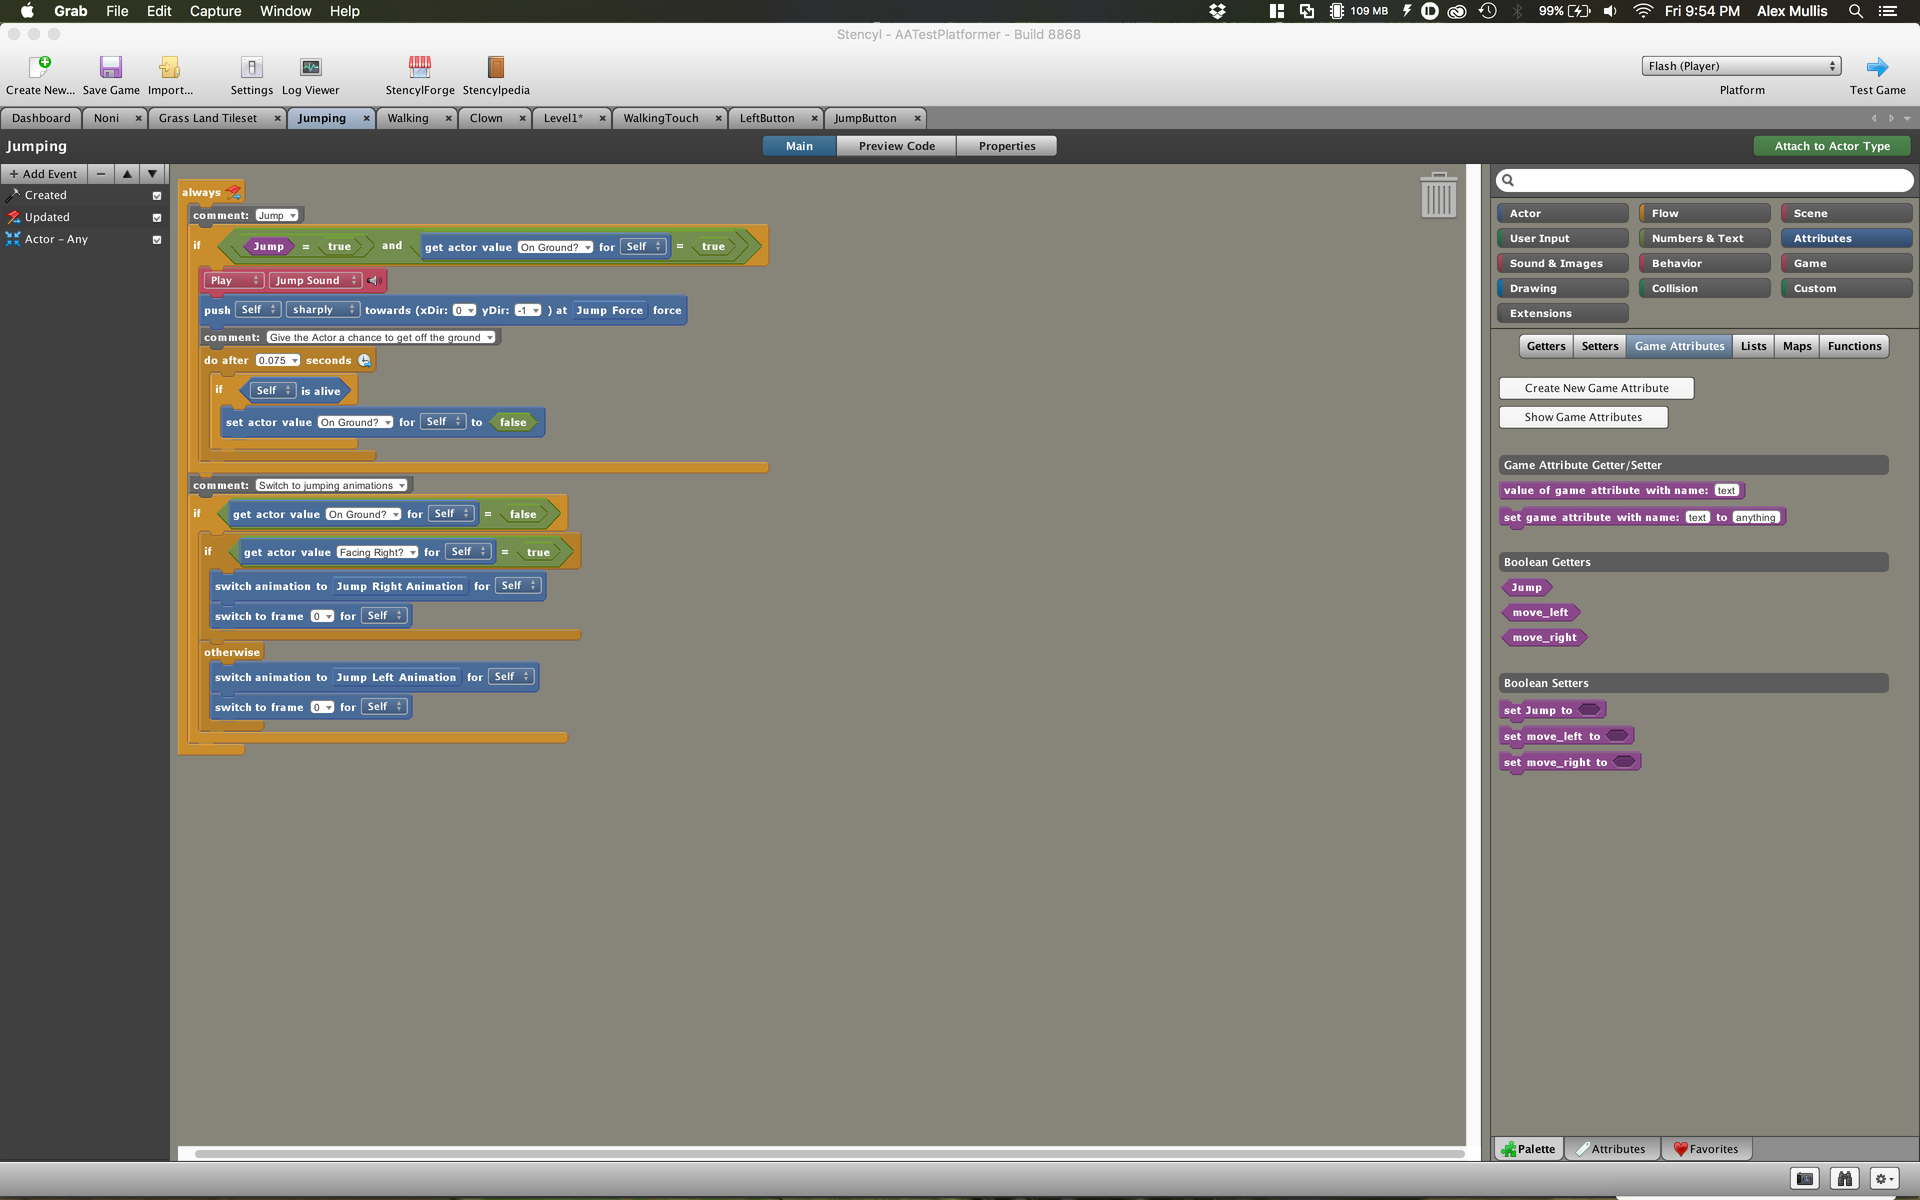
Once all of this is done move into the “Jumping” actor behavior. This one is much easier. Right under the comment “Jump” remove the FIRST condition in the if statement, do not remove the whole thing, remove everything just before “and”. Then drag the “anything = anything” block into that spot and set it to “jump = true”. That’s it! You will be able to make sure these work in the next step.
Next up, create a new scene by clicking “Scenes” under the “Dashboard” tab. You can name it whatever you want, something like “Level1” will do nicely. You can define the bounds of the room. You have the option to define the bounds by pixels or by tiles. This will depend on the use case of course, but for this example, I made the scene 1280×720. The last option is the ability to add a background color, I opted for a blue sky gradient. Hit “ok” when done.
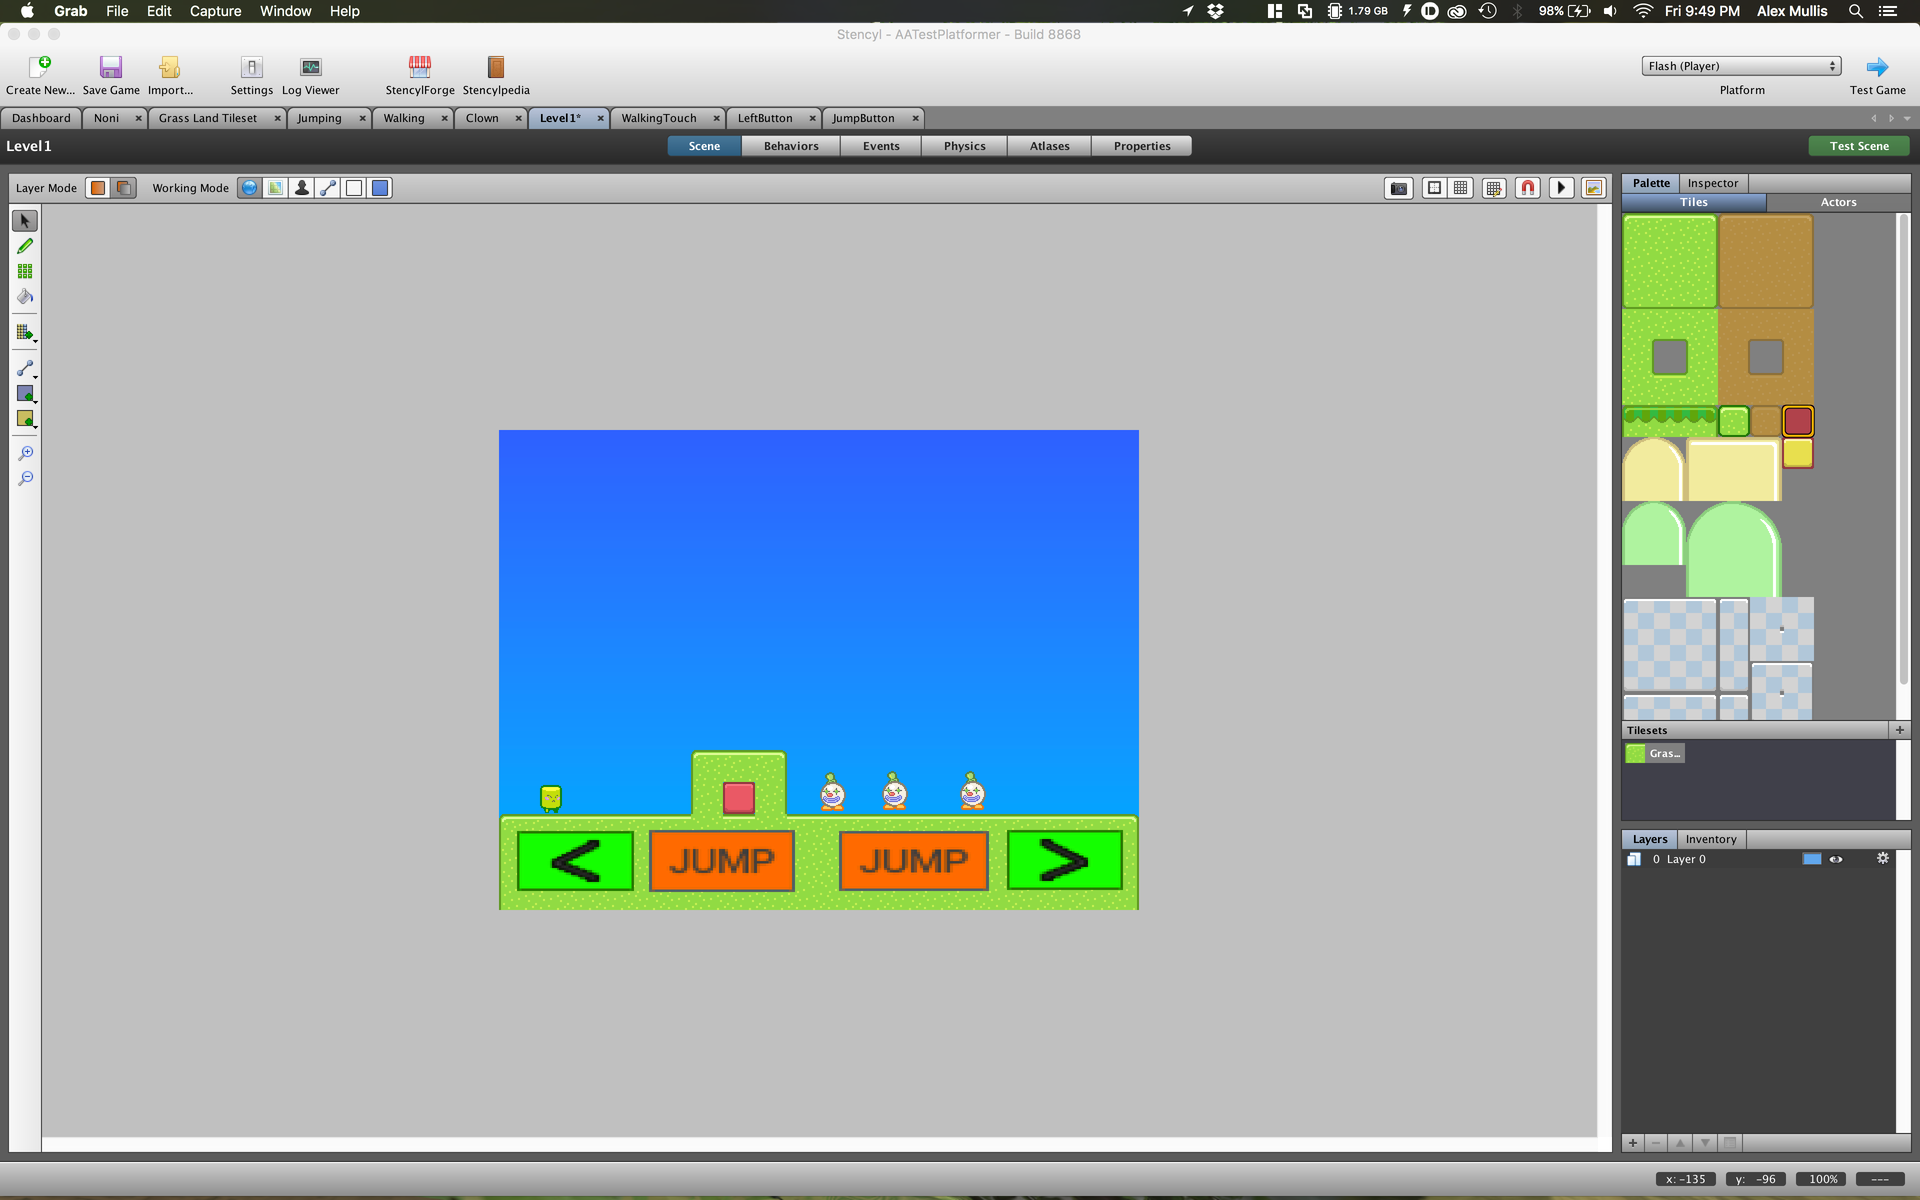
Once the scene is loaded up you will see the scene and to right of it you will see everything that can be placed in the scene. Click on the grass tile and make a platform and then add the player (Noni) and then add some enemies (Clowns). Here you can also add all of the buttons in any configuration that you want. The last step is to add gravity so the actors fall back to ground if they are in the air. Go to the “Physics” tab in the scene and change the vertical gravity to “1000”.
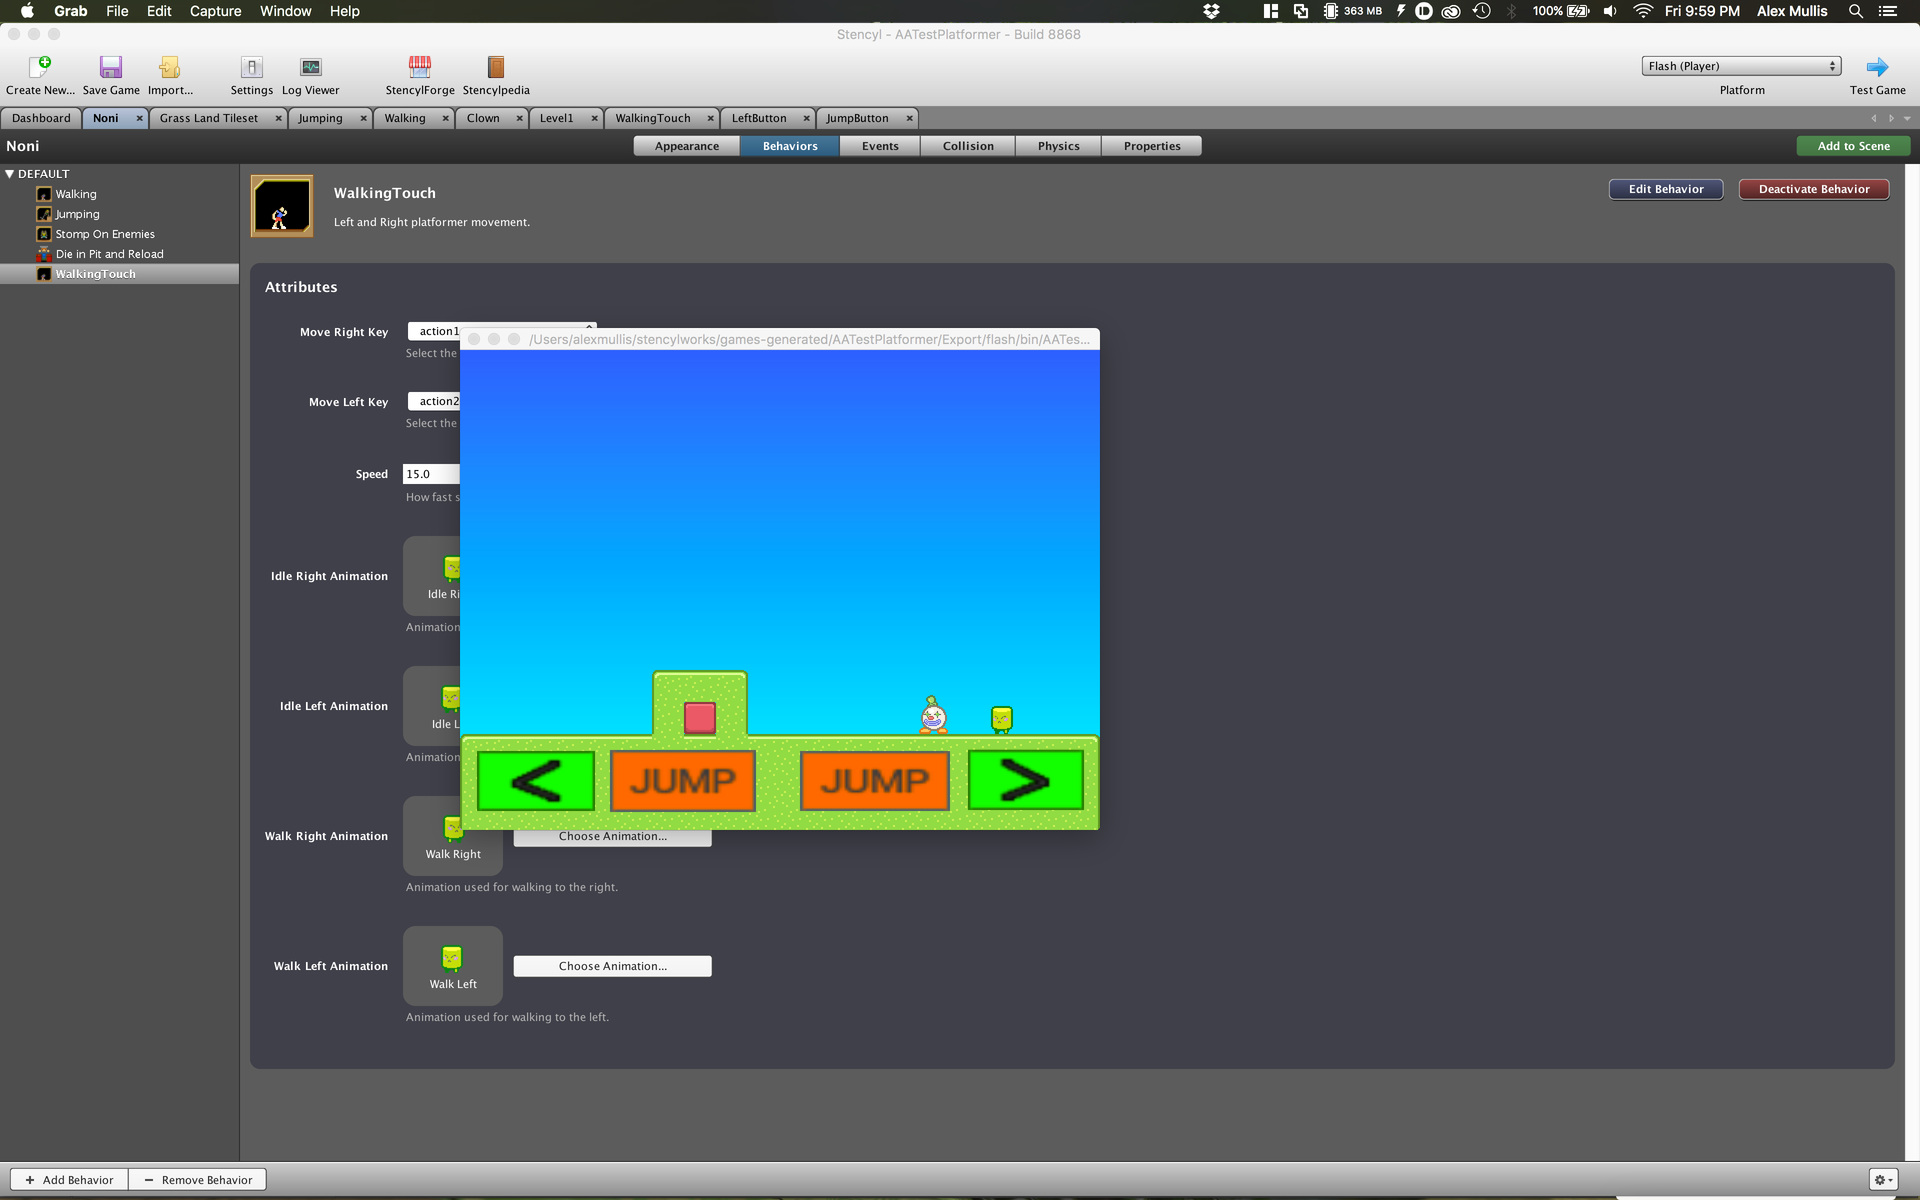
Now the scene is completely set up! Click “Test Game” in the upper right to test the game on any platform that you’d like, although remember, you must have your Android device plugged in to test the game on the Android platform. You will also need the Java JDK 1.6 or higher, and the Android SDK is automatically downloaded when you try to run a game on Android for the first time.
Wrap up
There are many ways to make games on Android, but I have found that, for free options, Stencyl works the best. It is not too difficult to learn and making games with it is a breeze. The user interface is very easy to understand and with a little practice the events and pseudo code blocks are pretty easy to understand. If you have any questions feel free to leave a comment, let us know how you develop games on Android!