Affiliate links on Android Authority may earn us a commission. Learn more.
How to update your Facebook privacy settings
No one should be giving Facebook free access to their data. We still haven’t forgotten about the Cambridge Audio Analytica scandal, which made us truly realize just how much private information Facebook has eyes on. So, how can you protect your data? You can always leave the social network altogether by deactivating your Facebook account. But a less drastic solution could just change your Facebook privacy settings. Here are a few ways to do just that.
QUICK ANSWER
To change your Facebook privacy settings, click on your profile picture, then select Settings & Privacy > Privacy Center. Here, you'll find comprehensive options for protecting your account and information, as well as controlling who can see or share them.
KEY SECTIONS IN THE ARTICLE
How to check your current privacy settings
Facebook has introduced a tool for users to easily review their current privacy setup. With this tool, you can assess who can see your posts, determine how people can find you, enhance your account’s security, and more. Here’s how to access it:
- Click on your profile picture, then select Settings & Privacy.
- Click on Privacy Check-up.
Within this section, you can review and adjust your privacy settings step by step.
Bonus Tip
You can set up a reminder to review your privacy settings periodically. On the Privacy Check-up page, click the three-dot icon and select Set up reminder. You can opt for reminders every week, month, or year.
What are the optimal privacy settings you can get on Facebook
Setting your profile visibility: choose “Only Me”, “Friends”, or “Public”
You can adjust your Facebook profile visibility from completely private to public. We’ve written a detailed article on making your Facebook profile private if you wish to explore further.
Here’s how to control the visibility of your profile:
- Click on your profile photo.
- Select Settings and Privacy > Settings > Privacy.
- Under Your Activity, you’ll find an option labeled Who can see my future posts. Click on the dropdown menu to select your desired audience. For the most private setting, click More and choose Only Me.
Bonus Tip
You can control the visibility of your old posts by clicking on Limit Past Posts in the same section. Keep in mind that this action is not revocable.
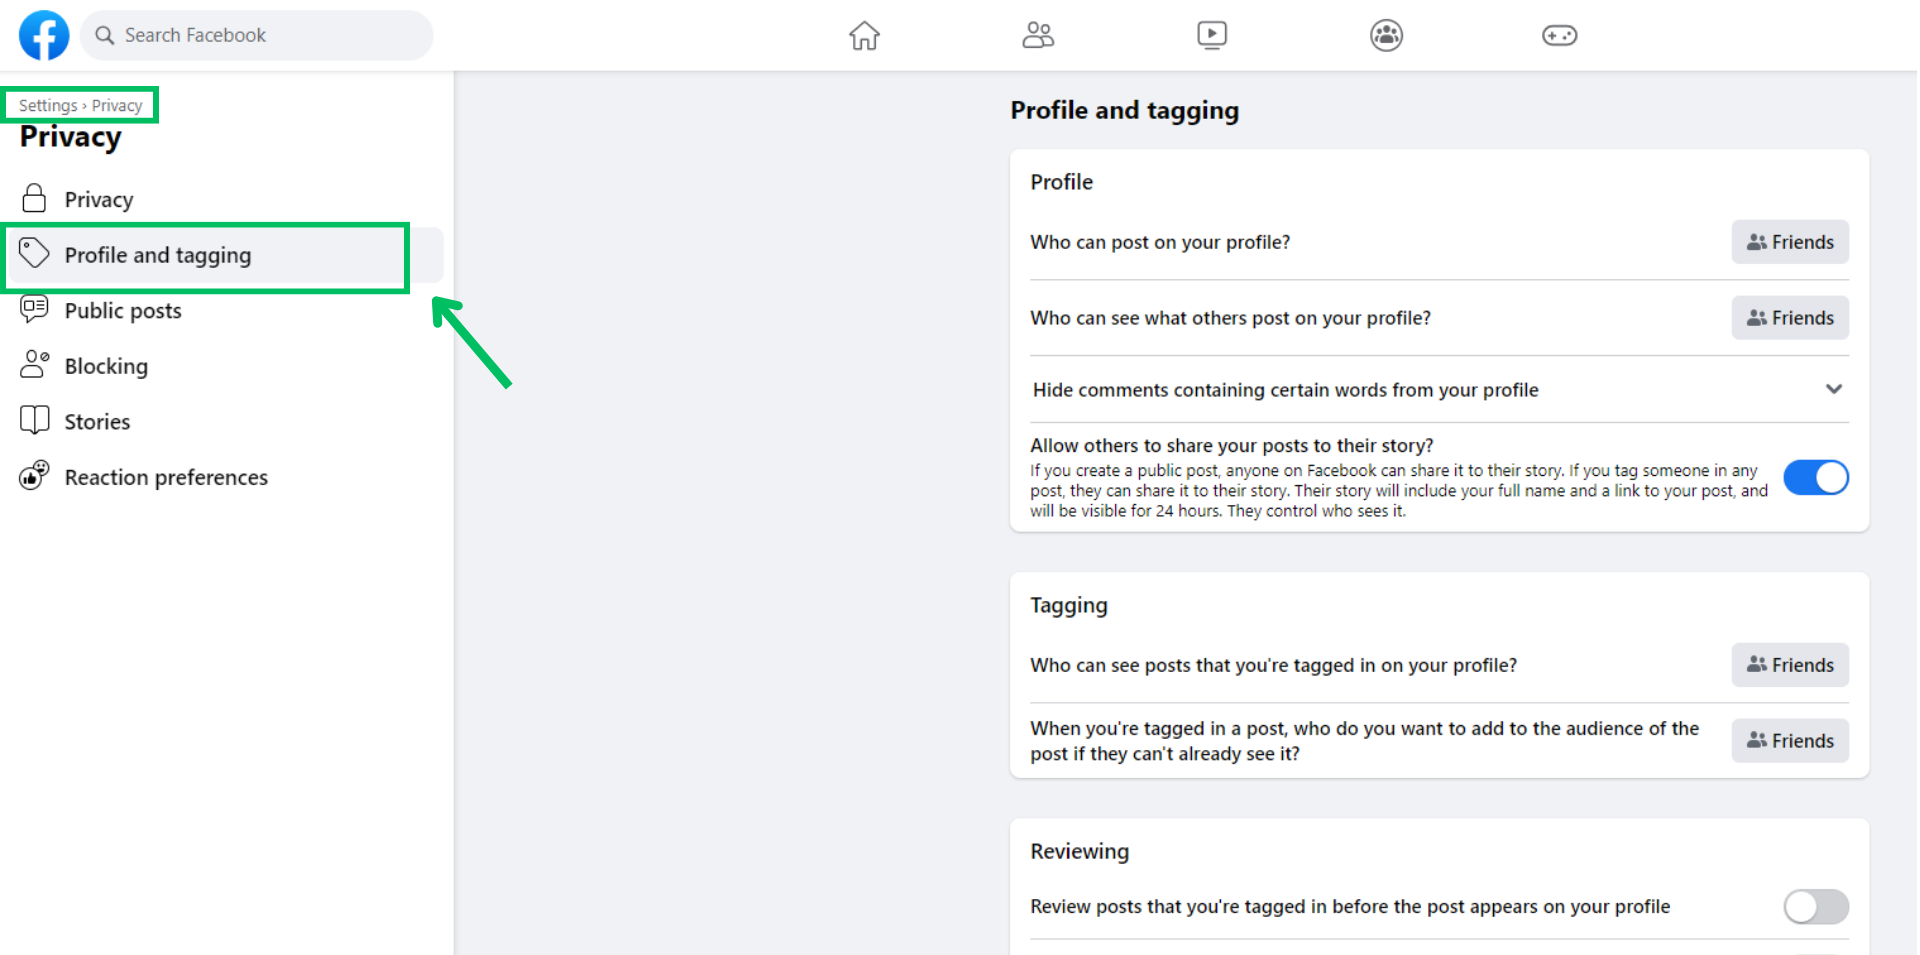
Controlling who can tag you
You can control who tags you in their posts and who can post on your profile. This ensures that no photos of you from your last evening appear without your consent.
To manage tagging and who can post on your profile:
- Click on your profile photo.
- Select Settings and Privacy > Settings > Profile and tagging.
You will see several options related to your profile, such as who can view posts you’re tagged in and how to hide comments containing specific words. Additionally, there’s an option to review the changes you’ve made and to see your profile as a viewer would.

Turning off Facebook location history
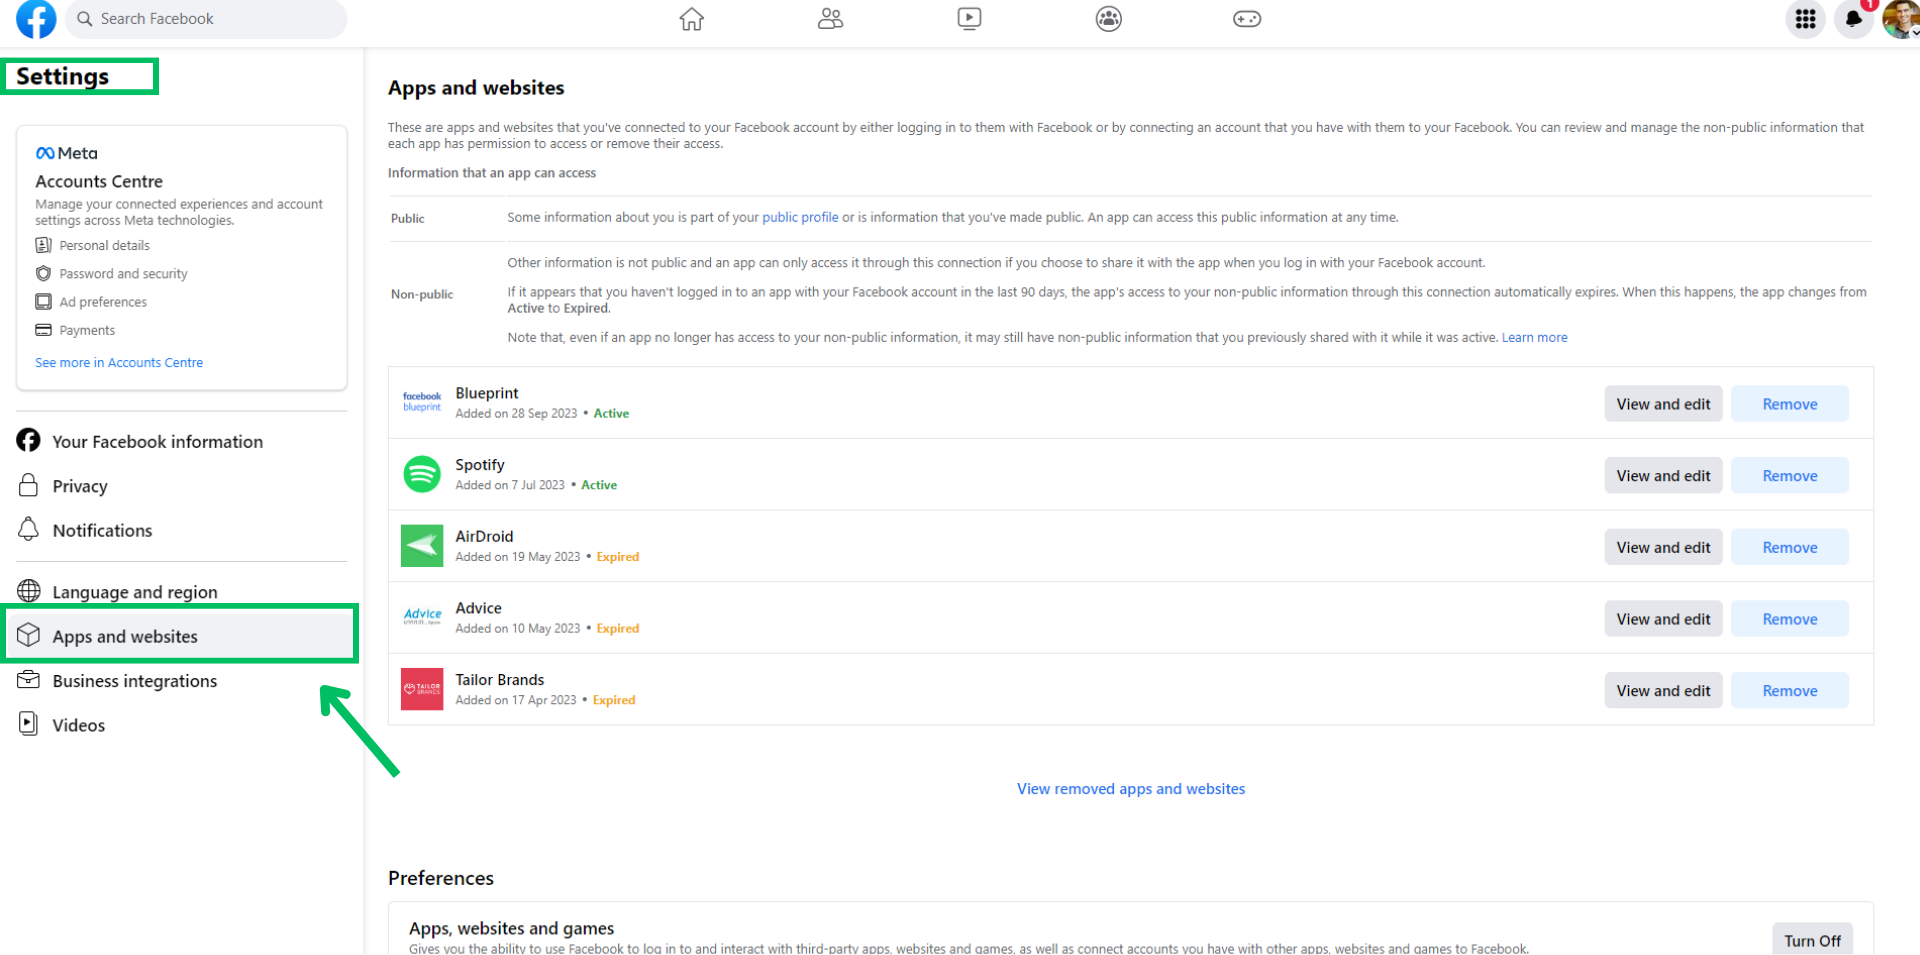
If you don’t want to share your location with Facebook for things like checking in, one of the easiest things you can do is deny permission on your Android phone. You can also double-check and edit which applications linked with Facebook store your location:
- Open Facebook.com and log in.
- Hit the arrow-down button in the top-right corner (next to your profile photo) and select Settings & Privacy.
- Go into Settings > Apps and Websites.

You will see a list of applications which you can edit the permissions and even remove.
Controlling Facebook Ad preferences
Although you can’t guess by its name, this is one of the most basic Facebook privacy settings sections you need to be aware of. You can view your interests — usually pages you’ve liked or interacted with, a list of advertisers who have uploaded your information and advertised to you, and more. There are plenty of necessary settings to change here too.
- Open Facebook.com and log in.
- Hit the arrow-down button in the top-right corner (next to your profile photo) and select Settings & Privacy.
- Go into Settings and select See more in Accounts Center > Ad preferences.
Now you can go section by section and adjust your preferences.
Controlling how Facebook uploads your contacts from your phone
This option is available only on the mobile version of Facebook. The platform may continuously upload your contacts to suggest new friends. While we’re uncertain if this is enabled by default, you can ensure it’s disabled by following these steps on your smartphone:
- Tap on your profile picture.
- Select the cog icon.
- Tap on the magnifying glass icon and enter “Contact.”
- Choose Upload Contact from the list that appears.
- Select your profile and toggle off Continuous Contacts Upload.
Face recognition has been removed from Facebook. This feature once allowed Facebook to recognize you in images. In 2017, Android Authority wrote an article about this face recognition feature, but Facebook has since discontinued it.
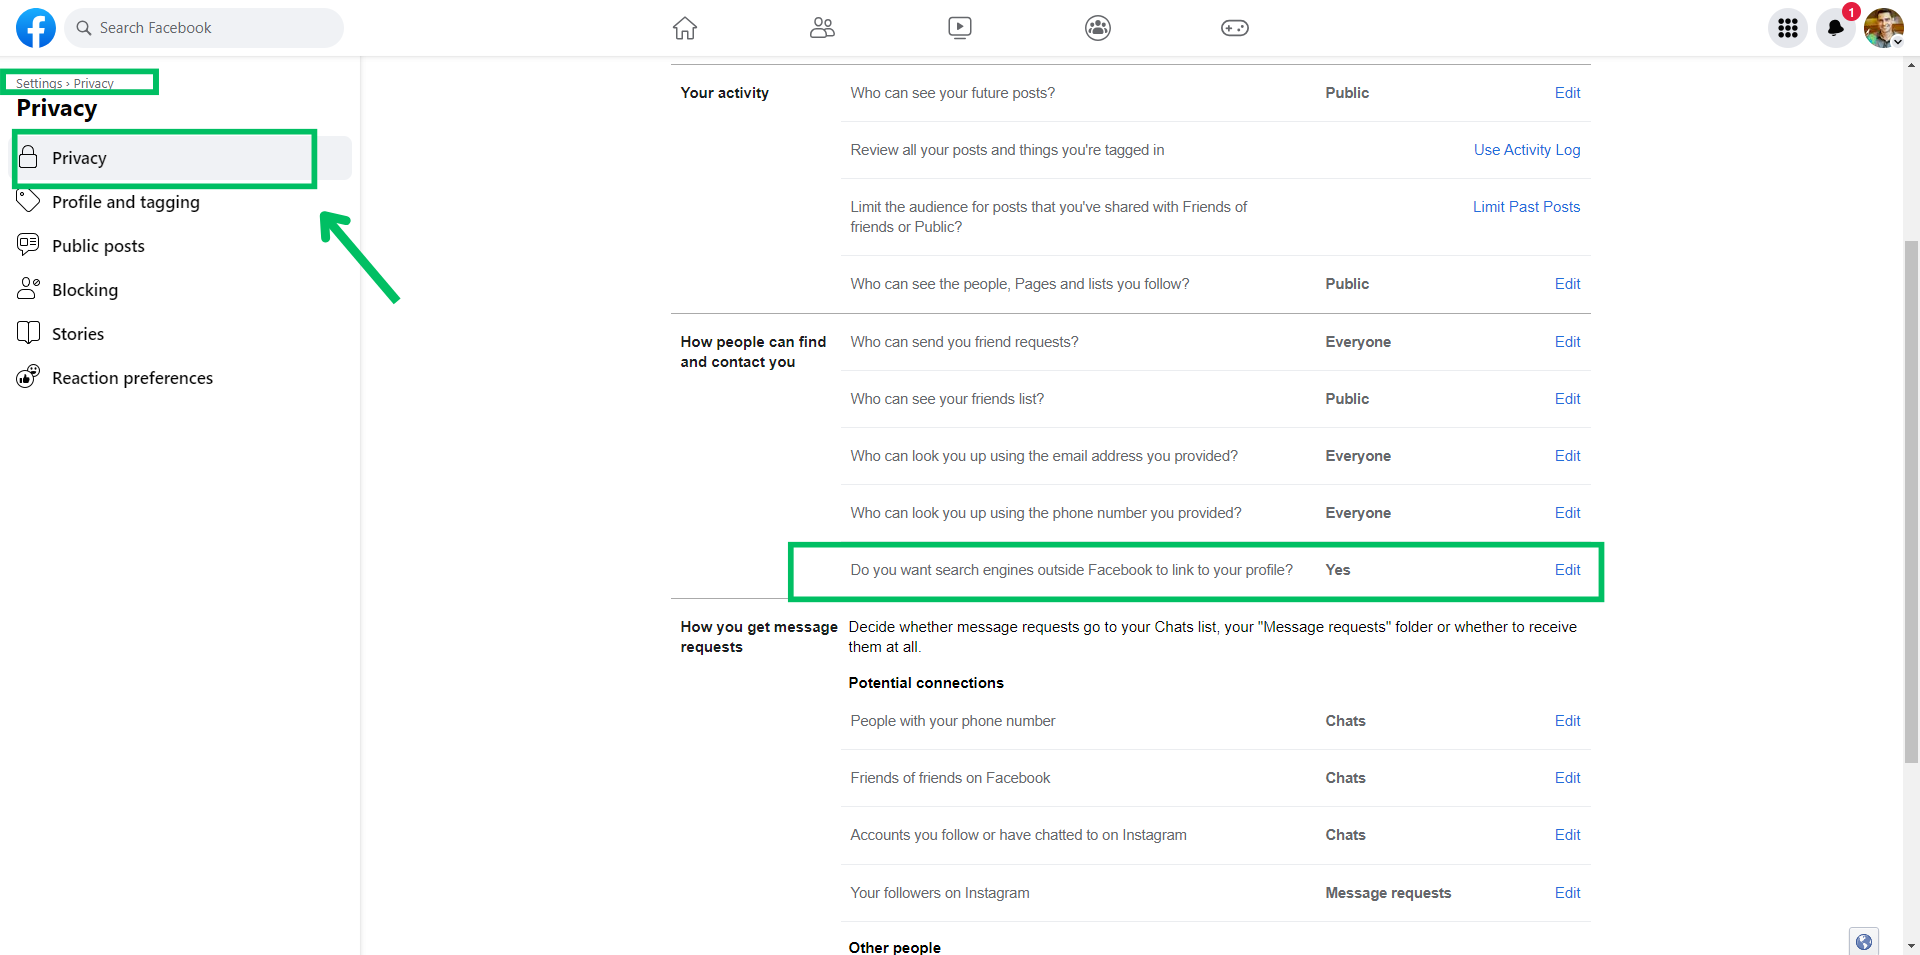
Turning off search engine linking to your profile
Facebook allows search engines, such as Google, to locate your profile. Thus, if someone searches for your name, there’s a chance they might find you. If you wish to disable this feature, here’s how to do it:
- Click your profile picture.
- Select Settings and Privacy, then click Settings.
- In the left column, click Privacy.
- Click Edit next to Do you want search engines outside Facebook to link to your profile, and uncheck the option.

Bonus tip
Facebook collects information on non-users too. If you want to ensure your data is safe, your best bet is to use a privacy-oriented browser that blocks third-party cookies, including social cookies. We recommend using Firefox with its Facebook Container add-on.
Advanced tips for keeping your profile extra secure
Manage who can post on your timeline and tag you
Managing who can post on your timeline and tag you in posts is crucial for curating a digital presence that aligns with your preferences. Ensure your Facebook profile reflects the image you want by proactively managing your timeline and tagging settings. Follow these steps:
- Navigate to your profile picture.
- Click on Settings & Privacy > Settings.
- In the Audience and visibility section on the left side panel, select Profile and Tagging.
- On the right side panel, scroll down to the Reviewing section and toggle them on.
Manage your app permissions
Many apps seek access to your Facebook data, and it’s essential to ensure their access aligns with your preferences. You can take charge of their permissions by following these steps:
- Navigate to your profile picture.
- Click on Settings & Privacy > Settings.
- In the Your activity section, select Apps and Websites on the left side panel.
- On the right panel, choose the app you want to mangae and click Remove.
- Select Remove once again to confirm your choice.