Affiliate links on Android Authority may earn us a commission. Learn more.
How to use Carbon App Sync and Backup
Most people neglect backing up their devices. Normally this isn’t so much of a problem as contacts and calendar events are automatically stored in the cloud, and Google can backup device settings too. To the other extreme, we have the likes of Titanium Backup, a comprehensive backup application for power users with root privileges.
You might like: How to use Titanium Backup
If you find that the built-in Google Backup isn’t comprehensive or reliable enough for you and that Titanium Backup is overkill for you, then Carbon App Sync and Backup, made by the same team who made ClockworkMod Recovery, can provide an excellent intermediate-level solution. Bonus — it doesn’t your device to have root access, but it helps.
In this post, learn how to use Carbon App Sync and Backup for creating backup copies of your data and files, as well as for syncing two or more Android devices. You may also watch the video tutorial towards the end of this post.
To root or not to root
Carbon Backup offers advantages to those who are brave enough to root their device. However, this route isn’t for everyone. Some devices are easier to root than others, and it usually means wiping your device. On the other hand, if you are feeling competent or brave enough then advantages await the beholders of root privileges.
Having a rooted phone means you can go on to try alternative firmwares like CyanogenMod or Paranoid Android. You can also expert apps like Titanium Backup and apps that will over or under clock your CPU. If you use Juice Defender to extend your battery life, extra features are available to rooted users.
Similarly, Carbon Backup offers advantages to rooted users. Without root, users will need to install the Carbon Backup desktop agent to enable the app to work at all. This makes Carbon Backup much more inconvenient to use, and pretty much rules out scheduled backups. Furthermore, having root lets you backup all of your Wi-Fi profiles.
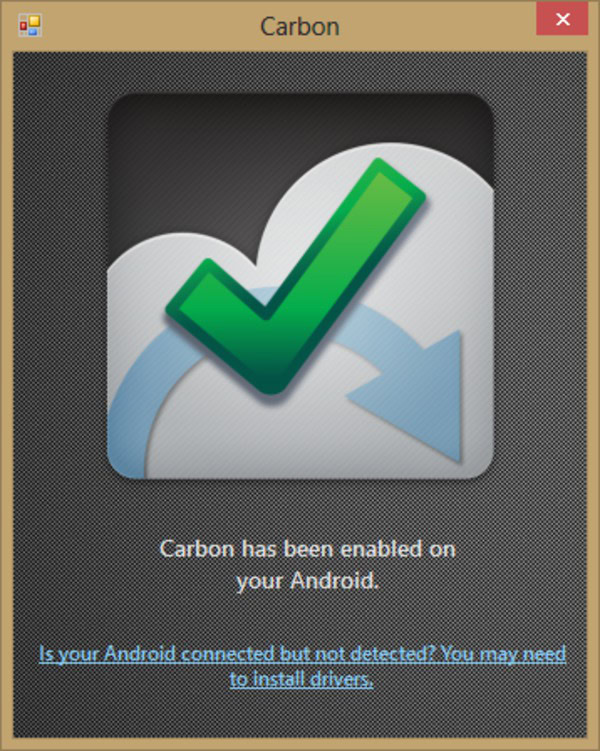
If you do not root your device, you’ll need the desktop agent (available for Windows, Mac, and Linux) which can be downloaded from http://www.clockworkmod.com/carbon. To enable the Carbon Backup client on your device, start the agent on your desktop and connect your device via USB. Once the green tick appears on the desktop agent, Carbon Backup is ready to go and you can disconnect the cable.
Going Premium
Note that most of the features discussed in this guide are unlocked when the premium version of Carbon Backup. Specifically these features are device to device sync, backup schedules, and backing up to cloud locations. Therefore, it’s recommended if that you go for the premium option. Even if you don’t like paying for apps, this comes with our recommendation.
Backing up
Carbon Backup has two tabs, “Backup” and “Restore and sync”. Each has a list of all the applications installed on your device, with a tick box to select which items will be backed up. As of version 1.1.0.0 of Carbon Backup allows you to backup settings for your Launcher, SMS store, user dictionary and Wi-Fi profiles (requires root). Carbon also features a control panel that resembles an upside down notification shade. Swipe it upwards to reveal its options. You’ll see you can “Select All” and “Deselect all,” along with a preview of all the apps you’ve selected. Also note that there’s an additional section at the end of the backup list of applications that do not allow their data to be backed up, even if you do have root privileges.
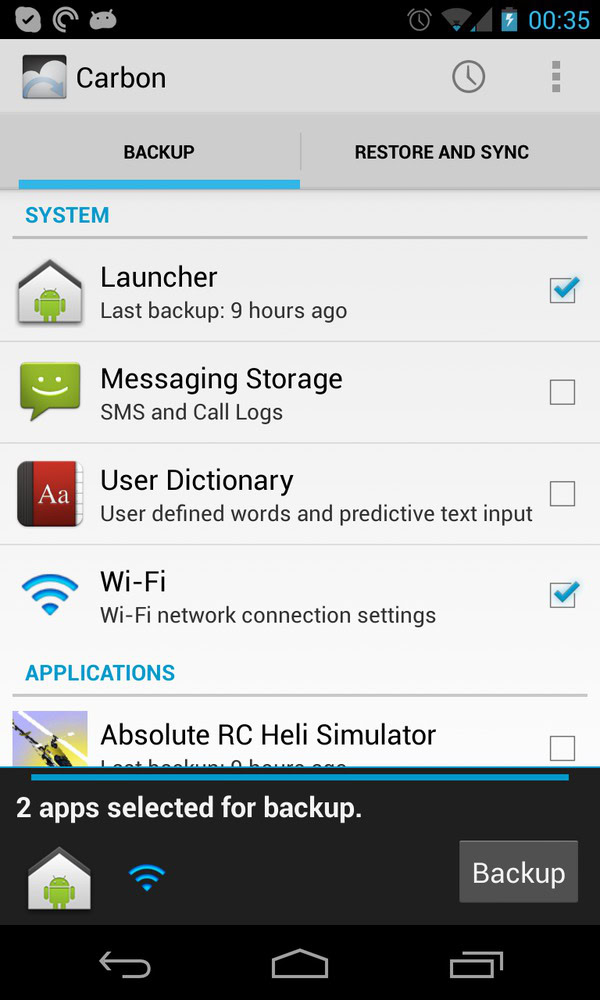
When Carbon Backup creates a copy of your apps, it also saves the APK files so that you don’t have to revisit the Play Store to reinstall everything. However, that creates a sizable backup (i.e. gigabytes). However, the control shade has an option to backup ‘App Data Only’. This will dispense with saving all of the installation files and only save the personal configuration data for each application. This will create smaller backups which makes transfers quicker – whether over a cable or uploading to the cloud. You can also save sets of backed up applications by giving a name to your selection – this option is also found in the control shade.
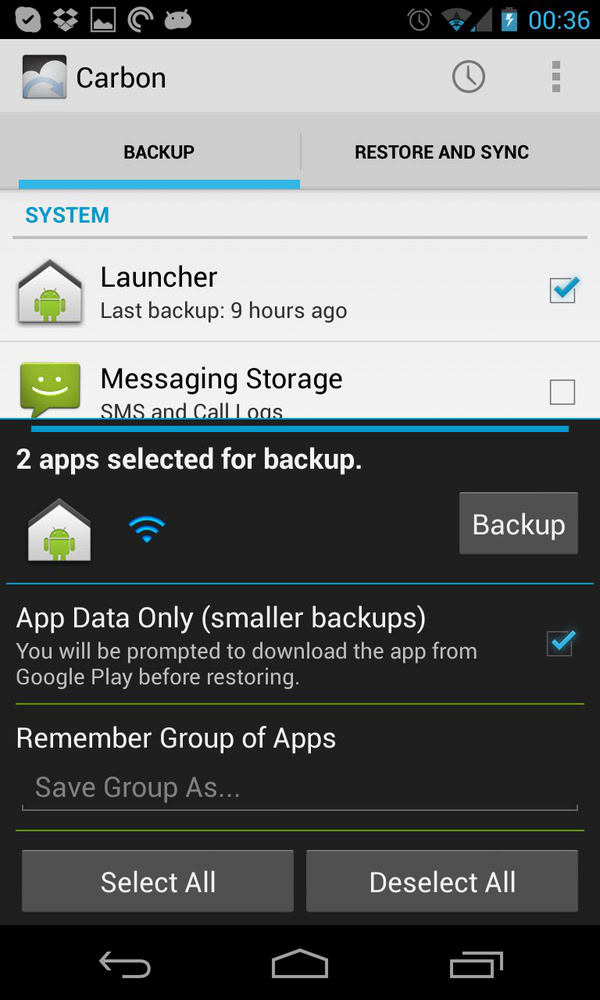
Once you are ready to begin backing up, tap the “Backup” button.
Where and how to save backups
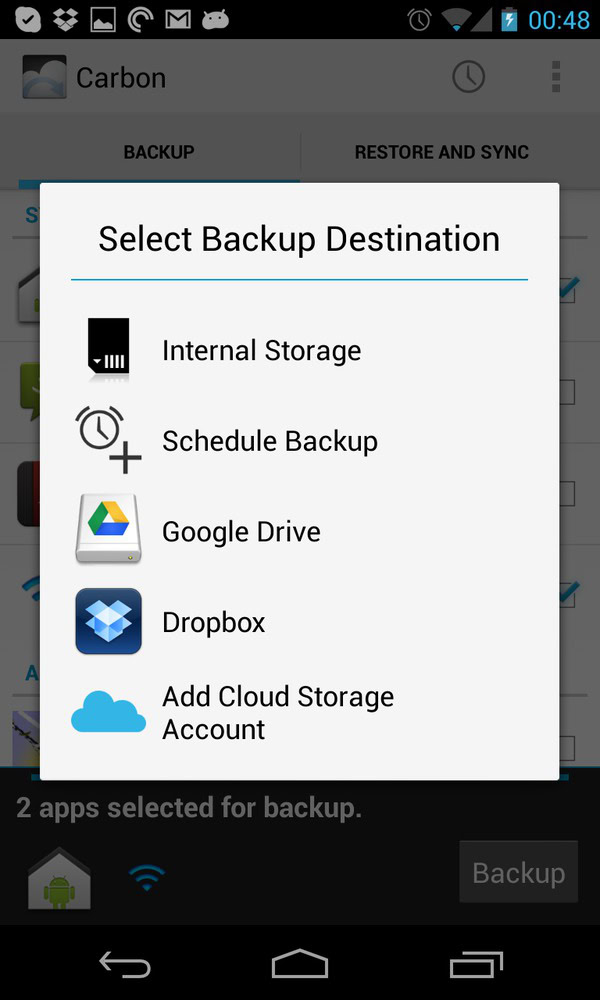
When beginning to backup you are given a list of destinations to save your backed up files. The options include the internal storage of your device, or cloud accounts: Dropbox, Google Drive, and Box (premium only). There is also an option to schedule this backup you’ve configured – even though it seems counter intuitive to create a schedule from a menu of places to save your data.
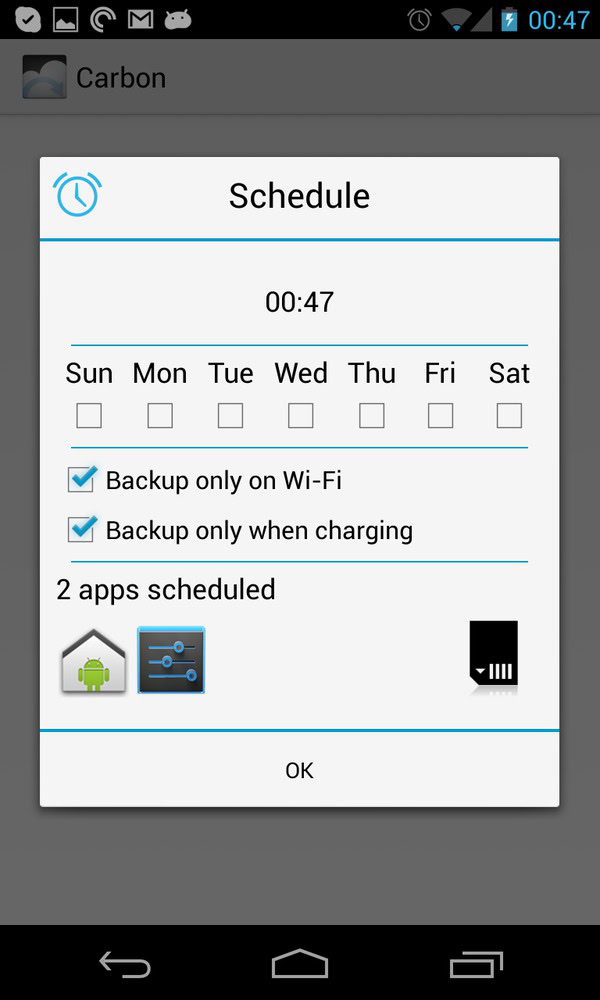
When setting a schedule, specific the time and day of the week, then you may opt to have the scheduled backup only run when the device is connected to Wi-Fi, and/or when the device is charging. The schedule settings also features an icon (to the right of the backup icon previews) that indicates to the backup destination, and tapping this allows you to edit the destination.
Note the clock icon in the upper toolbar of Carbon Backup – this allows you to review the schedules you’ve already set up. From this list you can also delete schedules via long press gesture.
Once the backup begins, an Android system screen appear for a few seconds where you can add a password to encrypt your data. You’ll have to act quickly as this screen is soon gone, and make sure to save the password safely as there will be no way to recover to the password if you lose it.
Restoring
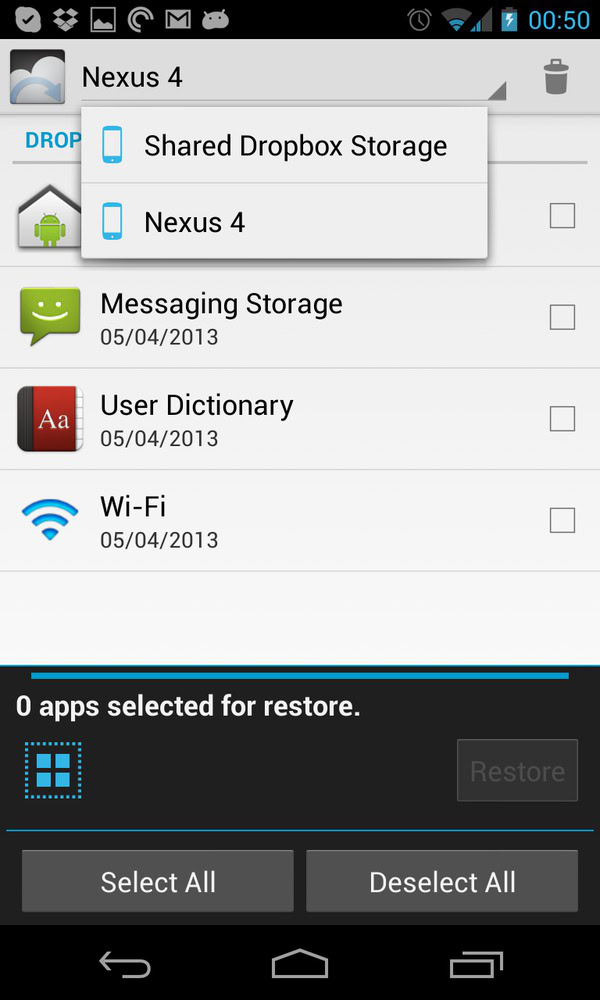
Swiping over to the “Restore and Sync” tab gives a list of all the cloud locations you have backups stored on, and all of the devices you have backups stored in – i.e. your internal storage and other Carbon Backup clients running on your WiFi network (more on this below). Note that Carbon Backup recently implemented support for multiple devices after having saved to the cloud from multiple devices into one shared pool. To handle this change over you’ll find a drop-down list at the top of the screen after selecting a given cloud backup location. The list will have an entry for the device you’re currently using and for your shared backup storage. Note that on Dropbox you’ll find the Carbon Backup files in the Dropbox\Apps\ClockworkMod Carbon subfolder of your Dropbox folder and in Google Drive, files are stored in a folder called com.koushikdutta.backup. I confess I’m not a Box user, so I appeal to you to advice in the comments as to where backups are stored on that service.

As with selecting what to backup, you can select some or all of the items available for restoration, with the same control shade for selecting or deselecting all options. Just tap the ‘Restore’ button and things Carbon will begin restoring the backup.
As when backing up your device, a system screen will appear briefly for you to enter the password you used if you encrypted your backup.
Backing up and restoring from a PC
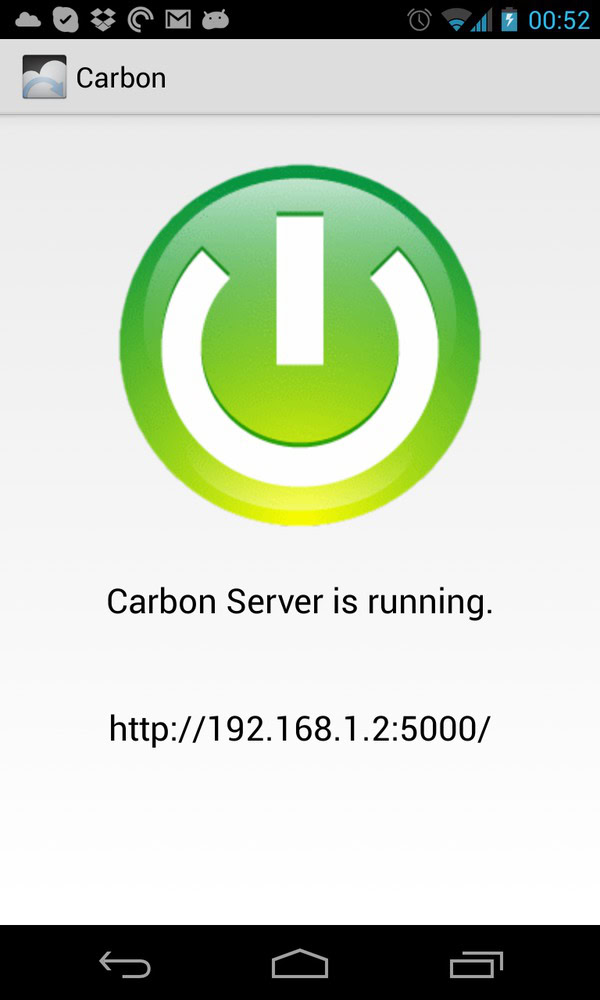
Carbon Backup comes complete with a web interface that allows you to view the installed apps and settings on a given device via your desktop browser. To enable this, tap the menu button (“…”) and select “PC Download”. The app will then show you a screen which gives you the IP address you’ll have to enter into your desktop browser to view the web interface. You can also quickly enable and disable the server via the large on-screen circular button.
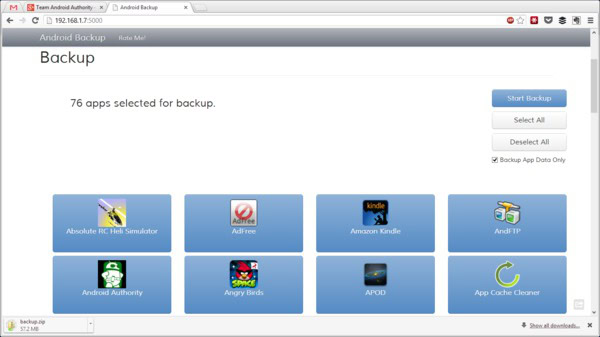
The web interface allows you to select some or all of the installed apps (including system settings as described above, e.g. launcher, Wi-Fi, etc). Once the selection is made and you have clicked the blue “Start Backup” button in your desktop browser a zip file will be transferred from your Android device to your desktop computer via your home network. Note that if you wish to encrypt your backup, you’ll have to enter a password on the Android device as before, i.e. you cannot set an encryption key from your desktop.
Restoring works similarly, you’ll need to locate the zip file you previously downloaded from your Android device and drag it onto the web page or select via file navigator. The file will be copied from your desktop to your Android device. If the backup is encrypted, you’ll have to be quick and enter the password on your Android device, as described above.
Be aware that it can take a while to transfer the backup file from your device. Even if you only backup application data, the backup file can be hundreds of megabytes. If you do a full backup, the file will be gigabytes in size and would probably be best left working overnight. When a PC backup is complete, the server will automatically turn off.
Synchronizing apps between Android devices
In addition to viewing the apps on your device that can be backed up via your desktop browser, the Carbon Backup client can browse the contents of other devices via a Wi-Fi network. In the Restore and Sync tab, tap “Refresh Device List”. This will cause your client to check your LAN for other Android devices that are running the Carbon Backup server. Tapping on any of the devices that appear allows you to browse the list of installed applications. Items in the list of items on another device can be selected and restored to the device you’re currently using.
Note, therefore, that the device to device restoration model is a Pull method rather than Push. This is good from a security point of view as you have to deliberately copy data form another device to yours, rather than anyone else having the ability to inject (i.e. push) app data to your device.
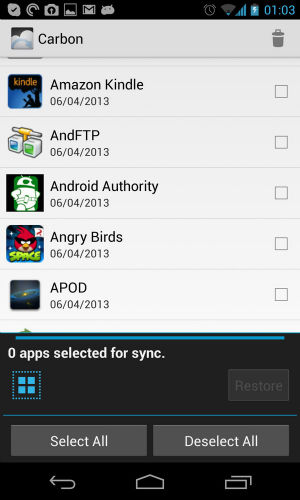
This is useful, for example, if you’re playing a game and have it installed on multiple devices. You can maintain your progress by manually pulling data from the last device you played on. Also, you can quickly install an app on your device by restoring it from another device, which may or may not be more convenient than looking for the device in the Play Store. I have not tested this with two devices configured with different Google accounts, but I expect that DRM limitations will apply if you try to copy a paid app from another device to your device.
Video Guide
Conclusion
If you want a reliable way to backup your apps, backup your data, or to sync app data and settings among your various Android without having to root your device, Carbon App Sync and Backup may be the solution that you’re looking for.
What method do you use for backing up your Android phone or tablet? Have you tried Carbon App Sync and Backup — and did it work well for you? Share your thoughts and stories about Carbon App Sync and Backup.