Affiliate links on Android Authority may earn us a commission. Learn more.
How to use Titanium Backup
Titanium Backup has been one of the most popular apps on the market for some time, and with good reason. It can be used to backup all your important app dada, system data, and even WiFi passwords on your handset.
Now, Android is a very stable operating system, and it’s pretty rare to run into a system or app killing bug. Even so, it’s better to be safe than sorry, you never know when a crippling update or malicious app might cause a problem. If you’re planning on removing apps using your newly found root permission or are planning to install custom versions of Android, then backing up your device is essential.
First things first, you’ll need a rooted handset before you can use Titanium Backup. Following that the app will need to be granted root permissions on your handset, but that’s simple enough. You’ll be prompted by Superuser once you run Titanium Backup, and can select to give it permanent access so you won’t be prompted again.
One word of caution before we proceed. If you’re using Titanium Backup to restore apps in between installing ROMs DO NOT attempt to restore system apps or their data across ROMs, as this will cause all sorts of crashes. Individual apps work fine, but system data will be incompatible.
Now that everything is setup we can begin.
Performing a mass backup
At first glance, Titanium Backup doesn’t appear to have the friendliest looking interface, the black and grey theme could certainly use a makeover. But don’t let that put you off, everything you need is actually very easy to find.
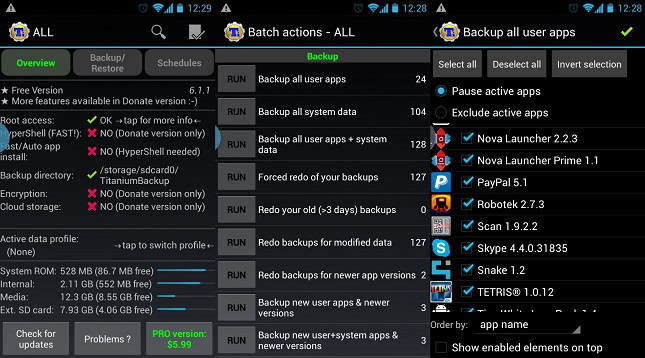
Frustratingly though, probably the most useful tool for performing a mass backup is actually hidden in another menu, rather than on the Backup/Restore tab where you’d think it would be. Instead, click the Menu button on your handset, and then select the “Batch actions” option under the “General” section, it should be the second option on the list.

The all-important backup section is located right here, giving you a wide variety of options regarding app and system data. System data includes Bookmarks, WiFi information, calendar events, etc. If you’re performing a backup for the first time then want to use the “Backup all user apps + system data” option, or at the very least the “all user apps” function. Clicking “Run” will present you with several more options to refine exactly what you’d like to backup. Once you’re satisfied with the selection, tap the green tick in the top right to begin the backup.
Patience is the key here as this can take a while, especially if you have lots of large apps installed.
If you’ve performed backups in the past and simply want to make a backup of newer apps you’ve installed recently, the “Backup new user apps” option on the “Batch actions” menu is the best choice. Alternatively, you can use the “Backup/Restore” tab on the Titanium homepage to select individual apps to backup.
Creating a recovery backup .zip file
Whilst the above backups will protect you from most bugs, they won’t be of much use if you experience a severe error that prevents your device from booting properly, such as corruption in a system file, or a bugged out launcher. This is where recovery compatible .zip files come in handy, as the backup can be restored without having to boot into Android. However, this is a donate version only option, but might be worthwhile if you’re changing ROMs a lot.
Head on over to the batch options again and scroll down until you see the “Recovery Mode” category. Here you can select the apps that you’d like to include in the backup .zip file, choose between apps or data only, and name the .zip file appropriately so that you can remember what it is.
If you ever need to recover your device using this boot file, enter ClockworkMod recovery and choose install zip from SDCard.
Scheduled backups
Generating a backup every time you install a new app is a bit of a pain, and it’s unlikely that anyone will remember to make a backup every week or month anyway. Fortunately, Titanium Backup now includes a scheduled backup option.
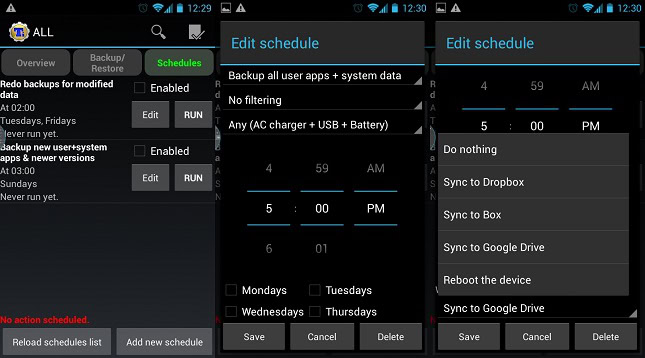
Over on the main menu tap the “Schedules” tab and you’ll be presented with two options. The first choice labelled “redo backups for modified data” will schedule backups only for app data which have been changed since the last backup. This could include games or changes make to specific app data.

The second option is probably the most important, as it will backup any new apps, system data, and updates since the previous update. Click “edit” to make changes to the schedule. There are all the necessary options to adjust the time and date of when backups are generated, but users can also set the charge state of the device required before making a backup, so as to prevent shutdowns mid backup, and there’s also a choice regarding filters and what to do once the backup has completed.
Restoring from backup
Alright, you’re protected in case your handset suffers a minor meltdown, but the next important step is being able to restore your apps and settings should anything go wrong.
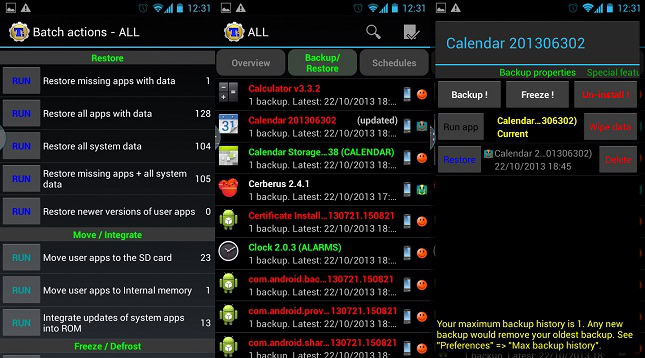
In the batch actions, yet again, you’ll find a list of options for mass restoring your data. “Restore missing apps with data” will replace any content that is missing from your handset after a wipe. Alternatively restoring all apps with data will replace any existing apps with the backed up versions of them created earlier. There’s also a rather helpful option to only restore newer versions of user apps if you’re reinstalling your system.
However, the option that’ll you’ll most likely be interested is the “restore missing apps + all system data” option, which will put everything back to where it was when you created the backup. Although I can’t stress enough, that system data shouldn’t be restore if you’re switching ROMs.

If you discover that a specific app has developed a fault, say after a bugged update, and you want to restore it to a previously saved version, then this can be done by clicking on the backup/restore option on the main page. Here you can pick the specific app or piece of data from the list. Once tapped, a list of backups will appear along with a list of other functions to create backups, etc. Here you can manage your individual app backups, or can restore the app to a specific date by clicking on the corresponding restore button.
Managing bloatware
Whilst looking at the specific apps you’ll probably have noticed the Freeze function. Freezing apps is a handy tool that will allow you to completely stop apps from running without having to uninstall them. Usually this is used on factory installed apps that you don’t want to use. This option is a paid for only function, but it’s very helpful if you want to stop an irritating tasks from running or to see how your handset will react before uninstalling a piece of software.
Root permission also means that Titanium Backup can be used to uninstalled unwanted apps and bloat ware. A word of caution before doing this with any pre-installed software, uninstalled essential apps can cause force close errors and even render your handset virtually unusable if not done with care, so I thoroughly recommend backing up your apps and system first, preferably with a recovery zip file too.
Special features
That’s the really important stuff out of the way, but Titanium backup includes plenty of additional advanced features if you want to make the most out of your backups.
Firstly, backup data can be imported from by going to Titanium’s main menu and scrolling down to the import backup option. So you don’t even need to store all your backups on your handset, the files can easily be moved back and forth from your PC to your phone.

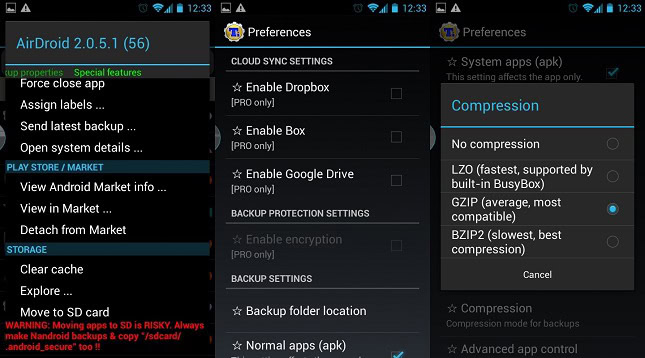
If you’re short of internal memory storage, there’s also the option to move apps to the SD card. However, this will cause certain apps to malfunction, so it’s only recommended to use on software which don’t integrate closely with any other part of Android, such as games.
Titanium Backup features many more options under the configurations menu, including tweaks to the type of compression used to create backups, the maximum number of backups to keep for each app, and whether or not to store market links for apps. In fact, apps can even be disconnected from the marketplace, so automatic updates can be left on for apps but then manually disconnected for certain apps, if you so desire.
Cloud backups
An extra feature for those who purchase the PRO edition is the ability to send backup data to various online services, including Dropbox and Google Drive. Although not essential, these options are very helpful if you need to wipe your SD card, or if your SD card ever develops a fault. To enable syncing to one of these services, tap your phone’s menu button and then go to “Preferences”, the options are under “cloud sync settings”.
And that concludes our guide on Titanium Backup. Hopefully that’s everything you need to protect your handset from unexpected faults.