Affiliate links on Android Authority may earn us a commission. Learn more.
Scheduling background tasks with Jetpack's WorkManager
Android apps can work in the background in sever ways, but sometimes too much choice can be a bad thing. Android has a range of APIs and components for scheduling background work, and the “correct” approach can vary depending on the version of Android, and other factors like whether the device has access to Google Play Services.
For example, you can use JobScheduler to schedule background work, but only on Android 5.0 (API 21) and later. If you want your app to be compatible with earlier versions of Android, you could use Firebase JobDispatcher, but there’s a catch: JobDispatcher requires Google Play Services, and there’s plenty of Android users who don’t have access to Google Play Services, especially in China.
WorkManager is a new library for making scheduling and managing background work much less painful. Announced at Google I/O 2018 as part of Jetpack, it provides a new, straightforward way to handle background tasks — by doing all the hard work for you.
Let’s take a look at how to use WorkManager to schedule background work, run tasks in parallel, and improve the user experience by specifying different conditions that need to be met before a task can run.
Exploring Jetpack: What is WorkManager?
WorkManager is a job dispatching service scheduling tasks, and then forget about them. Once a task is scheduled, WorkManager will run it regardless of whether the user navigates away from the related screen, exits your application, or even reboots their device. This makes it ideal for tasks requiring guaranteed execution.
By default, WorkManager runs each task immediately, but you can also specify the conditions a device needs to fulfill before the task can run, including network conditions, charging status, and the amount of storage space available on the device. For example, you can reduce the amount of mobile data your app consumes by delaying data-intensive tasks until the device is connected to an unmetered network, or only perform battery-intensive tasks when the device is charging.
If WorkManager executes while your application is running, it’ll perform its work in a new background thread. If your application isn’t running, WorkManager will choose the most appropriate way to schedule the background task, based on factors such as the device’s API level and whether it has access to Google Play Services. In this way, WorkManager can provide the functionality of APIs like JobScheduler without requiring you to check the device’s capabilities and provide alternative solutions depending on the results. Specifically, WorkManager uses JobScheduler on devices running API 23 and later. On API 14-22 it’ll use either Firebase JobDispatcher, or a custom AlarmManager and BroadcastReceiver implementation, if Firebase isn’t available.
Since WorkManager is part of Jetpack, it’s backwards compatible to API level 14, so it’s ideal for scheduling background tasks across earlier versions of Android where solutions such as JobScheduler aren’t supported. It can also function with or without Google Play Services, so you can be confident your app will behave as expected, even in parts of the world where access to Google Play Services is restricted.
Once WorkManager is stable it’ll be the recommended task scheduler for tasks that require guaranteed execution. WorkManager isn’t intended to be a catch-all solution for every task you need to run off the main thread, so if a task doesn’t require guaranteed execution then you should use intent services or foreground services instead.
One time task, or recurring?
WorkManager supports two types of work:
OneTimeWorkRequest
To schedule a task that executes one time only, you need to create a OneTimeWorkRequest object, and then enqueue your task:
WorkManager workManager = WorkManager.getInstance();
 workManager.enqueue(new OneTimeWorkRequest.Builder(MyWorker.class).build());
Since we haven’t specified any constraints, this task will run immediately.
PeriodicWorkRequest
You’ll want to repeat some tasks, like syncing your application’s data with a server once per day.
To create a recurring task, you use PeriodicWorkRequest.Builder to build a PeriodicWorkRequest object, specify the interval between each task, and then enqueue the PeriodicWorkRequest. Here we’re creating a task that will run once every 12 hours:
new PeriodicWorkRequest.Builder dataCheckBuilder =
           new PeriodicWorkRequest.Builder(DataCheckWorker.class, 12,
                            TimeUnit.HOURS);
PeriodicWorkRequest dataCheckWork = dataCheckBuilder.build();
WorkManager.getInstance().enqueue(dataCheckWork);
Making the switch to WorkManager
Let’s look at how you’d implement a few different WorkManager workflows, including how to create tasks that only run when specific constraints are met.
I’m going to create an app consisting of a button that will pass a task to WorkManager when clicked. To keep things simple, this task will print a message to Android Studio’s Logcat, but you can swap the Logcat portions of the code for any other task you had in mind.
Create a new project, then open its build.gradle file and add the WorkManager library as a project dependency:
dependencies {
   implementation fileTree(dir: 'libs', include: ['*.jar'])
   implementation "android.arch.work:work-runtime:1.0.0-alpha02"
   implementation "com.android.support:appcompat-v7:27.1.1"
   implementation "com.android.support.constraint:constraint-layout:1.1.0"
   androidTestImplementation "com.android.support.test:runner:1.0.1"
   androidTestImplementation "com.android.support.test.espresso:espresso-core:3.0.1"

}
Creating your app’s layout
Next, create a layout consisting of the button to trigger our WorkManager flow:
<?xml version="1.0" encoding="utf-8"?>
<android.support.constraint.ConstraintLayout xmlns:android="http://schemas.android.com/apk/res/android"
   xmlns:app="http://schemas.android.com/apk/res-auto"
   xmlns:tools="http://schemas.android.com/tools"
   android:layout_width="match_parent"
   android:layout_height="match_parent"
   tools:context=".MainActivity">

   <Button
       android:id="@+id/oneTimeRequest"
       android:layout_width="match_parent"
       android:layout_height="wrap_content"
       android:text="One time request"
       app:layout_constraintEnd_toEndOf="parent"
       app:layout_constraintStart_toStartOf="parent" />

</android.support.constraint.ConstraintLayout>
Creating one time WorkRequests
In our MainActivity, we need to perform the following:
- Create a WorkManager instance, which will be responsible for scheduling the task.
- Specify the Worker class. This is the class where you’ll define the task WorkManager should perform. We’ll be creating this class in the next step.
- Create the WorkRequest. You can either use OneTimeWorkRequest.Builder or PeriodicWorkRequest.Builder. I’ll be using OneTimeWorkRequest.Builder.
- Schedule the WorkRequest by passing the WorkRequest object to WorkManager, and specifying any constraints the device needs to meet before this task can be performed.
Here’s the finished MainActivity class:
import androidx.appcompat.app.AppCompatActivity;
import android.os.Bundle;
import androidx.work.OneTimeWorkRequest;
import android.view.View;
import androidx.work.WorkManager;

public class MainActivity extends AppCompatActivity {

   private WorkManager mWorkManager;

   @Override
   protected void onCreate(Bundle savedInstanceState) {
       super.onCreate(savedInstanceState);
       setContentView(R.layout.activity_main);

       mWorkManager = WorkManager.getInstance();

       findViewById(R.id.oneTimeRequest).setOnClickListener(new View.OnClickListener() {
          @Override
          public void onClick(View v) {
               startWorkManager();
           }
        });

   }

   private void startWorkManager() {
      OneTimeWorkRequest someWork = new OneTimeWorkRequest.Builder(MyWorker.class)
               .build();
      OneTimeWorkRequest oneTimeWorkRequest = someWork;
       mWorkManager.enqueue(oneTimeWorkRequest);
   }

   }
What task should WorkManager perform?
Next, you’ll need to specify the task WorkManager should perform in the background, by extending from the Worker class and overriding its doWork() method.
To create this worker class:
- Go to File > New > Java class.
- Name this class “MyWorker.java.”
- Add the following:
import android.support.annotation.NonNull;
import android.util.Log;
import androidx.work.Worker;

public class MyWorker extends Worker {
   private static final String TAG = "MyWorker";
   @NonNull
   @Override
   public Worker.WorkerResult doWork() {
       Log.d(TAG, "doWork called");

       return Worker.WorkerResult.SUCCESS;
   }

}
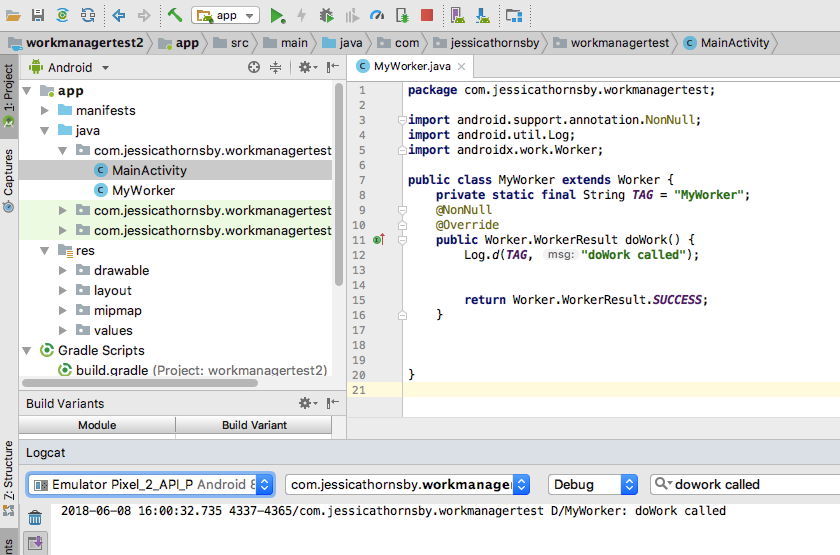
Run your project on an Android device or Android Virtual Device (AVD), and give the “One Time Request” button a click. This task should immediately run in the background and print the “doWork called” message to Android Studio’s Logcat.
Setting some constraints: Controlling when a task runs
By default, WorkManager will perform each task immediately, but you can also specify constraints that need to be met before the work gets done. You can use it to delay intensive tasks until the device is idle, to avoid negatively impacting the user experience.
To set some rules about when a task should run, you’ll need to create a Constraints object using Constraints.Builder, and then specify the Constraint(s) that you want to use, such as .setRequiresDeviceIdle:
private Constraints constraints() {
       Constraints constraints = new Constraints.Builder()
               .setRequiresCharging(true)
               .build();
       return constraints;
   }
}
Next, you’ll need to pass the Constraints object to your WorkRequest:
.setConstraints(constraints())WorkManager will then take these constraints into consideration, when finding the perfect time to run your task.
Let’s update our project, so the message is only printed to Logcat when the device enters a low battery state.
import android.app.Activity;
import android.os.Bundle;
import androidx.work.Constraints;
import androidx.work.OneTimeWorkRequest;
import android.view.View;
import androidx.work.WorkManager;

public class MainActivity extends Activity {

   private WorkManager mWorkManager;

   @Override
   protected void onCreate(Bundle savedInstanceState) {
       super.onCreate(savedInstanceState);
       setContentView(R.layout.activity_main);

       mWorkManager = WorkManager.getInstance();

       findViewById(R.id.oneTimeRequest).setOnClickListener(new View.OnClickListener() {
           @Override
           public void onClick(View v) {
             startWorkManager();
           }
      });

   }

   private void startWorkManager() {
       OneTimeWorkRequest someWork = new OneTimeWorkRequest.Builder(MyWorker.class)
               .setConstraints(constraints())
               .build();
       OneTimeWorkRequest oneTimeWorkRequest = someWork;
       mWorkManager.enqueue(oneTimeWorkRequest);
   }

   private Constraints constraints() {
       Constraints constraints = new Constraints.Builder()
       .setRequiresBatteryNotLow(true)
               .build();
       return constraints;
   }
}
Wherever possible you should test WorkManager on an Android Virtual Device (AVD), as it’s usually easier to simulate different device conditions, rather than waiting for them to occur on your smartphone or tablet naturally.
To test this particular project’s battery constraint, follow these steps:
- Install the application on an AVD.
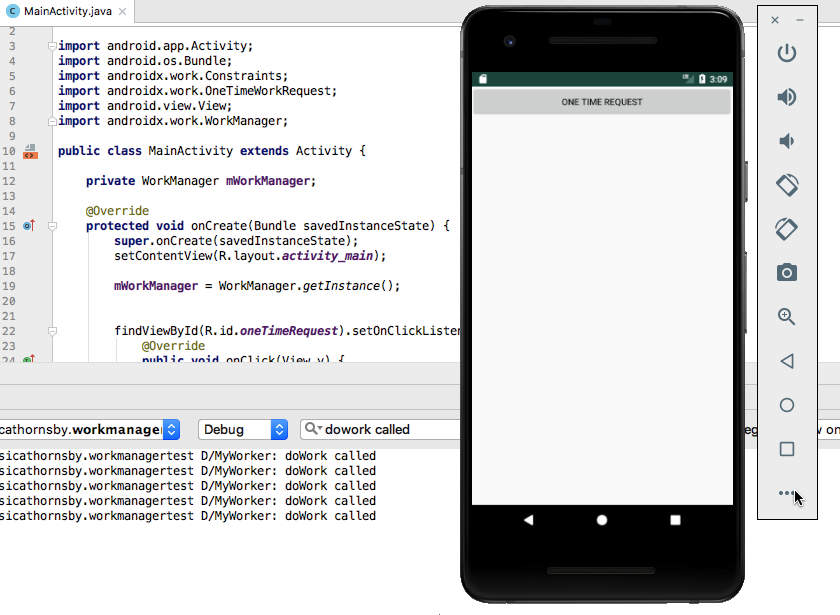
- Click the “More” icon in the strip of controls that appear alongside the emulator (where the cursor is positioned in the following screenshot).
- Select “Battery” from the left-hand menu.
- Open the “Charger connection” dropdown, and set it to “None.”
- Open the “Battery status” dropdown, and set it to “Not charging.”
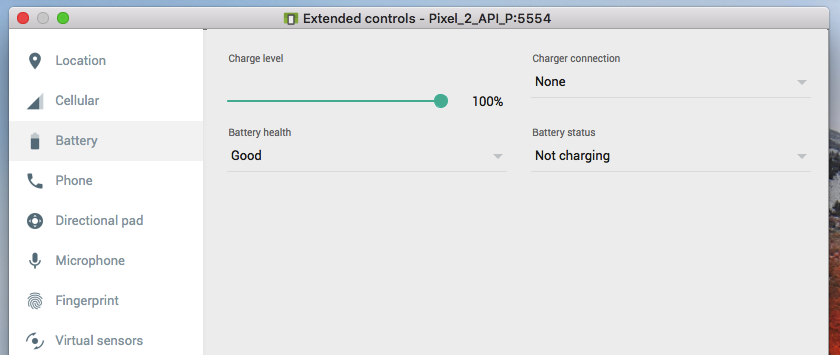
- Make sure the “Charge level” is set to 100 percent.
- Click the app’s “One Time Request” button.
- Check Android Studio’s Logcat window; the “doWork called” message should have been printed, as normal.
Next, repeat this process with a low battery level:
- Once again, click the “More” icon to open Android Studio’s “Extended controls” window.
- Select “Battery” from the left-hand menu.
- Drag the “Charge level” slider to 15 percent or lower.
- Click the “One Time Request” button; nothing should happen.
- Drag the slider to 100 percent, and the “doWork called” message should appear in Logcat.
This is also a good opportunity to see how WorkManager can run scheduled tasks, even when the user has exited your application:
- Set the AVD’s “Charge level” slider to 15 percent.
- Click the “One Time Request” button; no message should appear.
- Exit your application.
- Increase the “Charge level,” and the message should be printed, even though your application isn’t currently onscreen.
Get specific: Setting multiple constraints
Sometimes, you’ll have a task that should only run under very specific circumstances, for example you might want to delay an unusually intensive task until the device is charging, connected to the Internet and standing idle.
You can use WorkManager to build chains of constraints. Here we’re creating a task that will only run when the device is connected to an unmetered network and a power outlet:
import android.app.Activity;
import android.os.Bundle;
import androidx.work.Constraints;
import androidx.work.NetworkType;
import androidx.work.OneTimeWorkRequest;
import android.view.View;
import androidx.work.WorkManager;

public class MainActivity extends Activity {

   private WorkManager mWorkManager;

   @Override
   protected void onCreate(Bundle savedInstanceState) {
       super.onCreate(savedInstanceState);
       setContentView(R.layout.activity_main);

       mWorkManager = WorkManager.getInstance();

       findViewById(R.id.oneTimeRequest).setOnClickListener(new View.OnClickListener() {
           @Override
           public void onClick(View v) {
               startWorkManager();
           }
       });

   }

   private void startWorkManager() {
       OneTimeWorkRequest someWork = new OneTimeWorkRequest.Builder(MyWorker.class)
               .setConstraints(constraints())
               .build();
       OneTimeWorkRequest oneTimeWorkRequest = someWork;
       mWorkManager.enqueue(oneTimeWorkRequest);
   }

   private Constraints constraints() {
       Constraints constraints = new Constraints.Builder()
               .setRequiredNetworkType(NetworkType.CONNECTED)
               .setRequiresCharging(true)
               .build();
       return constraints;
   }
}
You can put this application to the test by only meeting one of these constraints and checking whether the message still appears in Android Studio’s Logcat:
- Install the updated project on your AVD.
- Click the “More” button, followed by “Battery.”
- Set the dropdowns to “Charger connection: AC charger” and “Battery status: Charging.”
- Disconnect this emulated device from the Wi-Fi, by opening the AVD’s Settings application, selecting “Network & Internet,” and then pushing the Wi-Fi slider to the Off position.
- Switch back to your application and give its “One Time Request” button a click. At this point, nothing should appear in Logcat, as the device successfully meets the first condition (charging) but doesn’t meet the second condition (connected to the network).
- Navigate back to the device’s Settings > Network & Internet menu, and then push the Wi-Fi slider into the On position. Now that you’ve met both constraints, the message should appear in Android Studio’s Logcat panel.
Chaining tasks with WorkContinuation
Some of your tasks may depend on the successful completion of other tasks. You might want to upload your application’s data to a server, but only after that data has been compressed.
You can create chains of tasks, by calling WorkManager’s beginWith() method and passing it the first task in the chain. This will return a WorkContinuation object, which allows you to chain subsequent tasks, via the WorkContinuation.then() method. Finally, when enqueue this sequence using WorkContinuation.enqueue(), WorkManager will run all of your tasks in the requested order.
Note you cannot enqueue periodic and one-time work in the same queue.
To create a chain, we need a second Worker class:
- Select File > New > Java class from the Android Studio toolbar.
- Name this class “MySecondWorker.”
- Enter the following code:
import android.support.annotation.NonNull;
import android.util.Log;
import androidx.work.Worker;

   public class MySecondWorker extends Worker {
       private static final String TAG = "MyWorker";
       @NonNull
       @Override
       public Worker.WorkerResult doWork() {
           Log.d(TAG, "My second worker");
           return Worker.WorkerResult.SUCCESS;
       }

   }
To make it clear which task is running, I’m going to update the MyWorker class so that it prints a different message to Logcat:
public Worker.WorkerResult doWork() {
Log.d(TAG, "My first worker");
return Worker.WorkerResult.SUCCESS;
}
Then, add the following to your MainActivity:
import android.app.Activity;
import android.os.Bundle;
import androidx.work.OneTimeWorkRequest;
import android.view.View;

import androidx.work.WorkContinuation;
import androidx.work.WorkManager;

public class MainActivity extends Activity {

   private WorkManager mWorkManager;

   @Override
   protected void onCreate(Bundle savedInstanceState) {
       super.onCreate(savedInstanceState);
       setContentView(R.layout.activity_main);

       mWorkManager = WorkManager.getInstance();

       findViewById(R.id.oneTimeRequest).setOnClickListener(new View.OnClickListener() {
           @Override
           public void onClick(View v) {
               startWorkManager();
           }
       });

   }

   private void startWorkManager() {

       OneTimeWorkRequest request1 = new OneTimeWorkRequest
               .Builder(MyWorker.class)
               .build();

       OneTimeWorkRequest request2 = new OneTimeWorkRequest
               .Builder(MySecondWorker.class)
               .build();

       WorkContinuation continuation = WorkManager.getInstance().beginWith(request1);
       continuation.then(request2).enqueue();

   }
}
Click the app’s “One Time Request” button, and your Logcat output should look something like this:
D/MyWorker: My first worker called
D/WorkerWrapper: Worker result SUCCESS
D/WorkerWrapper: Setting status to enqueued
D/MyWorker: My second worker
D/WorkerWrapper: Worker result SUCCESS
Alternatively, you could run these tasks in parallel:
private void startWorkManager() {
       WorkManager.getInstance().enqueue(from(MyWorker.class,
               MySecondWorker.class));

   }
}
If you need to create more complex sequences, then you can join multiple chains using the WorkContinuation.combine() method.
Different constraints, for different tasks
You can combine constraints and chained tasks to create a sequence where each task waits until a different set of conditions are met. Our application could compress its data whenever storage space is low, and then wait until the device is connected to an unmetered network, before syncing this newly-compressed data with the server.
Here, I’ve updated my MainActivity so that request1 only runs when the device is charging, and request2 only runs when there’s an active network connection:
import android.app.Activity;
import android.os.Bundle;

import androidx.work.Constraints;
import androidx.work.NetworkType;
import androidx.work.OneTimeWorkRequest;
import android.view.View;

import androidx.work.WorkContinuation;
import androidx.work.WorkManager;

public class MainActivity extends Activity {

   private WorkManager mWorkManager;

   @Override
   protected void onCreate(Bundle savedInstanceState) {
      super.onCreate(savedInstanceState);
      setContentView(R.layout.activity_main);

      mWorkManager = WorkManager.getInstance();

      findViewById(R.id.oneTimeRequest).setOnClickListener(new View.OnClickListener() {
          @Override
          public void onClick(View v) {
               startWorkManager();
           }
     });

   }

   private Constraints batteryConstraints() {
       Constraints constraints = new Constraints.Builder()
               .setRequiresCharging(true)
               .build();
       return constraints;
   }

   private Constraints networkConstraints() {
       Constraints constraints = new Constraints.Builder()
               .setRequiredNetworkType(NetworkType.CONNECTED)
               .build();
       return constraints;
   }

   private void startWorkManager() {

       OneTimeWorkRequest request1 = new OneTimeWorkRequest
                .Builder(MyWorker.class)
                .setConstraints(batteryConstraints())
                .build();

       OneTimeWorkRequest request2 = new OneTimeWorkRequest
               .Builder(MySecondWorker.class)
               .setConstraints(networkConstraints())
               .build();

       WorkContinuation continuation = WorkManager.getInstance().beginWith(request1);
       continuation.then(request2).enqueue();

   }
}
To help us see what’s happening, I’ve updated the messages MyWorker and MySecondWorker print to Logcat:
MyWorker:
public Worker.WorkerResult doWork() {
       Log.d(TAG, "My battery worker");
       return Worker.WorkerResult.SUCCESS;
   }

}
MySecondWorker:
public Worker.WorkerResult doWork() {
       Log.d(TAG, "My network worker");
       return Worker.WorkerResult.SUCCESS;
   }

}
Wrapping up
So that’s how to use the new WorkManager API to schedule background work, including running tasks in parallel, creating chains of related tasks, and using constraints to specify exactly when a task should run.
Now that you’ve seen WorkManager in action, do you think it’s an improvement on Android’s previous schedulers? Let us know in the comments below!