Affiliate links on Android Authority may earn us a commission. Learn more.
How To Update Samsung Galaxy S GT I9000 With Jellybean Custom ROM
While everyone is still waiting for the latest Android OS version, the “Ice Cream Sandwich” update, some third-party developers have decided to make their own custom ROM and called it “Jellybean” – which is probably the next name for the Android OS version after ICS. So what are the features of this Jellybean?
- Pre-rooted custom firmware with Super User as well as Busy Box added
- Multi-language support which is derived from the Stock ROM of XXJVT
- TouchWiz 4.5
- Custom Theme with Gingerbread elements and colored icons
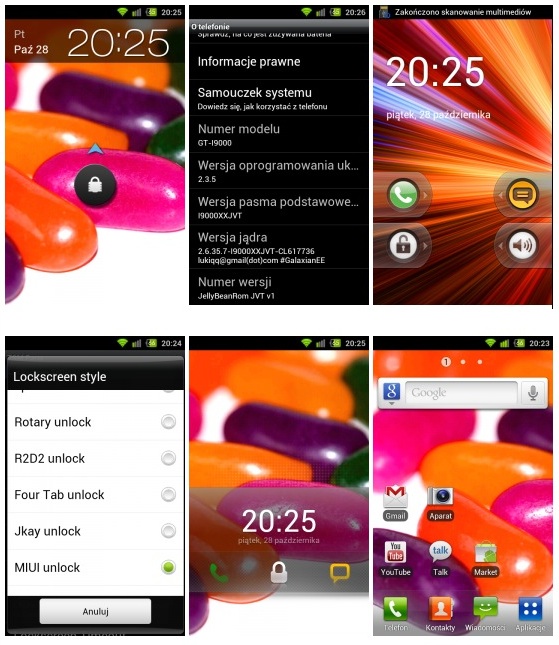
- 10 Lock Screens
- CRT Off Animation
- App Widget Picker
- Over Scroll Glow
- Extended Power Menu
- SGS2 Stock Keyboard
- Microbes Live wallpaper
- Custom Window Animation
- Nexus S System Sounds
- Modified Camera App (power button shutter + enabled shooting on < 15% battery)
- SGS Kernel Flasher, Faster Fix, SGS Tools, CF Root Ext4 Tools added & 3D blur Fix
- Galaxian Kernel with better battery backup
Some screenshots of the Jellybean ROM:


If you want to install this ROM on your device, then just follow these instructions:
Note: You may lose your data so back up your data with these apps/steps:
- Text messages – Use SMS Backup & Restore app
- Phone Contacts – Sync with the Gmail application
- Call Log – Call Log and Restore
- Pictures, Music, Videos, Files etc.– Copy to Internal / External SD Card
- Internet & MMS Settings – Backup all the settings from the path “Applications > Settings > Wireless and Network > Mobile Networks > Access Point Names”
Requirements:
- Samsung Galaxy S GT I900
- USB Data Cable
- Computer
- First, make sure that your phone’s battery level is at 70% or above.
- Next, enable USB Debugging on your phone. From your homescreen, tap Menu > Settings > Applications > Development, then make sure then USB Debugging is checked.
- Check if your phone is updated to the latest version of the Gingerbread 2.3.5 XXJVT firmware as well as being rooted.
- If your phone is not updated and rooted follow these links: Procedure to Root and Update Samsung Galaxy S with XXJVT 2.3.5
- Next, download this file to your computer: Jellybean custom rom Zip file.
- Connect your phone to your computer via USB Data Cable.
- Tap the “Turn on USB Storage” button on your phone.
- Then locate the SDCARD on your computer and copy the file (Jellybean custom rom Zip file) you’ve downloaded into the root of the SDCARD.
- Once copied, tap “Turn off USB Storage” on your phone and disconnect it from your computer.
- Turn off your phone.
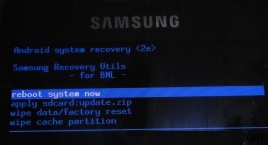
- Enter recovery mode by holding the Volume Up Key + OK button while turning the phone on with the power button.

Bonus Application Packs
Samsung Galaxy S2 Apps Pack:
This includes applications like Reader’s Hub, Weather Clock, Digital Clock, Email, Email Widget, Social Hub (Recovery Zip)
Samsung Galaxy S Stock Apps Pack:
Aldiko, Buddies Now, Days, Dual Clock, Job Manager, Mini Diary, My Files, Press Reader, Samsung Widgets, Think Droid Office, Unified Inbox & Write and Go plus Maps with Street View
To install these bonus apps, just follow steps 10-14 with these respective zip files. Only install one zip file at a time per recovery session. (Install one zip then reboot, then install another then reboot)