Affiliate links on Android Authority may earn us a commission. Learn more.
Reduce your APK size with Android App Bundles and Dynamic Feature
Creating an app that can run across the full range of Android devices is one of the biggest challenges facing Android developers.
Even if you take the time to create code and resources optimized for all the different screen densities, CPU architectures, and languages, you can quickly end up with a whole new problem: a bloated APK full of code, resources, and assets the user doesn’t even need.
A recent study from Google showed APK size directly affects the number of people who end up installing your app after visiting its Google Play page. For every 6MB increase in the size of your APK, you can expect to see a one percent decrease in the installation conversion rate. Everything you can do to reduce the size of your APK will increase the chances of the user downloading your app.
Let’s look at Android App Bundle, a new publishing format that can help you support the full range of Android devices while reducing the size of your APK.
By the end of this article, you’ll have configured, built, and tested a project supports the App Bundle format, and uploaded this Bundle to the Google Play Console, ready to publish and share with your users.
Because APK size is such a big deal, I’ll also show you how to trim even more megabytes from your APK, by dividing your App Bundle into optional dynamic feature modules that users can download on demand.
What is Android App Bundle?
Previously, when it was time to publish your Android app, you had two options:
- Upload a single APK with all the code and resources for the different device configurations that your app supports.
- Create multi-APKs targeting specific device configurations. Each APK is a complete version of your app, but they all share the same Google Play listing.
Now, Android developers have a third option: publish an Android App Bundle (.aab) and let Google Play handle the rest!
Once you’ve uploaded your .aab file, Google Play will use it to generate the following:
- A base APK. This contains all the code and resources required to deliver your app’s base functionality. Whenever a user downloads your app, this is the APK they’ll receive first, and every subsequent APK will depend on this base APK. Google Play generates the base APK from your project’s “app,” or base module.
- Configuration APK(s). Every time someone downloads your app, Google Play will use the new Dynamic Delivery serving model, to deliver a configuration APK tailored for that specific device configuration.
Google Play can also generate one or more dynamic feature APKs.
Often, an application has one or even multiple features not required to deliver its core functionality, for example if you’ve developed a messaging app, not all of your users will need to send GIFs or emojis.
When you build an App Bundle, you can reduce the size of your APK by separating these features into dynamic feature modules users can then download on demand, if required. If a user requests a dynamic feature module, Dynamic Delivery will serve them a dynamic feature APK containing only the code and resources required to run this specific feature, on the user’s specific device.
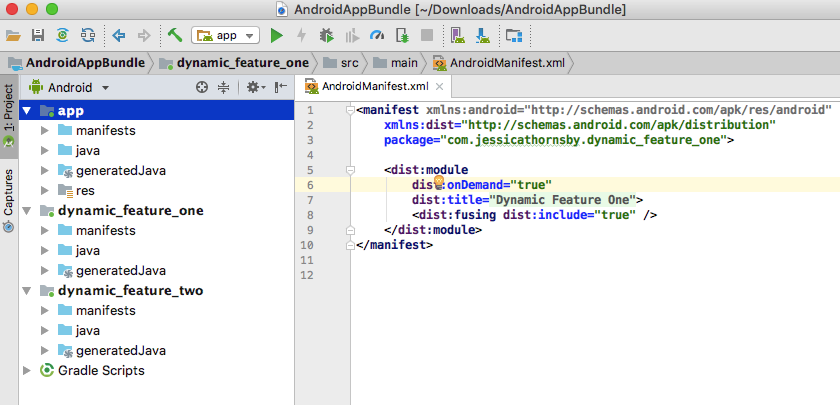
In this article, I’ll be adding a dynamic feature module to our App Bundle. However, dynamic feature modules are currently still in beta, so if your Bundle includes dynamic feature modules you won’t be able to publish it to production (unless you enrol in the dynamic features beta program).
Why should I use this new publishing format?
The major benefit of Android App Bundles, is the reduced APK size. There’s evidence to suggest APK size is a huge factor in how many people install your application, so publishing your app as a Bundle can help ensure it winds up on as many devices as possible.
If you’ve previously resorted to building multi-APKs, then Bundles can also simplify the build and release management process. Instead of navigating the complexity, potential for error, and general headaches of building, signing, uploading, and maintaining multiple APKs, you can build a single .aab, and let Google Play do all the hard work for you!
However, there are a few restrictions. Firstly, APKs generated from the App Bundle must be 100MB or smaller. In addition, devices running Android 4.4 and earlier don’t support split APKs, so Google Play can only serve your App Bundle to these devices as multi-APKs. These multi-APKs will be optimized for different screen densities and ABIs, but they’ll include resources and code for every language your application supports, so users running Android 4.4 and earlier won’t save quite as much space as everyone else.
Creating an app that supports the Android App Bundle
You can publish an existing app in the App Bundle format, but to help keep things straightforward we’ll be creating an empty project, and then building it as an App Bundle.
Create a new project with the settings of your choice. By default, the Google Play Console will take your App Bundle and generate APKs targeting all of the different screen densities, languages, and Application Binary Interfaces (ABI) your application supports. There’s no guarantee this default behavior won’t change in a subsequent update, so you should always be explicit about the behavior you want.
To let the Play Console know exactly which APKs it should generate, open your project’s build.gradle file, and add a “bundle” block:
android {
   compileSdkVersion 28
   defaultConfig {
       applicationId "com.jessicathornsby.androidappbundle"
       minSdkVersion 24
       targetSdkVersion 28
       versionCode 1
       versionName "1.0"
       testInstrumentationRunner "android.support.test.runner.AndroidJUnitRunner"
   }

   bundle {

//To do//

       }
       }
You can now specify whether Google Play should (“true”) or shouldn’t (“false”) generate APKs targeting specific screen densities, languages, and ABIs:
android {
   compileSdkVersion 28
   defaultConfig {
       applicationId "com.jessicathornsby.androidappbundle"
       minSdkVersion 24
       targetSdkVersion 28
       versionCode 1
       versionName "1.0"
       testInstrumentationRunner "android.support.test.runner.AndroidJUnitRunner"
   }

   bundle {

//Generate APKs for devices with different screen densities//

       density {

           enableSplit true
       }

//Generate APKs for devices with different CPU architectures//

       abi {
           enableSplit true

//Create a split APK for each language//

       }
       language {
           enableSplit true
       }
The base module’s build.gradle file also determines the version code Google Play will use for all the APKs it generates from this Bundle.
Testing your Android App Bundle
When testing your app, you can either deploy a universal APK, or an APK from your Bundle optimized for the specific Android smartphone, tablet, or Android Virtual Device (AVD) you’re using to test your app.
To deploy an APK from your App Bundle:
- Select Run > Edit Configurations… from the Android Studio toolbar.
- Open the Deploy dropdown, and select APK from app bundle.
- Select Apply, followed by OK.
Adding on-demand features with Dynamic Delivery
While we could build an App Bundle at this point, I’m going to add a dynamic feature module, which will be included in our Bundle.
To create a dynamic feature module:
- Select File > New > New Module… from the Android Studio toolbar.
- Select Dynamic Feature Module, and then click Next.
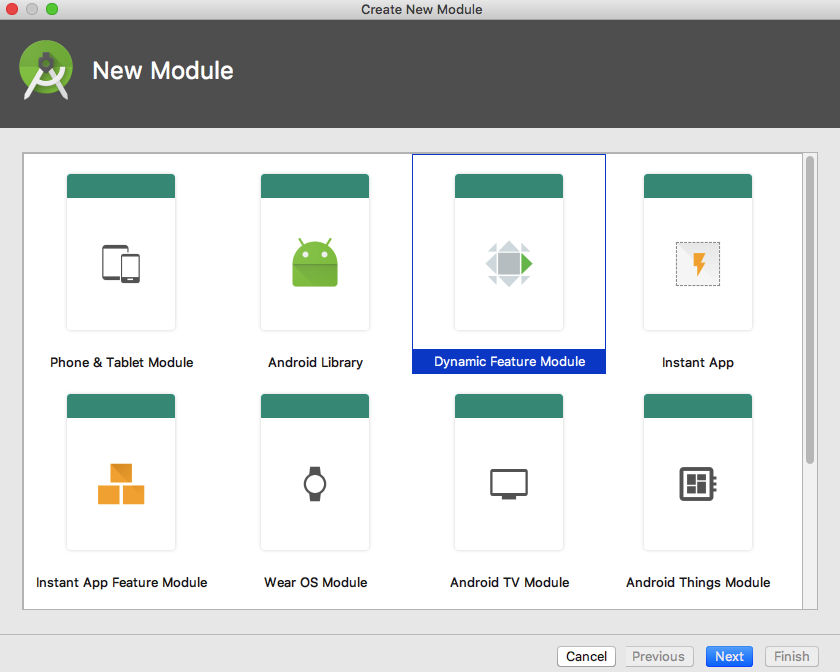
- Open the Base application module dropdown, and select app.
- Name this module dynamic_feature_one, and then click Next.
- To make this module available on-demand, select the Enable on-demand checkbox. If your app supports Android 4.4 or earlier, then you’ll also need to enable Fusing, as this makes your dynamic feature module available as a multi-APK, which will run on Android 4.4 and earlier.
- Next, give your module a title that’ll be visible to your audience; I’m using Dynamic Feature One.
- Click Finish.
Exploring the Dynamic Feature Module
You can now add classes, layout resource files, and other assets to your dynamic feature module, just like any other Android module. However, if you take a look at your project’s build.gradle files and Manifest, you’ll notice some important differences:
1. The Dynamic Feature Module’s Manifest
This defines some important characteristics for the dynamic feature module:
<manifest xmlns:android="http://schemas.android.com/apk/res/android"
   xmlns:dist="http://schemas.android.com/apk/distribution"
   package="com.jessicathornsby.dynamic_feature_one">

   <dist:module

//Whether the module should be available as an on-demand download//

       dist:onDemand="true"

//The module’s user-facing title//

       dist:title="@string/title_dynamic_feature_one">

//Whether to include this module in multi-APKs targeting Android 4.4 and earlier//

       <dist:fusing dist:include="true" />
   </dist:module>
</manifest>
2. The module’s build.gradle file
This file applies the dynamic-feature plugin, which includes all the Gradle tasks and properties required to build an App Bundle includes a dynamic feature module. The build.gradle file should also name your base (“app”) module as a project dependency:
apply plugin: 'com.android.dynamic-feature'

android {
   compileSdkVersion 28

   defaultConfig {
       minSdkVersion 24
       targetSdkVersion 28
       versionCode 1
       versionName "1.0"

   }

}

dependencies {
   implementation fileTree(dir: 'libs', include: ['*.jar'])
   implementation project(':app')
}
3. The base feature module’s Manifest
Every time you create a dynamic feature module, Android Studio will update your app module’s build.gradle file, to reference this dynamic module:
dynamicFeatures = [":dynamic_feature_one"]
}
Requesting features at runtime
Once you’ve created a dynamic feature module, you’ll need to give the user a way to request that module at an appropriate time. For example, if you’ve created a fitness application, tapping your app’s “Advanced exercises” menu might trigger a workflow that’ll download the dynamic “AdvancedExercises” module.
To request a module, you’ll need the Google Play Core library, so open your base feature module’s build.gradle file, and add Core as a project dependency:
dependencies {
   implementation fileTree(dir: 'libs', include: ['*.jar'])
   implementation 'com.android.support:appcompat-v7:28.0.0'
   implementation 'com.android.support.constraint:constraint-layout:1.1.3'

//Add the following//

   implementation 'com.google.android.play:core:1.3.5'
Next, open the Activity or Fragment where you want to load your dynamic feature module, which in our application is MainActivity.
To kickoff the request, create an instance of SplitInstallManager:
splitInstallManager =
               SplitInstallManagerFactory.create(getApplicationContext());
   }
Next, you need to create the request:
SplitInstallRequest request =
    SplitInstallRequest
        .newBuilder()
A project can consist of multiple dynamic feature modules, so you’ll need to specify which module(s) you want to download. You can include multiple modules in the same request, for example:
.addModule("dynamic_feature_one")
      .addModule("dynamic_feature_two")
      .build();
Next, you need to submit the request via the the asynchronous startInstall() task:
splitInstallManager
              .startInstall(request)
Your final task is acting on a successful download, or gracefully handling any failures that occur:
.addOnSuccessListener(new OnSuccessListener<Integer>() {
                   @Override

//If the module is downloaded successfully...//

                    public void onSuccess(Integer integer) {

//...then do something//

                    }
               })
               .addOnFailureListener(new OnFailureListener() {
                   @Override

//If the module isn’t downloaded successfully….//

                   public void onFailure(Exception e) {

//...then do something//

                   }
               });
   }
}
Every time you upload a new version of your App Bundle, Google Play will automatically update all its associated APKs, including all your dynamic feature APKs. Since this process is automatic, once a dynamic feature module is installed on the user’s device, you don’t need to worry about keeping that module up-to-date.
Here’s our completed MainActivity:
import android.support.v7.app.AppCompatActivity;
import android.os.Bundle;

import com.google.android.play.core.splitinstall.SplitInstallManager;
import com.google.android.play.core.splitinstall.SplitInstallManagerFactory;
import com.google.android.play.core.splitinstall.SplitInstallRequest;
import com.google.android.play.core.tasks.OnFailureListener;
import com.google.android.play.core.tasks.OnSuccessListener;

public class MainActivity extends AppCompatActivity {

   private SplitInstallManager splitInstallManager = null;

   @Override
   protected void onCreate(Bundle savedInstanceState) {
       super.onCreate(savedInstanceState);
       setContentView(R.layout.activity_main);

//Instantiate an instance of SplitInstallManager//

       splitInstallManager =
               SplitInstallManagerFactory.create(getApplicationContext());
   }

   public void loadDyanmicFeatureOne() {

//Build a request//

       SplitInstallRequest request =
               SplitInstallRequest
                       .newBuilder()

//Invoke the .addModule method for every module you want to install//

                       .addModule("dynamic_feature_one")
                       .build();

//Begin the installation//

       splitInstallManager
               .startInstall(request)
               .addOnSuccessListener(new OnSuccessListener<Integer>() {
                   @Override

//The module was downloaded successfully//

                   public void onSuccess(Integer integer) {

//Do something//

                   }
                })
                .addOnFailureListener(new OnFailureListener() {
                   @Override

//The download failed//

                   public void onFailure(Exception e) {

//Do something//

                   }
               });
   }
}
Giving your users instant access to Dynamic Feature Modules
By default, the user will need to restart their app before they can access any of the code and resources associated with their freshly-installed dynamic feature mode. However, you can grant your users instant access, with no restart required, by adding SplitCompatApplication to your base (“app”) module’s Manifest:
<?xml version="1.0" encoding="utf-8"?>
<manifest xmlns:android="http://schemas.android.com/apk/res/android"
   package="com.jessicathornsby.androidappbundle">

   <application

//Add the following//

      android:name="com.google.android.play.core.splitcompat.SplitCompatApplication"
Testing your modular app
Any dynamic feature modules you include in your project are entirely optional, so you’ll need to test how your app functions when the user installs different combinations of these modules, or even if they completely ignore your dynamic feature modules.
When testing your app, you can choose which dynamic feature module(s) to include in the deployed APK:
- Select Run > Edit Configurations… from the Android Studio toolbar.
- Find the Dynamic features to deploy section and select the checkbox next to each dynamic feature module that you want to test.
- Select Apply, followed by OK.
You can now run this app on your Android smartphone, tablet, or AVD, and only the selected dynamic feature modules will be deployed.
Get ready for Google Play: Building your Bundle
Once you’re happy with your App Bundle, the final step is uploading it to the Google Play Console, ready to analyze, test, and eventually publish.
Here’s how to build a signed version of your App Bundle:
- Select Build > Generate Signed Bundle/APK from the Android Studio toolbar.
- Make sure the Android App Bundle checkbox is selected, and then click Next.
- Open the module dropdown, and select app as your base module.
- Enter your keystore, alias and password, as usual, and then click Next.
- Choose your Destination folder.
- Make sure the Build Type dropdown is set to Release.
- Click Finish.
Android Studio will now generate your App Bundle, and store it in your AndroidAppBundle/app/release directory.
Uploading your dynamic App Bundle
To upload your App Bundle to Google Play:
- Head over to the Google Play Console, and sign into your account.
- In the upper-right corner, select Create Application.
- Complete the subsequent form, and then click Create.
- Enter the requested information about your app, and then click Save.
- In the left-hand menu, select App releases.
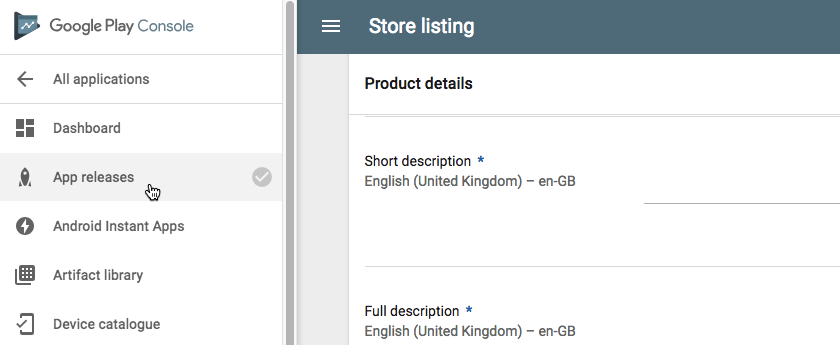
- Find the track that you want to upload your Bundle to, and select its accompanying “Manage” button. Just like an APK, you should test your Bundle via the internal, alpha and beta tracks, before publishing it to production.
- On the subsequent screen, select Create release.
- At this point, you’ll be prompted to enroll in App Signing by Google Play, as this provides a secure way to manage your app’s signing keys. Read the onscreen information and if you’re happy to proceed, click Continue.
- Read the terms and conditions, and then click Accept.
- Find the Android App Bundles and APKs to add section, and click its accompanying Browse files button.
- Select the .aab file that you want to upload.
- Once this file has been loaded successfully, click Save. Your Bundle will now have uploaded to the Google Play Console.
How many APKs were included in your Bundle?
The Google Play Console will take your Bundle and automatically generate APKs for every device configuration your application supports. If you’re curious, you can view all of these APKs in the Console’s App Bundle Explorer:
- In the Console’s left-hand menu, select App releases.
- Find the track where you uploaded your Bundle, and select its accompanying Edit release button.
- Click to expand the Android App Bundle section.
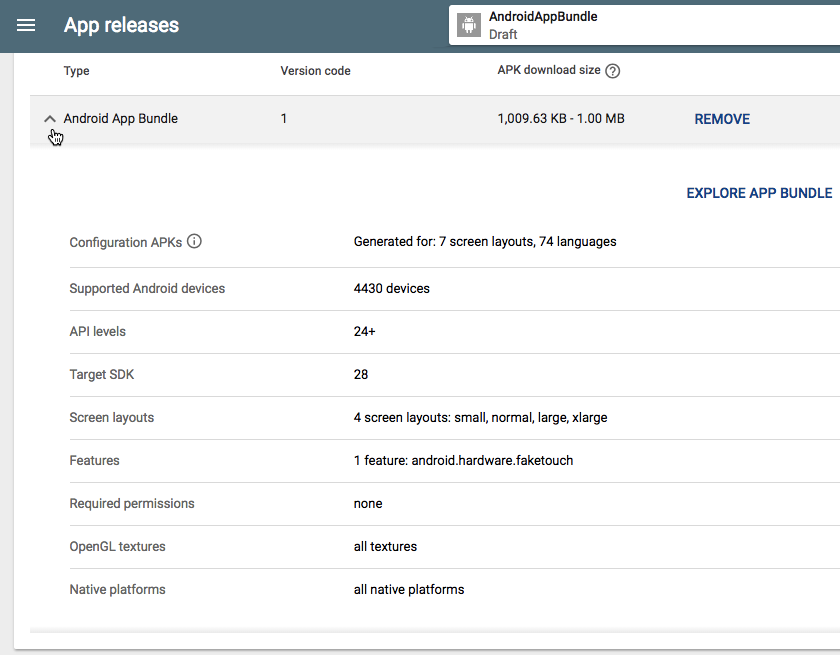
- Select Explore App Bundle.
The subsequent screen displays an estimate of how much space you’ve saved, by supporting App Bundles.
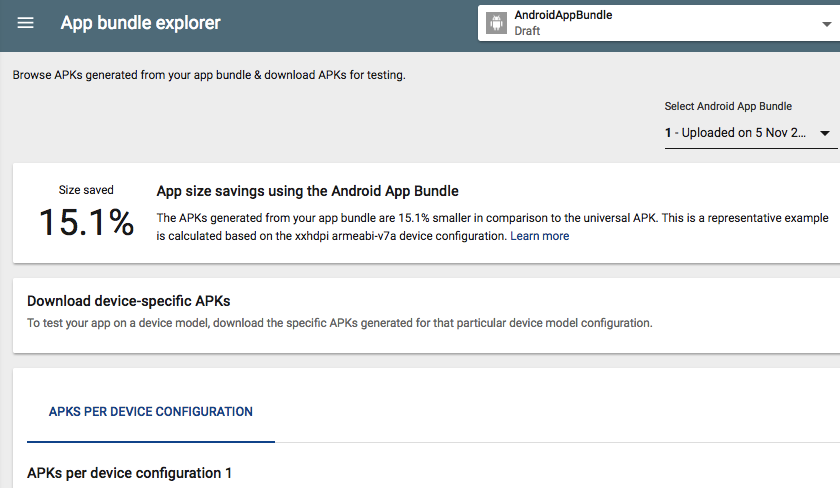
You can also choose between the following tabs:
- APKs per device configuration. The base, configuration and dynamic feature APKs that’ll be served to devices running Android 5.0 and higher.
- Auto-generated multi-APKs. The multi-APKs that’ll be served to devices running Android 5.0 and earlier. If your app’s minSdkVersion is Android 5.0 or higher, then you won’t see this tab.
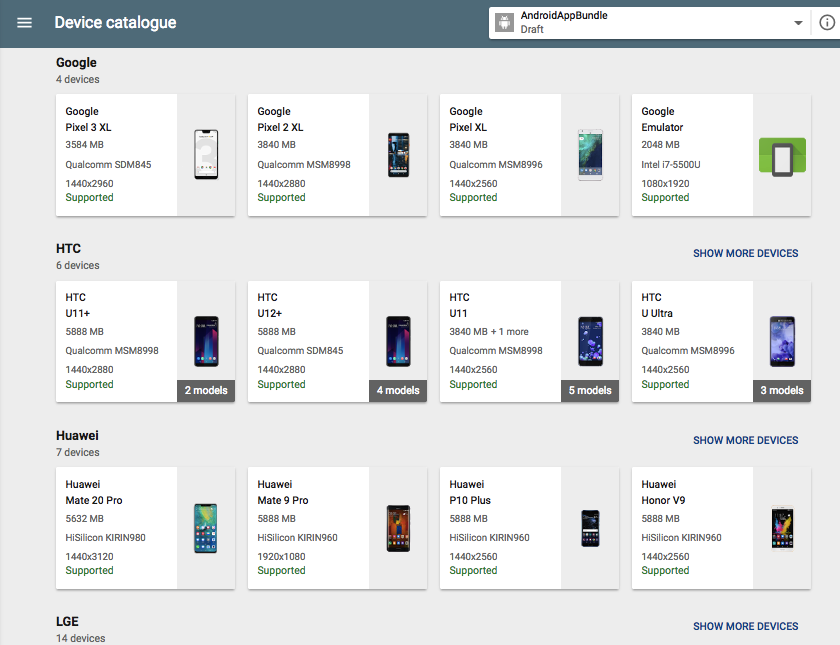
Finally, you can view a list of all the devices each APK is optimized for, by selecting that APK’s accompanying View devices button.
The subsequent screen includes a Device catalogue of every smartphone and tablet your chosen APK is compatible with.
Wrapping up
Now you can build, test, and publish an App Bundle, and know how to create a dynamic feature module users can download on demand.
Do you think this new publishing format could take the pain out of supporting multiple Android devices? Let us know in the comments!