Affiliate links on Android Authority may earn us a commission. Learn more.
How to use the Mail app in Windows 10 to access Gmail, iCloud, and more
Published onApril 27, 2019
There’s absolutely nothing wrong with using Microsoft’s default Mail app in Windows 10. It’s a native email client that supports Google, Yahoo, AOL, Apple iCloud, Microsoft Exchange, and other POP/IMAP email services. Given it’s baked into Windows 10, you can trust Microsoft will keep your messages secure and the app stable and reliable. We show you how to use the Windows 10 Mail app based on version 1809 (October 2018 update).
Add your first account
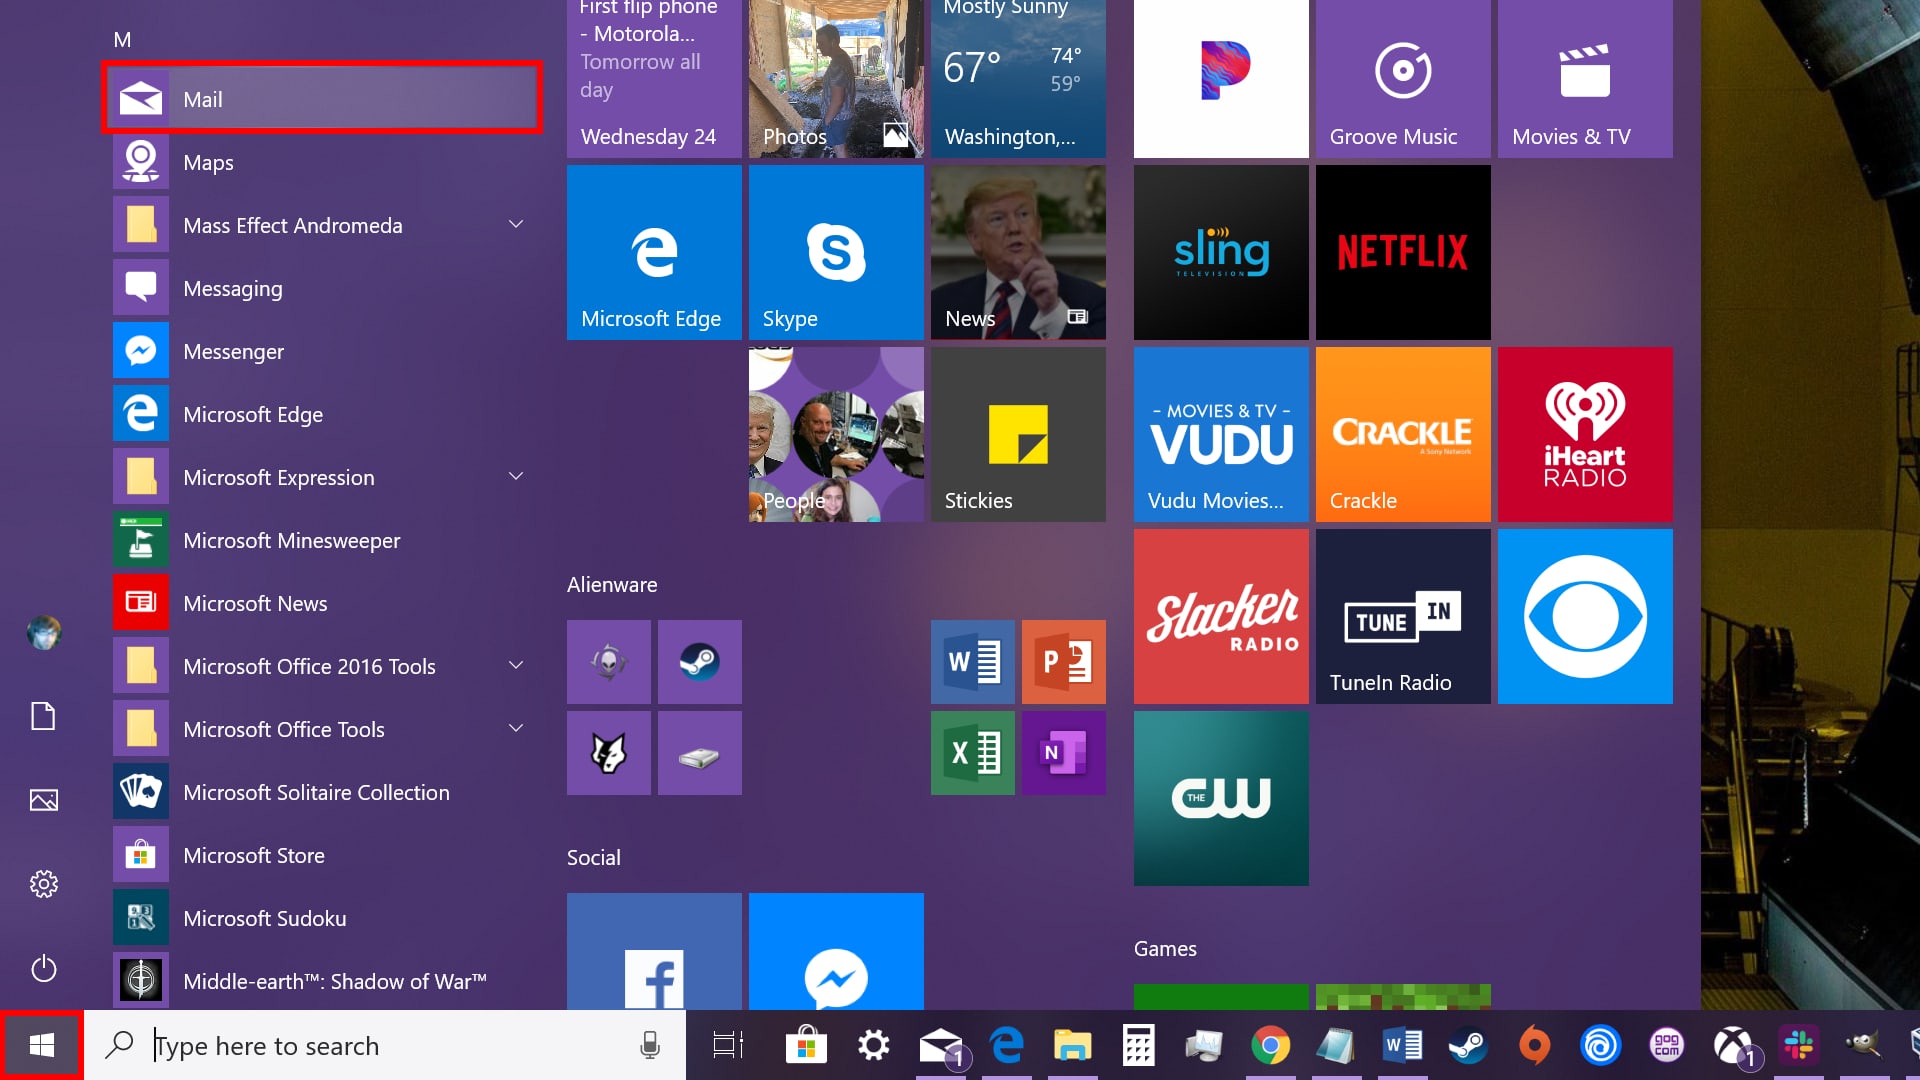
1. Click the Start button.
2. Scroll down the Start Menu to locate and open the Mail app.
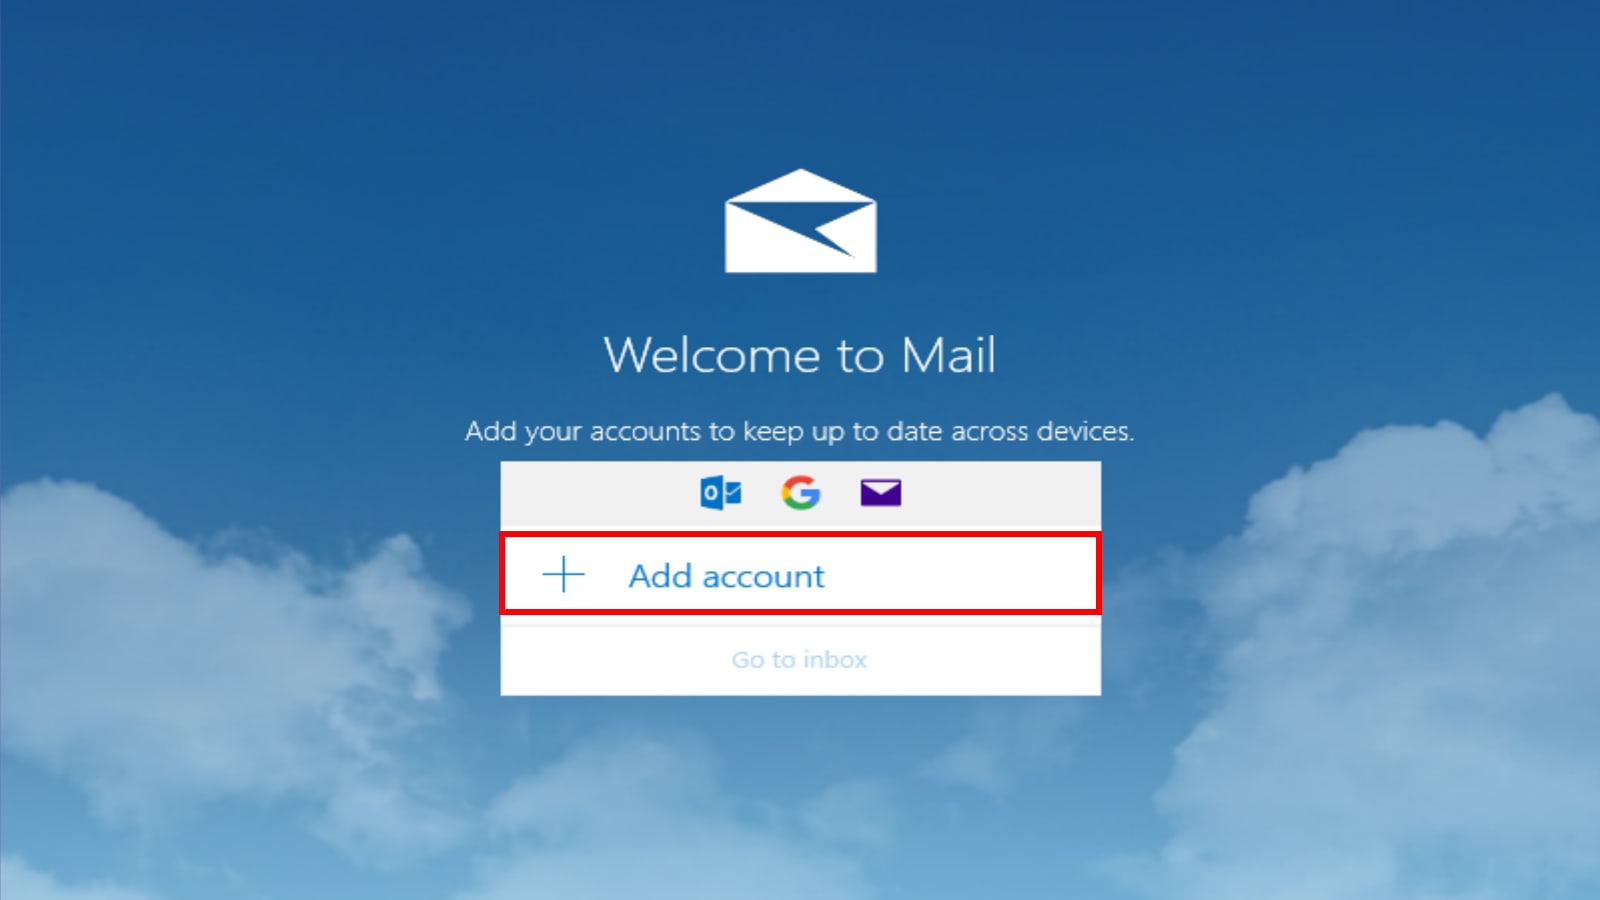
3. On the Mail app’s welcome screen, select Add account.
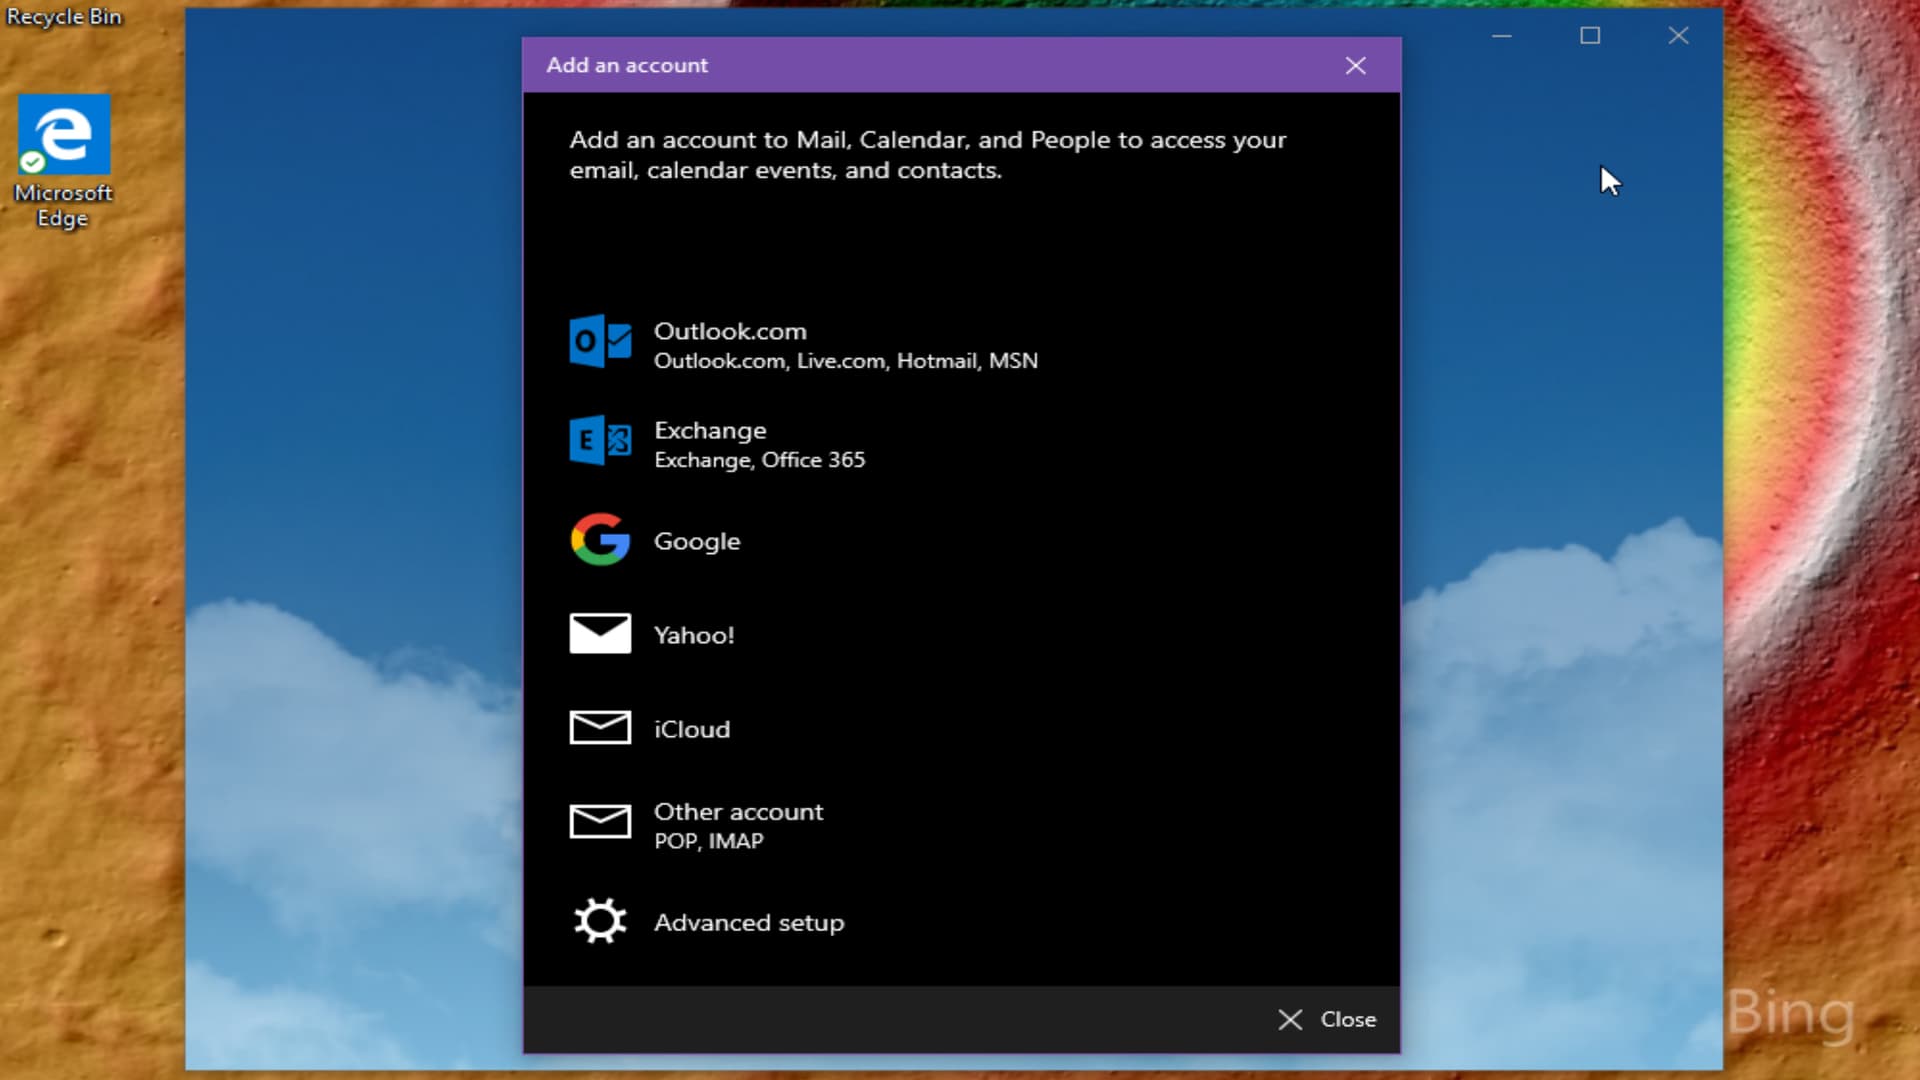
4. Select a service on the following pop-up screen.
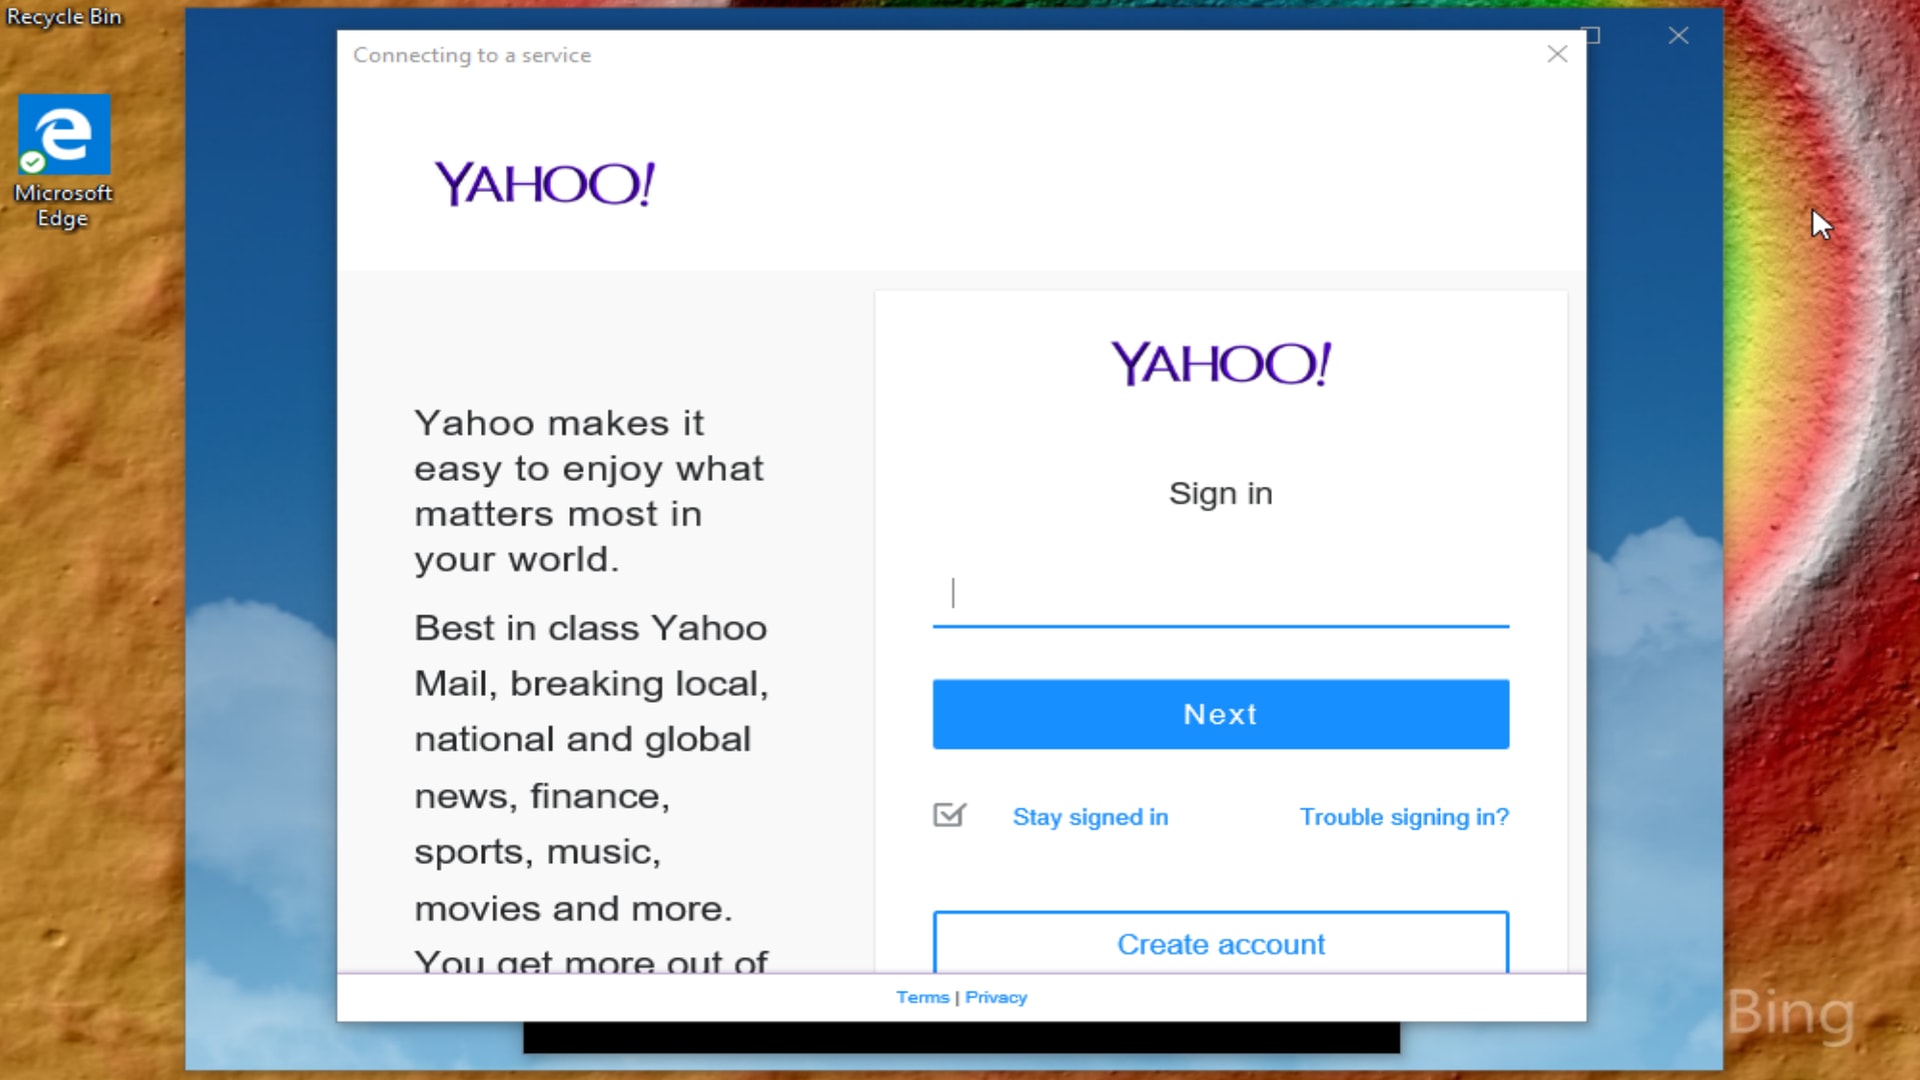
5. Enter your credentials in the following Connecting to a service screen.
6. Click Done when complete.
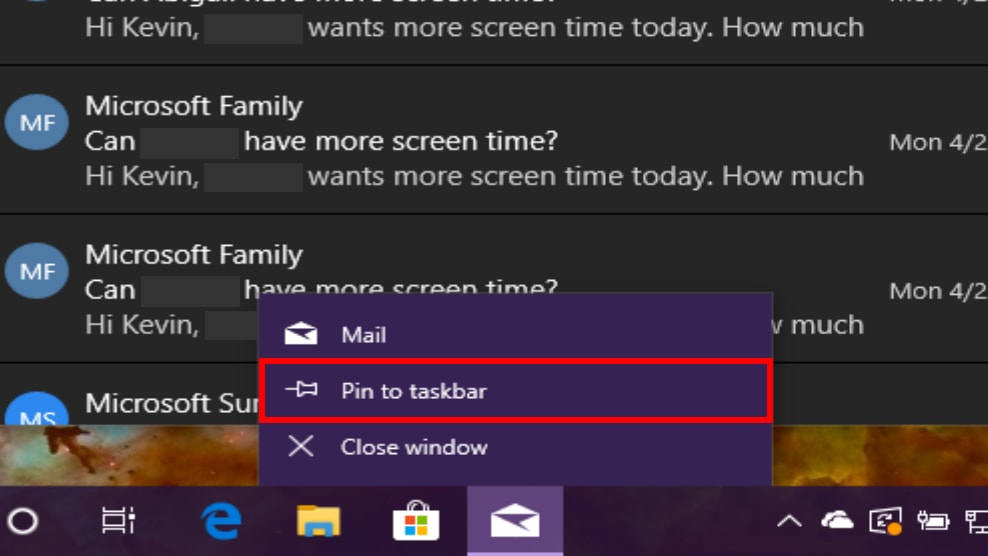
Note that if you continuously use the Mail app, you can pin it to the taskbar. This will prevent you from having to hunt down the app on the Start Menu each time you want to check email.
1. With the Mail app already open, right-click on its icon shown on the taskbar.
2. Select Pin to taskbar.
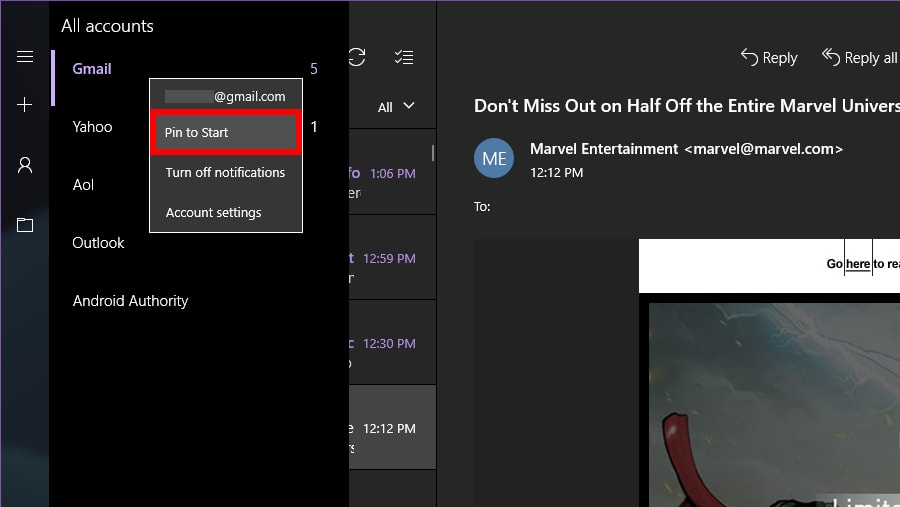
Another option is to pin a specific email account to Start. For instance, if you have multiple email accounts but use only one as your primary, such as Gmail, you can create a “shortcut” on the Start menu without pinning the Mail app:
1. With the Mail app already open, right-click on the account you want pinned to Start.
3. Select Pin to Start.
Add another account

1. Open the Mail app.
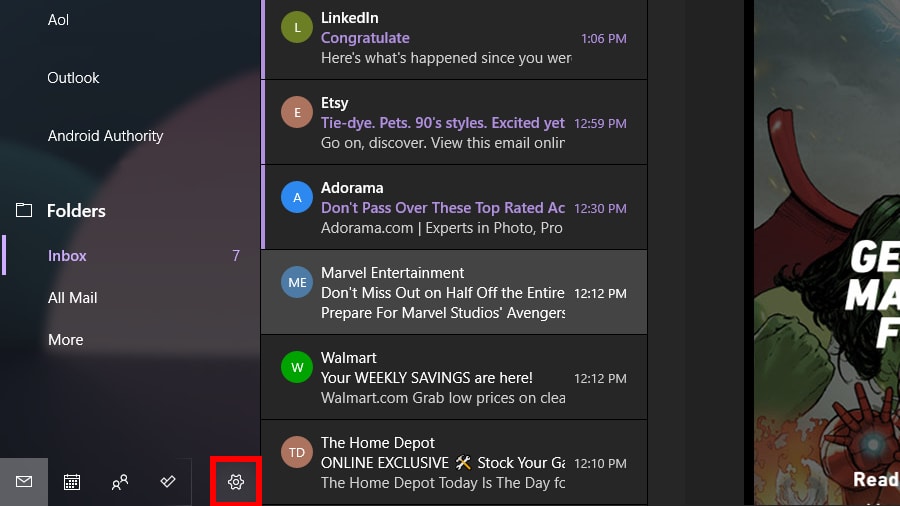
2. Click the gear-style icon at the bottom of the left panel to access Settings.
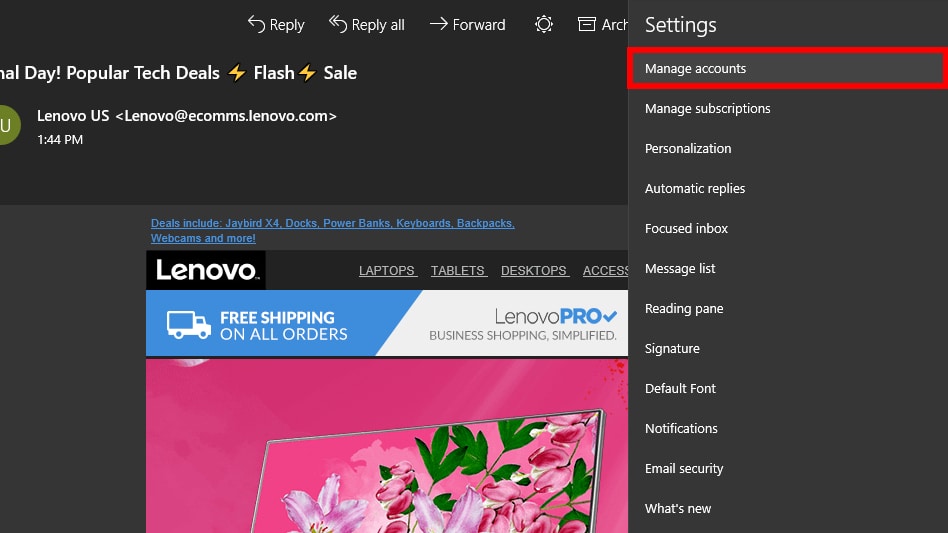
3. In the rollout menu, select Manage accounts.
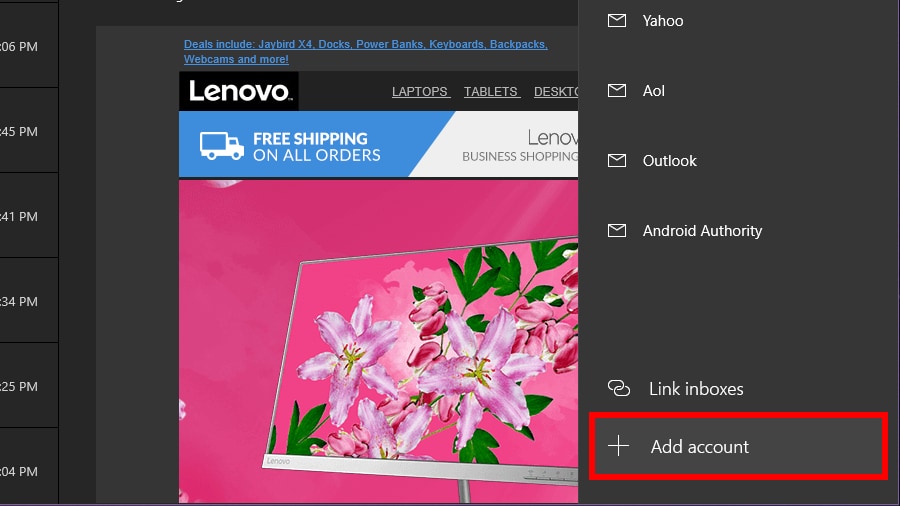
4. Select Add account.
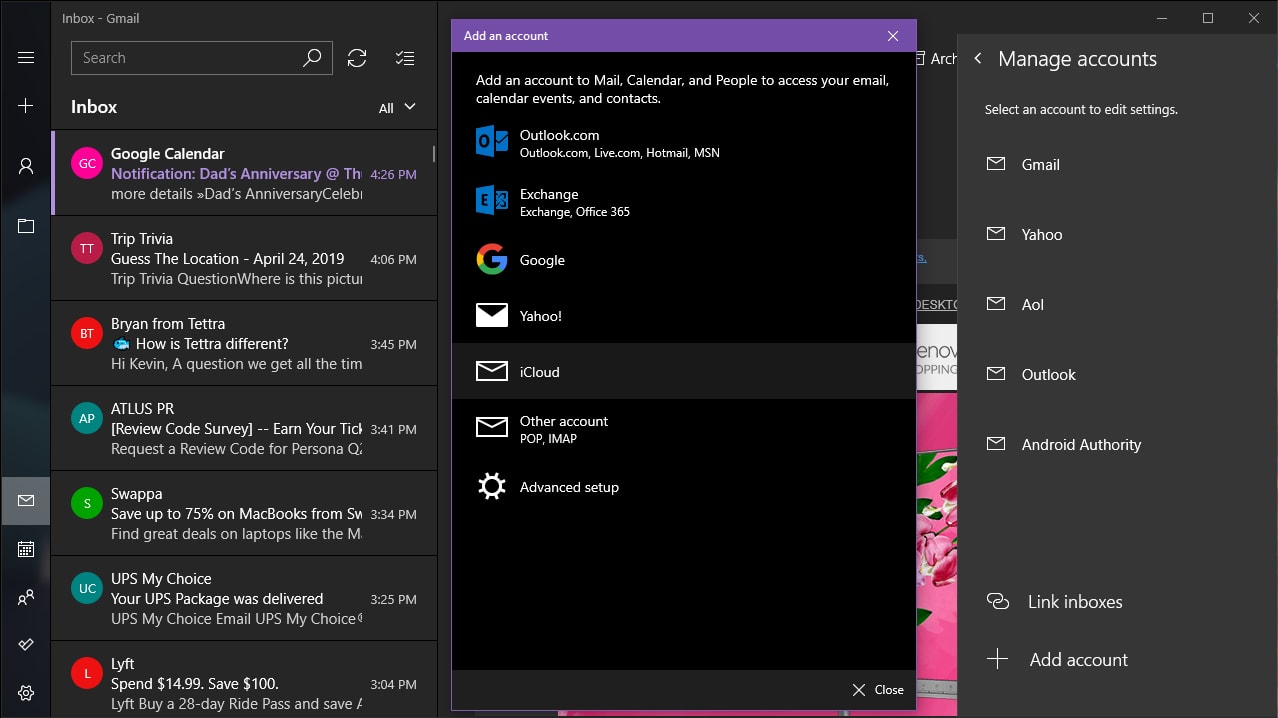
5. Select a service on the following pop-up screen.
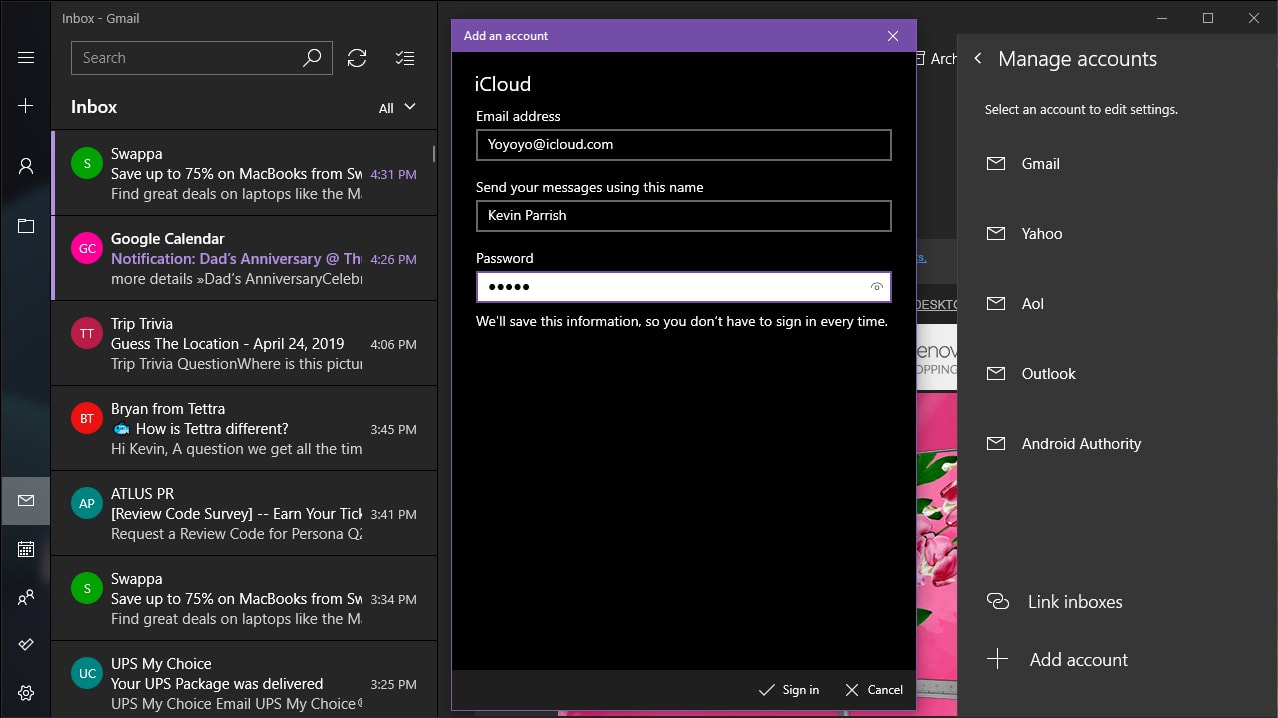
6. Enter your credentials in the following Add an account screen.
7. Click Sign in when complete.
8. Click Done if successful.
Modify accounts

1. Open the Mail app.

2. Click the gear-style icon at the bottom of the left panel to access Settings.

3. In the rollout menu, select Manage accounts.
4. Select the account you want to modify.
There’s also a shorter way to change account settings. With the Mail app open, right-click on the email account you want to modify and select Account settings.
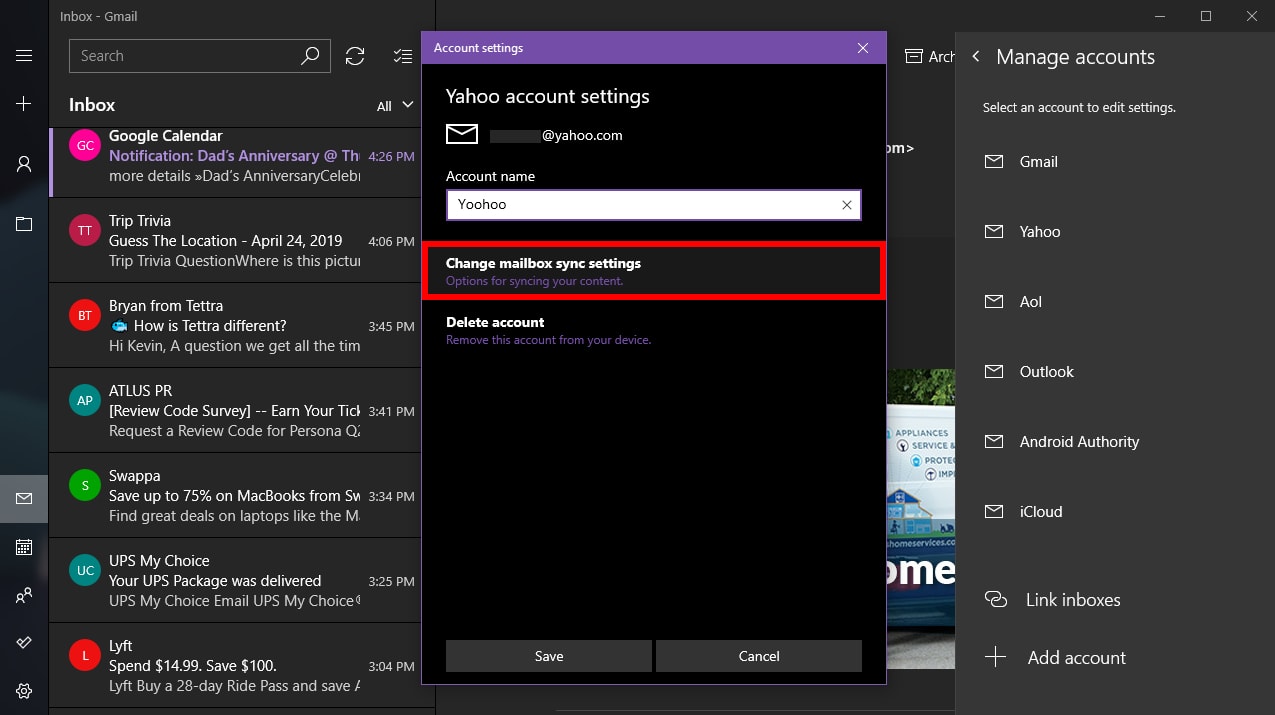
5. Insert an optional custom name for the account.
6. Click the Change mailbox sync settings option.
This section provides control over how often the app checks for mail, when it downloads new content, and other synchronization options. You can also change your account password and server settings here.
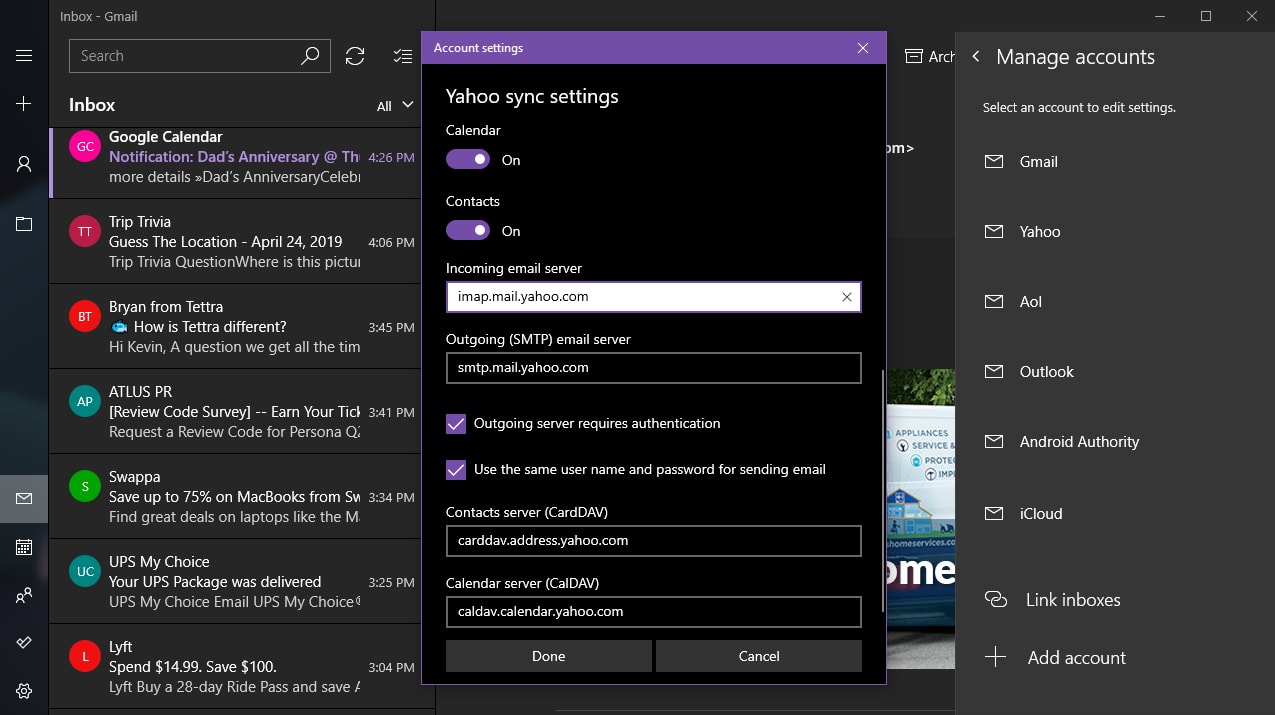
7. While remaining on the sync settings screen, scroll down and click Advanced mailbox settings. Additional settings will appear:
- Incoming mail server
- Outgoing mail server
- Contacts server
- Calendar server
Click Done and then Save when complete.
A note on changing passwords
As of Version 1809, there is no way to manually change your email account password in Windows 10. For instance, if Google or Yahoo required you to update your account password, there is no direct method to change the same password in Microsoft’s Mail app. Instead, you have two options:
- Delete the account and re-add it to the Mail app.
- Wait for the Mail app to fail when checking your account. When this happens, you’ll see a yellow banner flashed across the app stating the account’s settings are out-of-date. Click the Fix account button and insert the new password on the following pop-up screen.
Delete an account

1. Open the Mail app.

2. Click the gear-style icon at the bottom of the left panel to access Settings.

3. In the rollout menu, select Manage accounts.
4. Select the account you want to delete.
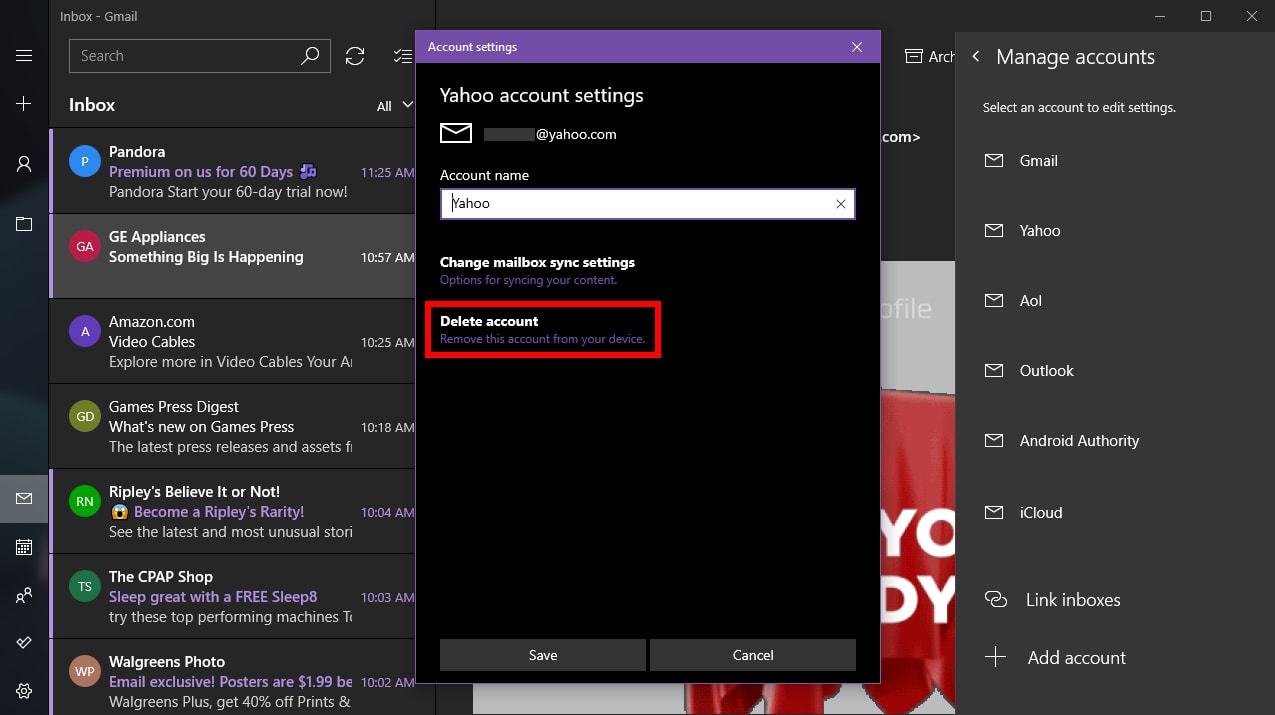
5. In the pop-up window, select Delete account.
Snooze an account
If you need to temporarily disable automatic email retrieval on a specific account, you have two options.

1. Open the Mail app.

2. Click the gear-style icon at the bottom of the left panel to access Settings.

3. In the rollout menu, select Manage accounts.
4. Select the account you want to snooze.

5. In the pop-up window, select Change mailbox sync settings.
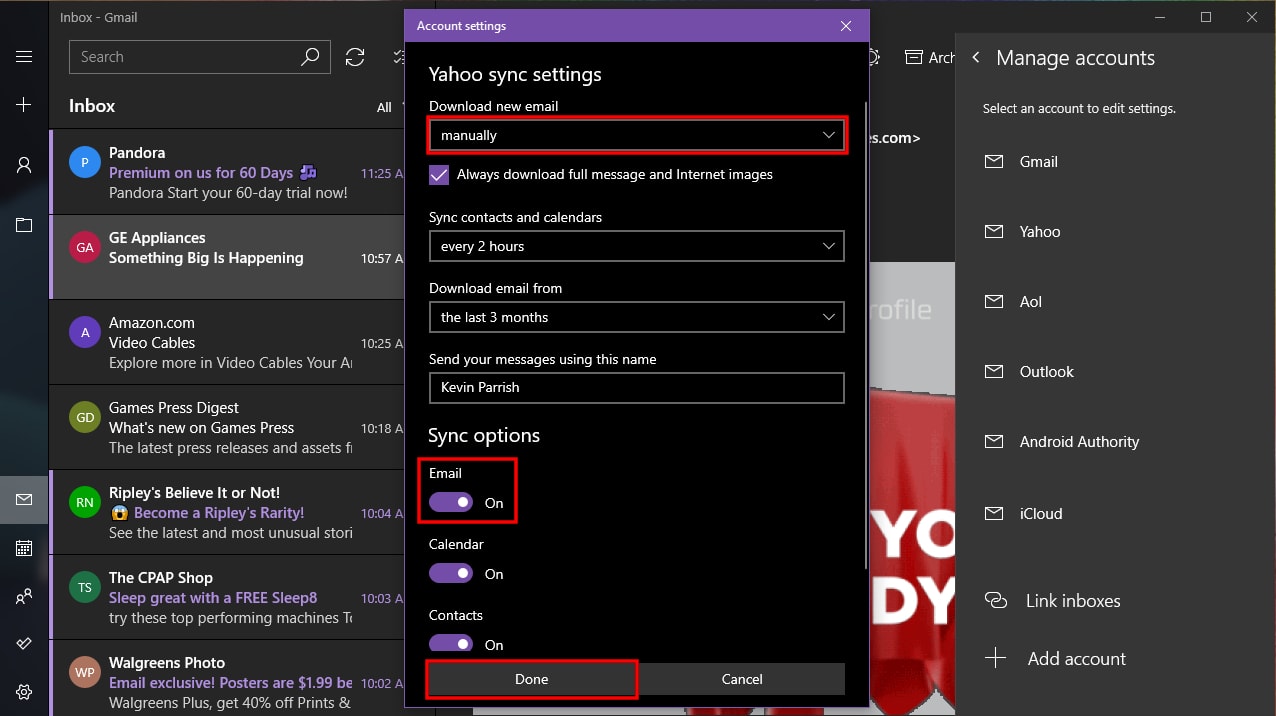
6. On the Download new email drop-down menu, select Manually. This turns off automatic email retrieval but retains the emails you already downloaded in the Mail app.
7. A second option is to toggle off Email synchronization, but this de-lists the account and you won’t have access to the downloaded email. These emails aren’t deleted from your PC, just made unavailable.
General use
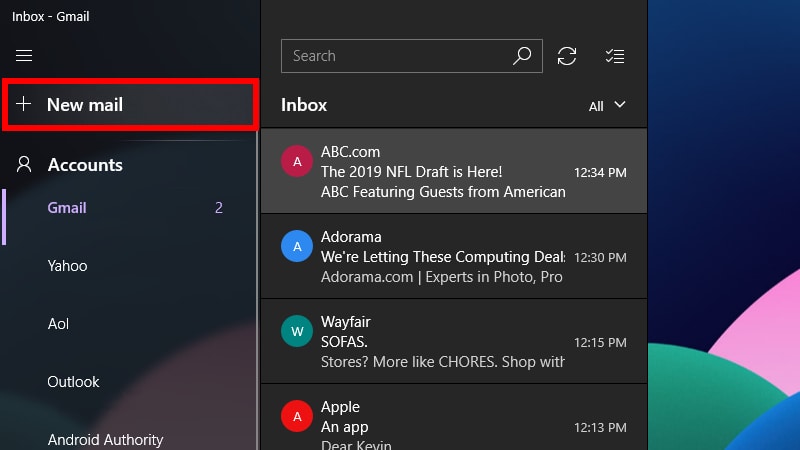
1. To create a new message, highlight the source account and click New mail.
2. In the new message window, select Format for text-based options like italics, bold font, and more.
3. The Insert option allows you to add files, pictures, links, emoji, and tables.
4. The Draw option supports touch-based input, virtual pen widths, pen colors, and a drawing canvas.
5. The Options category allows you to set the email to High Priority, check your spellings, and more.
6. When complete, hit the Send button in the top-right corner.
Add a signature

1. Open the Mail app.

2. Click the gear-style icon at the bottom of the left panel to access Settings.
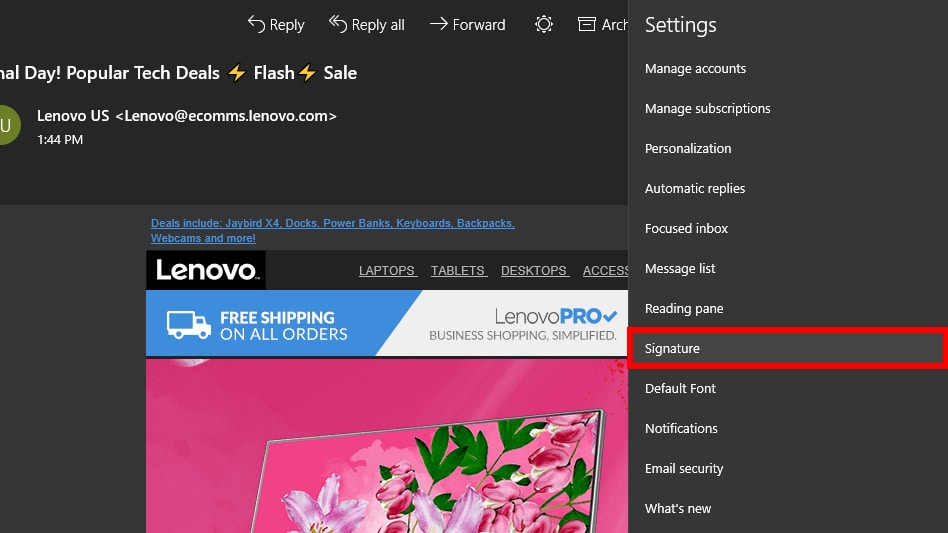
3. On the roll-out Settings panel, select Signature.
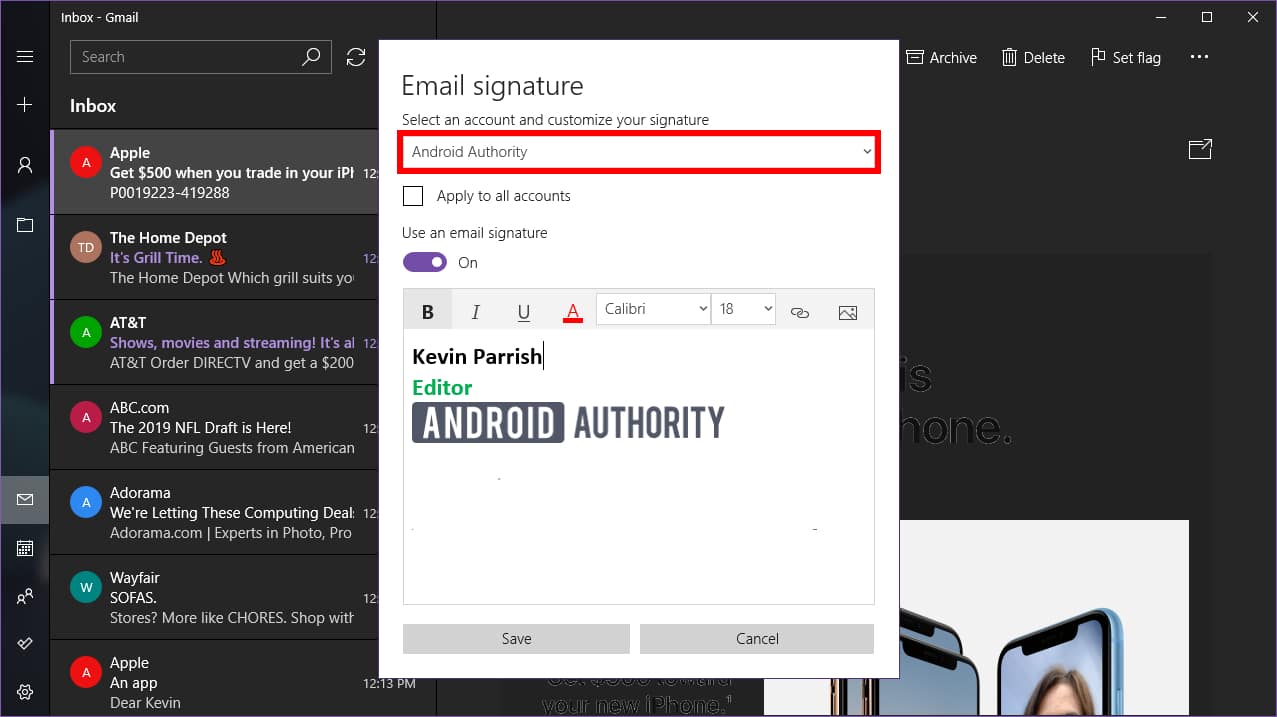
4. In the resulting window, select the source email account that will use the signature.
5. Make sure the Use an email signature slider is blue (on).
6. Enter your custom text in the what-you-see-is-what-you-get field.
Based on Windows 10 version 1809, you cannot use HTML script as a signature. Instead, you must build a signature from scratch. However, you can change the font face and size, insert links and images.
7. If you want to use the same signature across all email accounts, check the Apply to all accounts option.
8. Click the Save button.
Change notifications

1. Open the Mail app.

2. Click the gear-style icon at the bottom of the left panel to access Settings.
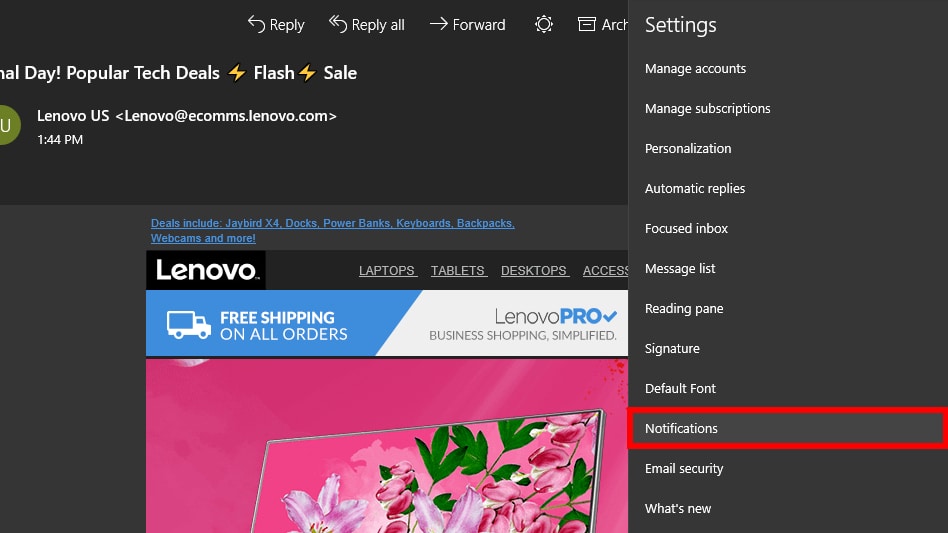
3. On the roll-out Settings panel, select Notifications.
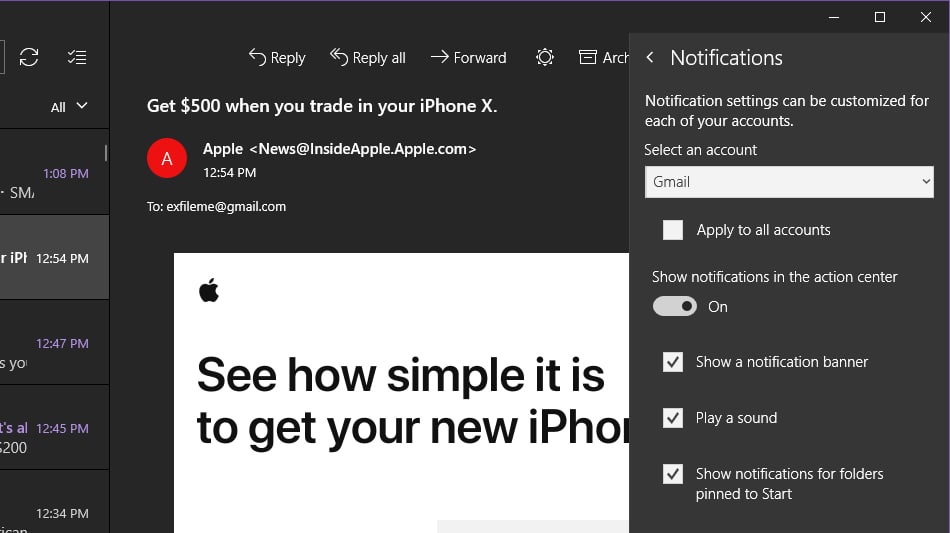
4. On the roll-out Notifications panel, select the account you want to modify.
5. Toggle on or off the Show notifications in the action center option.
6. Check or uncheck banners, sounds, and notifications for folders.
If you simply want to turn off notifications for a specific email account, right-click on the account in the Mail app’s Accounts menu and select Turn off notifications. Repeat this set to turn on notifications.
Enable / disable grouped conversations
“Conversation” is a grouping mechanism that crams all emails stemming from a specific subject into one long message thread. For instance, if you’re emailing and receiving responses from multiple people about a specific topic, everything is crammed together into one entry in your inbox. This tidies up your inbox so there’s less to navigate. Conversations are toggled on by default, but you can easily disable this feature and return to your cluttered old-school email ways.

1. Open the Mail app.

2. Click the gear-style icon at the bottom of the left panel to access Settings.
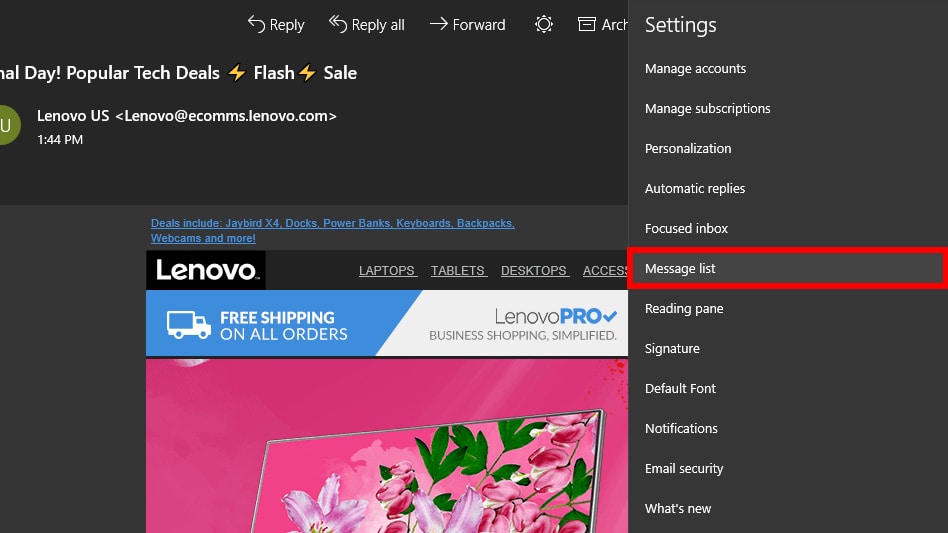
3. On the roll-out Settings panel, select Message list.
4. Select the email account you want to modify.
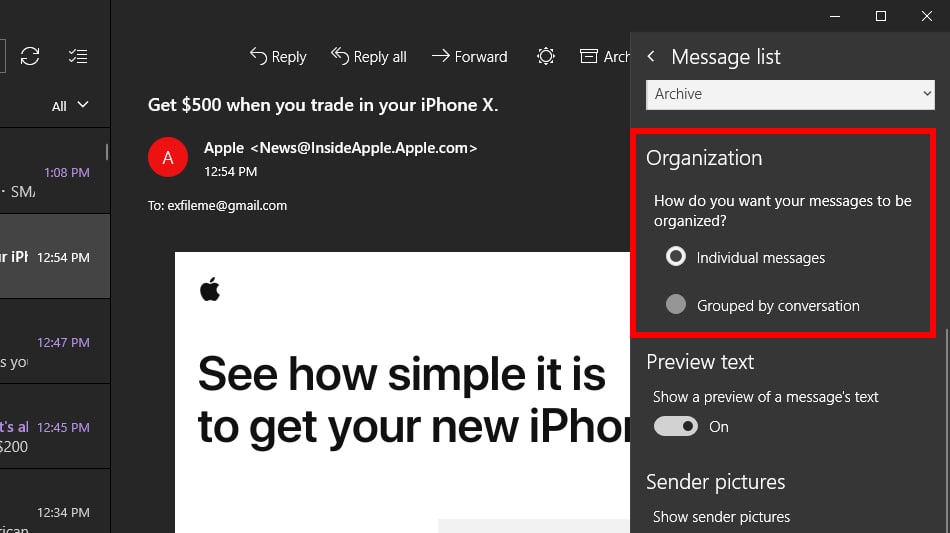
5. Scroll down to Organization.
6. Select Individual messages to turn off grouped conversations or select Grouped by conversation to enable the feature.
Enable / disable Focused inbox (Outlook only)
Here’s another email filter you may find annoying. With Focused inbox, the Mail app splits your Outlook email into two tabs: Focused and Other. Emails deemed “important” fall under the Focused tab while everything gets dumped into the Other group. This filtering system doesn’t always work correctly despite its good intentions.

1. Open the Mail app.

2. Click the gear-style icon at the bottom of the left panel to access Settings.
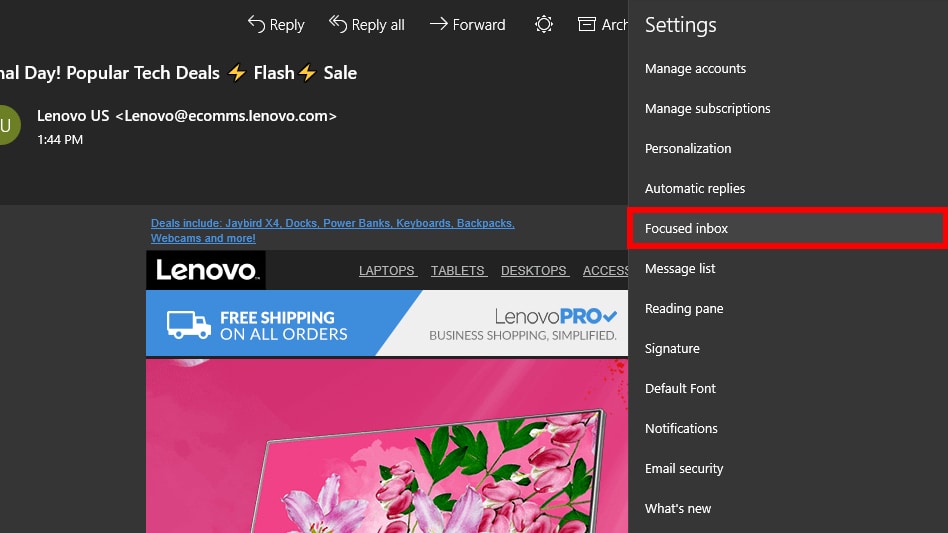
3. On the roll-out Settings panel, select Focused inbox.
4. Select the email account you want to modify.
5. Toggle on or off the Sort messages into Focused and Other option.
Enable / disable automatic replies (Outlook only)

1. Open the Mail app.

2. Click the gear-style icon at the bottom of the left panel to access Settings.
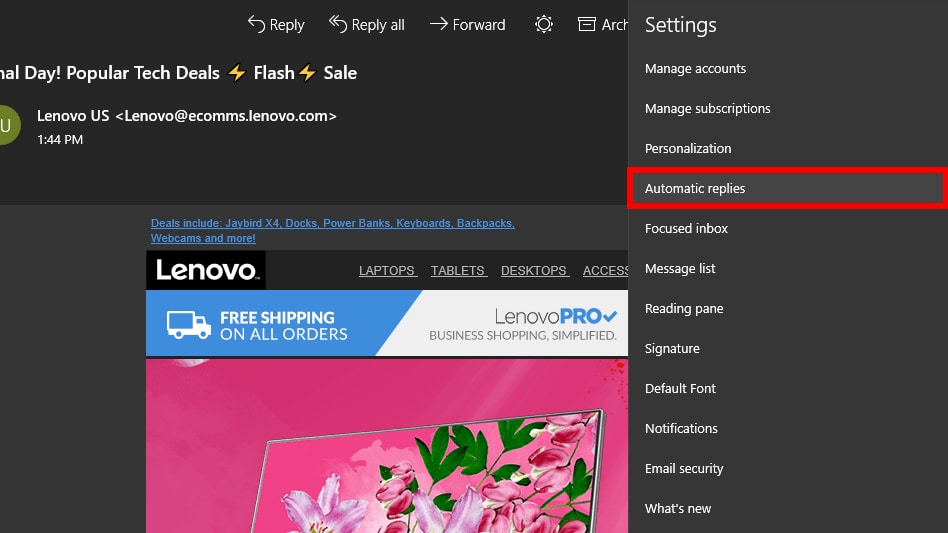
3. On the roll-out Settings panel, select Automatic replies.
4. Select a compatible account.
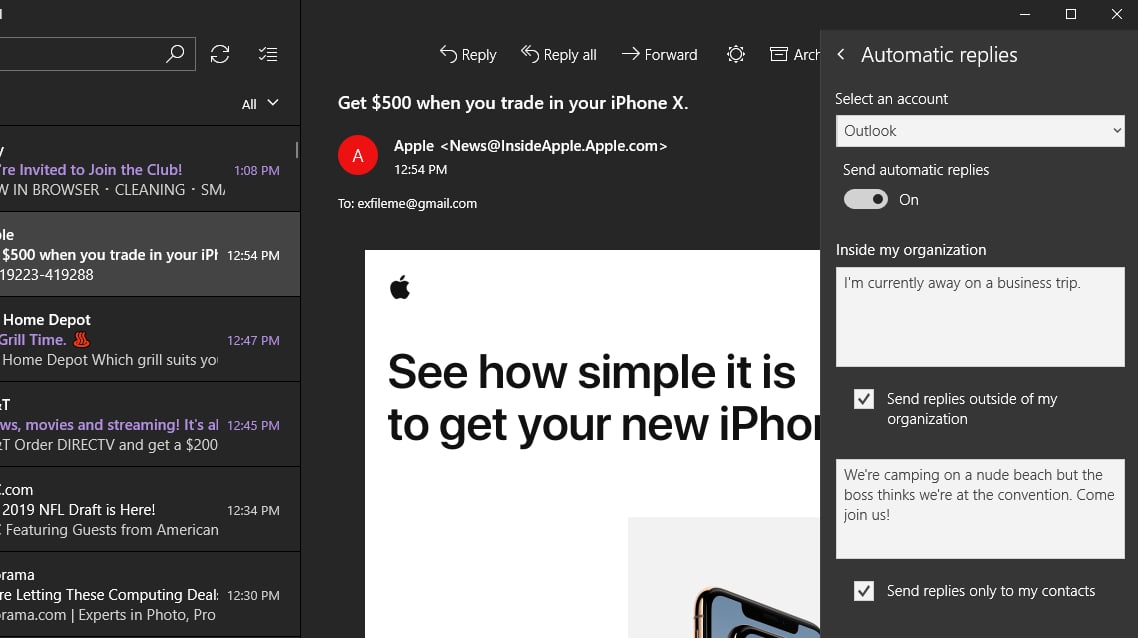
5. Toggle on/off the Send automatic replies setting.
6. If toggled on, you can set an automatic response delivered within your organization.
7. Click the Send replies outside of my organization to set a second message for everyone outside your organization.
8. Click the Send replies only to my contacts option if you don’t want strangers knowing you’re baking on a nude beach for the week.
Personalize the Mail app

1. Open the Mail app.

2. Click the gear-style icon at the bottom of the left panel to access Settings.
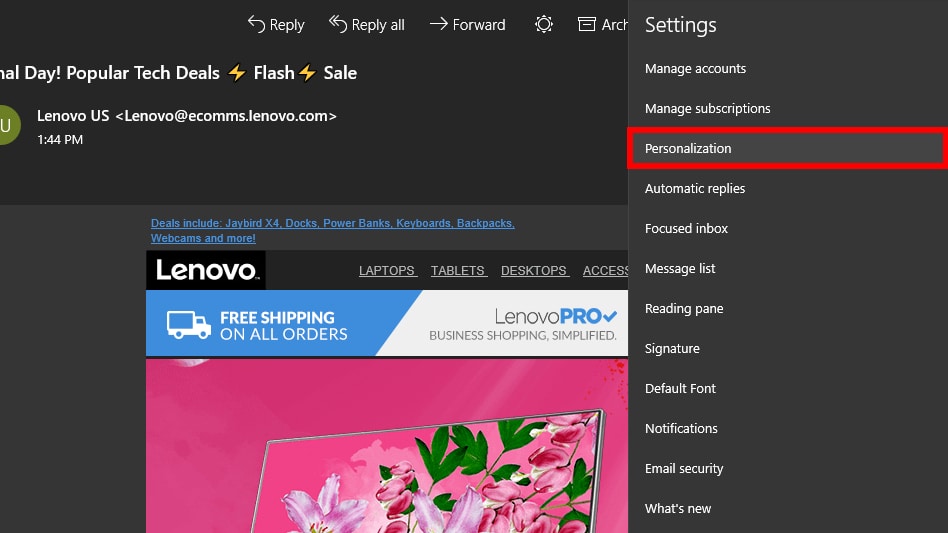
3. On the roll-out Settings panel, select Personalization.
4. Change your accent color.
5. Switch between Light, Dark, and Windows mode.
6. Switch between Spacious, Medium, and Compact folder and message spacing.
7. Toggle on the Background feature and select an image to fill the entire app window background. Click Browse to search for a custom image.
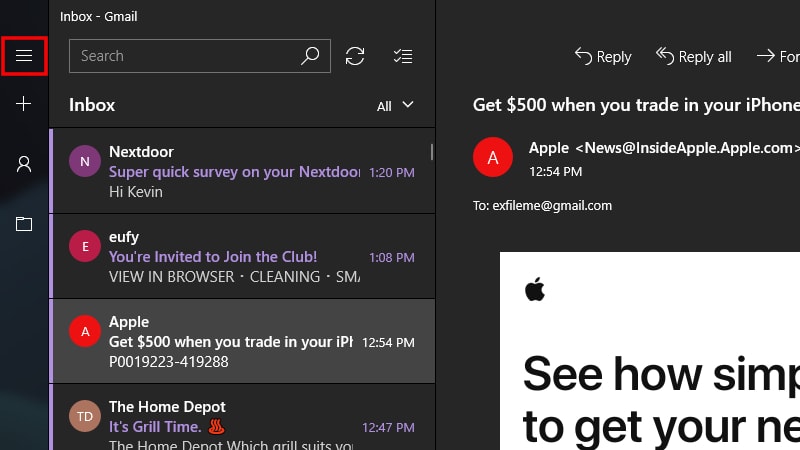
8. To collapse the Accounts menu, click the three-line icon in the top-left corner. This is ideal when using the Mail app out in public. Click it again to expand the Accounts menu.
Modify the reading pane

1. Open the Mail app.

2. Click the gear-style icon at the bottom of the left panel to access Settings.
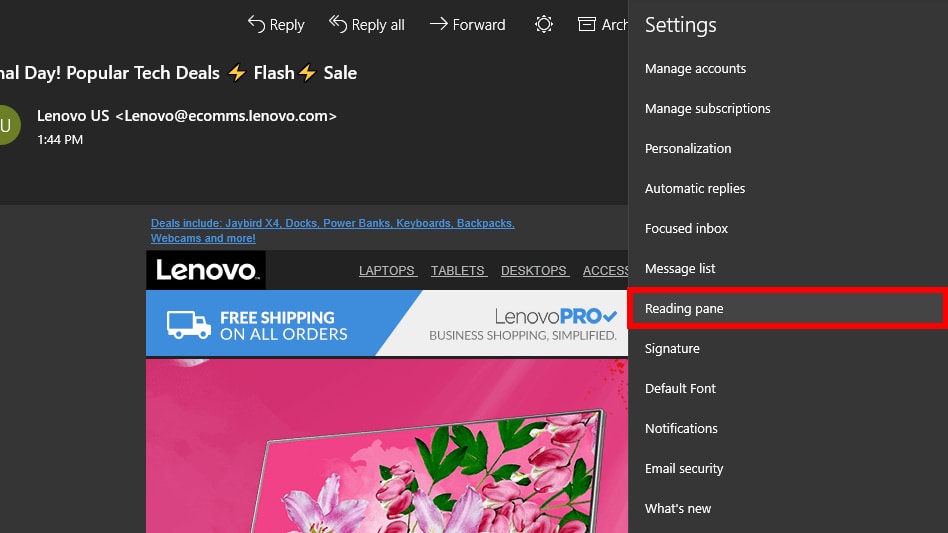
3. On the roll-out Settings panel, select Reading pane.
Here you can do the following:
- Enable or disable auto-opening the next email.
- Determine when emails are marked as read.
- Toggle on and off caret browsing. This has nothing to do with grazing for carrots. It’s a cool feature that lets you move the cursor with the arrow keys within an email and select text like a standard document.
- Disable and enable automatic downloads of external images and style formats.
Access iCloud mail with 2-step security turned on
1. Log in to your Apple ID account.
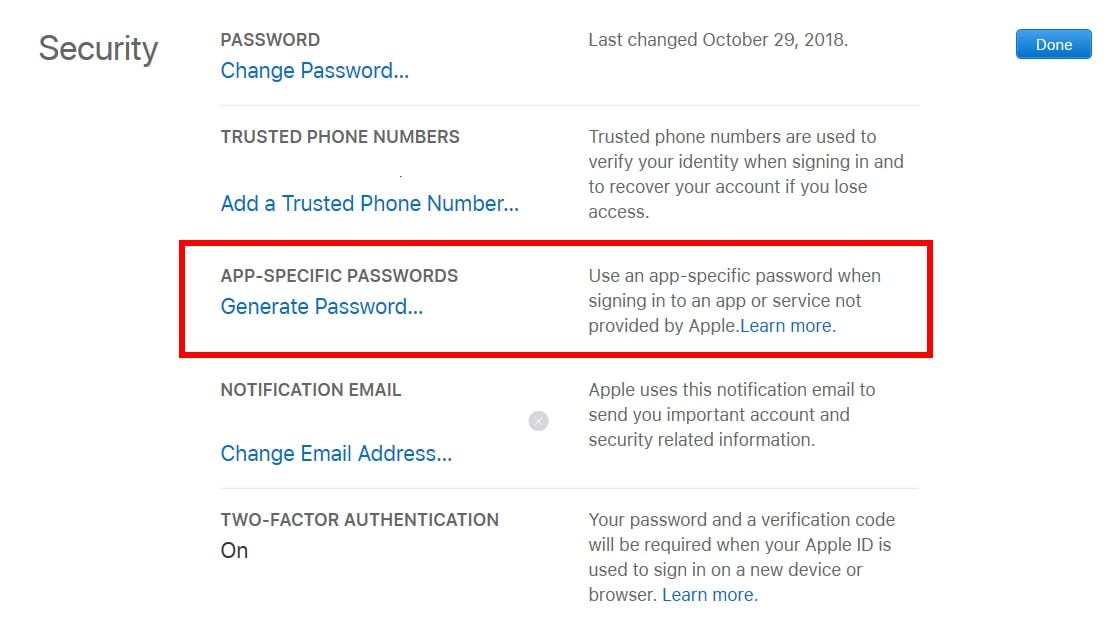
2. Scroll down to the Security section and click the Edit button.
3. Under App-Specific Passwords, click Generate Password.
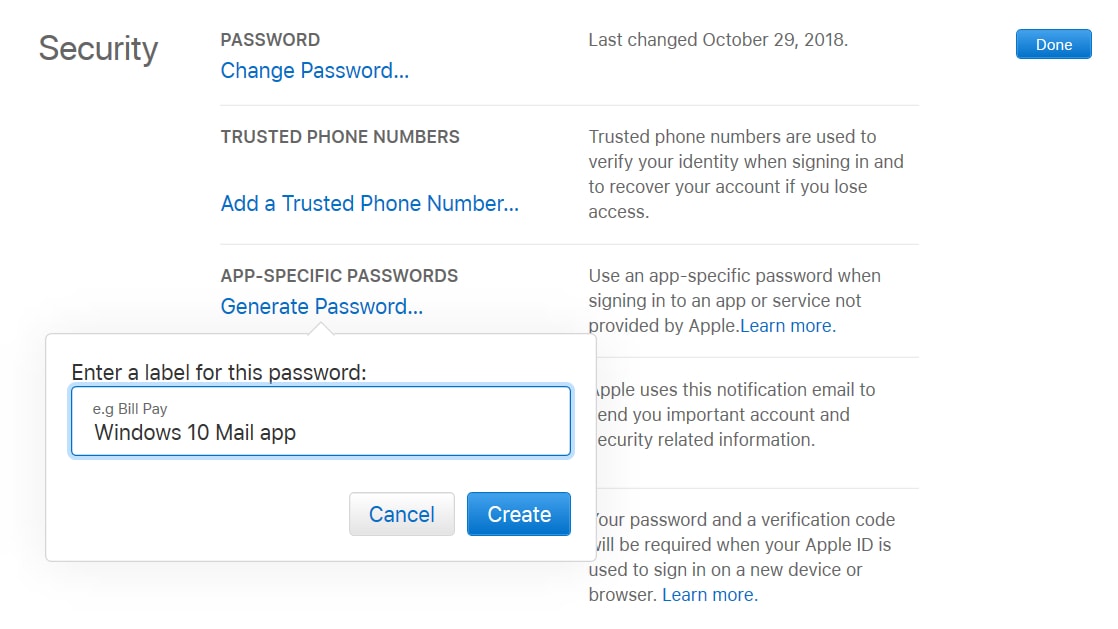
4. In a pop-up window, enter a label for the new password.
5. Click the Create button.
6. Copy the password as-is and click the Done button.
7. Open the Windows 10 Mail app and follow the steps to create a new iCloud account.
8. Instead of using your Apple ID password, use the new app-specific password.
9. Click the Save button.
Reset the Mail app
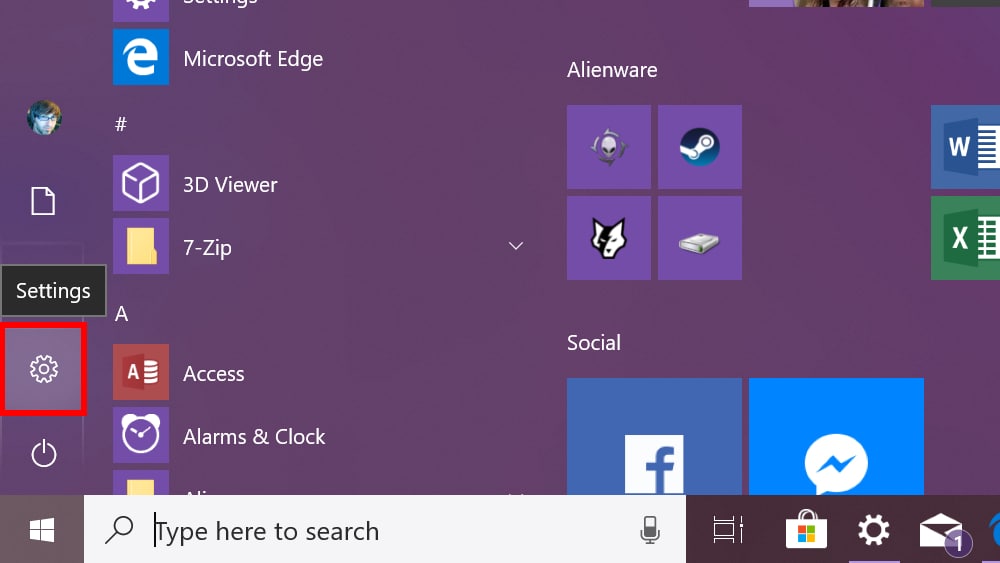
1. Click the Start button.
2. On the Start Menu, click the gear-style icon to open the Settings app.
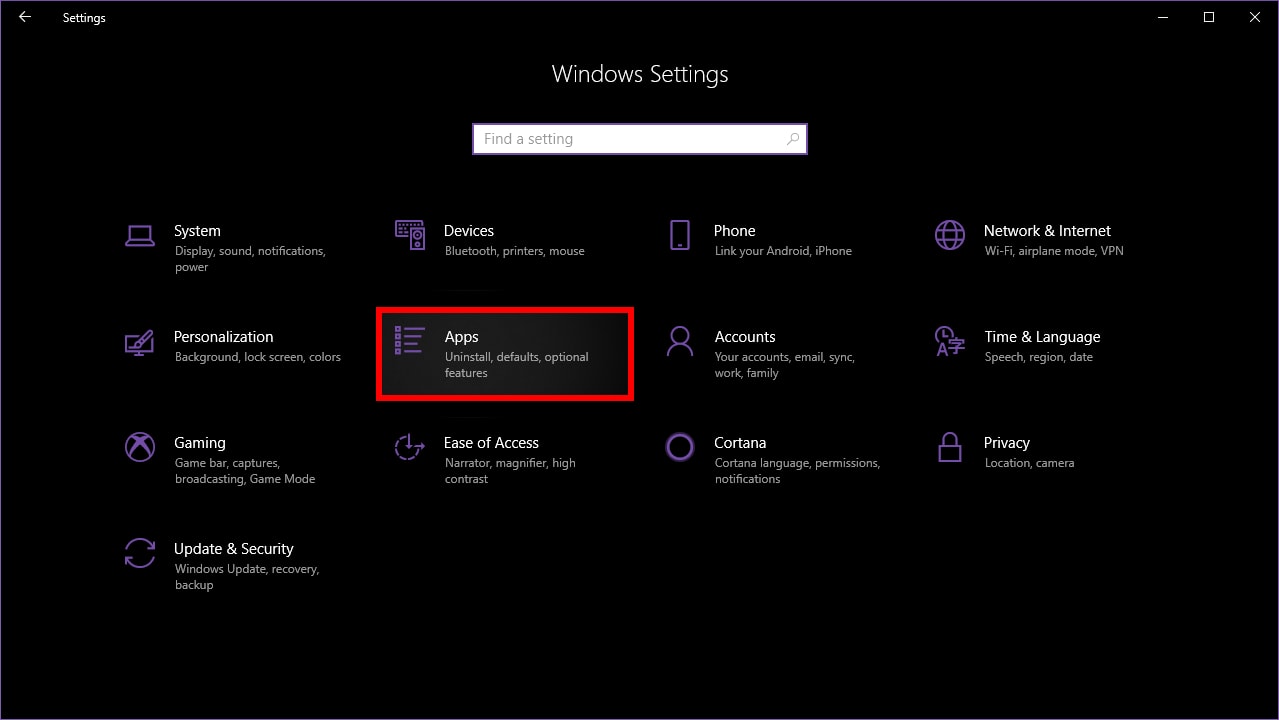
3. Select Apps.
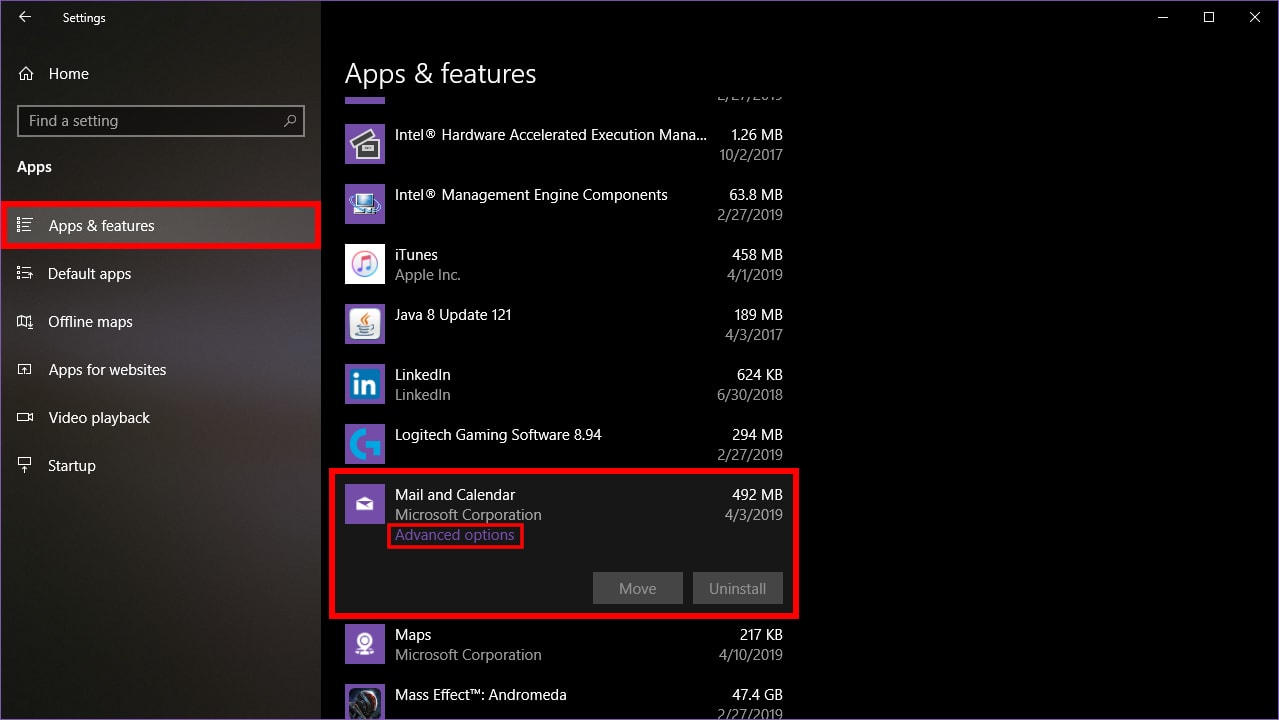
4. The Apps & features section loads by default. Scroll down and click the Mail and Calendar app.
5. Click the Advanced options link.
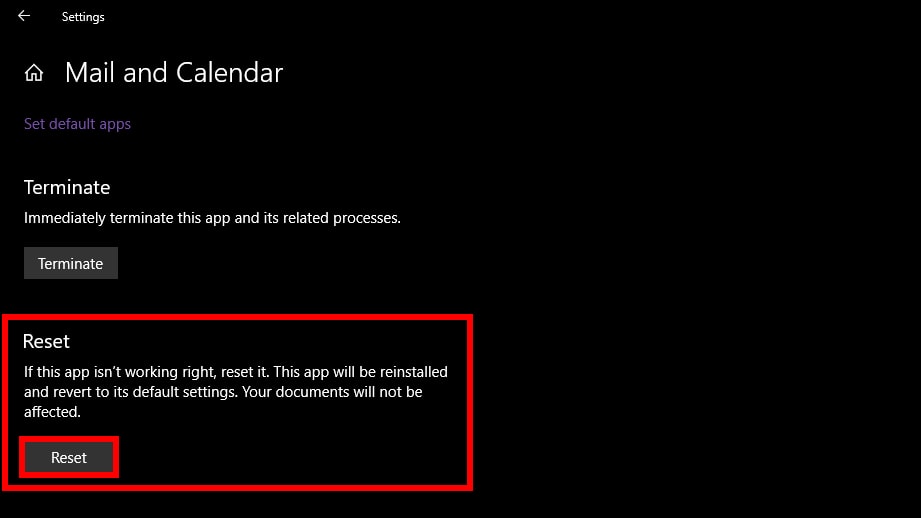
6. In the following window, scroll down to Reset and click the Reset button.
7. Click a second Reset button to confirm.
That concludes our guide on how to use the Mail app in Windows 10. For more Windows 10 fun, check out these guides: