Affiliate links on Android Authority may earn us a commission. Learn more.
Improve your app's UI with animations

Animations can add visual cues that notify users about what’s going on in your app and improve their understanding of its interface. Animations are useful when loading content, or when a screen changes state. They can also add a glossy look to your app, which gives it a higher quality feel.
Animations are not necessarily meant to make your app pretty. They are meant to grab the attention of the user and enhance their experience. With thousands of applications available for download every day, yours will only stand a chance if it’s not boring or unpleasant to users.
Some of the reasons for incorporating animations into your application include:
- To engage users – Animations can keep a user engaged before the content fully loads. This will prevent users from abandoning your app. Gmail is a good example of this. It uses animation in its pull-to-refresh feature and a spinner for loading new emails.
- Give feedback – Animations can give visual feedback that shows a certain event or action has been completed or to show the site is not working properly. Animations can be used in buttons, tabs and other elements to inform users of their current state especially in e-commerce applications.
- To help users in navigation – This can be beneficial especially if the content keeps changing. For example, animated scrolling can be used to show a transition between tabs and menu items. Most apps will have introductory slide screens for showcasing the application’s most important features or to simply explain to the user what the app does.
Here is how you can implement some of these animations in your app to improve the user experience.
Introduction Slider
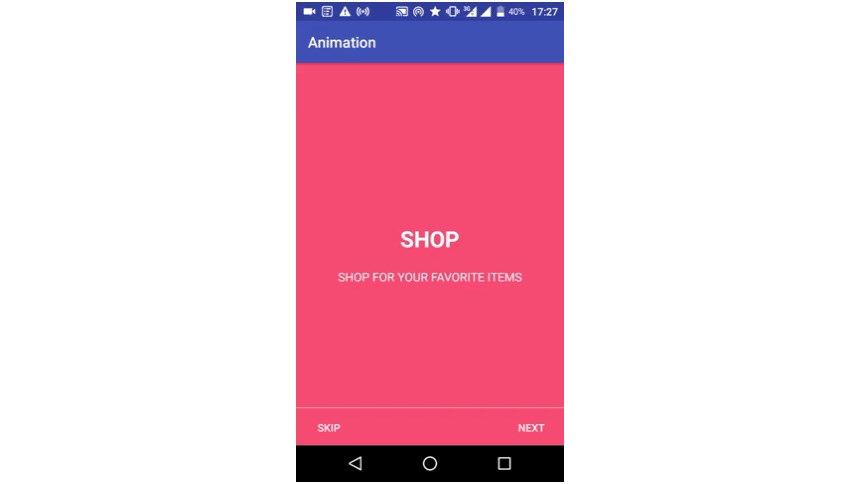
This is meant to showcase the different features of your application. Users will be able to navigate through the screens using swipe gestures or they can skip the introduction and go to the main application.
The introduction slider should be shown only when the app is launched for the first time. Subsequent launches should direct the user to the main screen. We are going to have three slides in our application to show the user the three most important aspects of our application.
The final result should look like this:

Add this XML to a new file called slide.xml:
<?xml version="1.0" encoding="utf-8"?>
<RelativeLayout xmlns:android="http://schemas.android.com/apk/res/android"
    android:layout_width="match_parent"
    android:layout_height="match_parent"
    android:background="#f64c73">
    <LinearLayout
        android:layout_width="wrap_content"
        android:layout_height="wrap_content"
        android:layout_centerInParent="true"
        android:gravity="center_horizontal"
        android:orientation="vertical">

        <TextView
            android:layout_width="wrap_content"
            android:layout_height="wrap_content"
            android:text="@string/shop"
            android:textColor="@android:color/white"
            android:textSize="30dp"
            android:textStyle="bold" />
        <TextView
            android:layout_width="wrap_content"
            android:layout_height="wrap_content"
            android:layout_marginTop="20dp"
            android:paddingLeft="40dp"
            android:paddingRight="40dp"
            android:text="@string/slide_1_title"
            android:textAlignment="center"
            android:textColor="@android:color/white"
            android:textSize="16dp" />
    </LinearLayout>
</RelativeLayout>
And this to slide2.xml:
<?xml version="1.0" encoding="utf-8"?>
<RelativeLayout xmlns:android="http://schemas.android.com/apk/res/android"
    android:layout_width="match_parent"
    android:layout_height="match_parent"
    android:background="#f64c73">
    <LinearLayout
        android:layout_width="wrap_content"
        android:layout_height="wrap_content"
        android:layout_centerInParent="true"
        android:gravity="center_horizontal"
        android:orientation="vertical">
        <TextView
            android:layout_width="wrap_content"
            android:layout_height="wrap_content"
            android:text="@string/earn"
            android:textColor="@android:color/white"
            android:textSize="30dp"
            android:textStyle="bold" />
        <TextView
            android:layout_width="wrap_content"
            android:layout_height="wrap_content"
            android:layout_marginTop="20dp"
            android:paddingLeft="40dp"
            android:paddingRight="40dp"
            android:text="@string/slide_1_title"
            android:textAlignment="center"
            android:textColor="@android:color/white"
            android:textSize="16dp" />
    </LinearLayout>
</RelativeLayout>
And in slide3.xml:
<?xml version="1.0" encoding="utf-8"?>
<RelativeLayout xmlns:android="http://schemas.android.com/apk/res/android"
    android:layout_width="match_parent"
    android:layout_height="match_parent"
    android:background="#f64c73">
    <LinearLayout
        android:layout_width="wrap_content"
        android:layout_height="wrap_content"
        android:layout_centerInParent="true"
        android:gravity="center_horizontal"
        android:orientation="vertical">
        <TextView
            android:layout_width="wrap_content"
            android:layout_height="wrap_content"
            android:text="@string/redeem"
            android:textColor="@android:color/white"
            android:textSize="30dp"
            android:textStyle="bold" />
        <TextView
            android:layout_width="wrap_content"
            android:layout_height="wrap_content"
            android:layout_marginTop="20dp"
            android:paddingLeft="40dp"
            android:paddingRight="40dp"
            android:text="@string/slide_1_title"
            android:textAlignment="center"
            android:textColor="@android:color/white"
            android:textSize="16dp" />
    </LinearLayout>
</RelativeLayout>
Next, we are going to design the welcome screen. Create another activity (activity_welcome.xml) and add the following to the XML file:
<?xml version="1.0" encoding="utf-8"?>
<RelativeLayout xmlns:android="http://schemas.android.com/apk/res/android"
    xmlns:tools="http://schemas.android.com/tools"
    android:layout_width="match_parent"
    android:layout_height="match_parent">
    <android.support.v4.view.ViewPager
        android:id="@+id/view_pager"
        android:layout_width="match_parent"
        android:layout_height="match_parent" />
    <LinearLayout
        android:id="@+id/welcomeLayout"
        android:layout_width="match_parent"
        android:layout_height="30dp"
        android:layout_alignParentBottom="true"
        android:layout_marginBottom="20dp"
        android:gravity="center"
        android:orientation="horizontal"></LinearLayout>
    <View
        android:layout_width="match_parent"
        android:layout_height="1dp"
        android:alpha=".5"
        android:layout_above="@id/welcomeLayout"
        android:background="@android:color/white" />
    <Button
        android:id="@+id/btn_next"
        android:layout_width="wrap_content"
        android:layout_height="wrap_content"
        android:layout_alignParentBottom="true"
        android:layout_alignParentRight="true"
        android:background="@null"
        android:text="@string/next"
        android:textColor="@android:color/white" />
    <Button
        android:id="@+id/btn_skip"
        android:layout_width="wrap_content"
        android:layout_height="wrap_content"
        android:layout_alignParentBottom="true"
        android:layout_alignParentLeft="true"
        android:background="@null"
        android:text="@string/skip"
        android:textColor="@android:color/white" />
</RelativeLayout>
The XML file contains a view pager responsible for the swipe actions and buttons, which take the user to the next (or back to the previous) screen. You will also need the strings.xml for the definitions like “@string/redeem” etc.
<resources>
    <string name="app_name">Animation</string>
    <string name="title_activity_welcome">Home Screen</string>
    <string name="next">NEXT</string>
    <string name="skip">SKIP</string>
    <string name="start">GOT IT</string>
    <string name="shop">SHOP</string>
    <string name="earn">EARN</string>
    <string name="redeem">REDEEM POINTS</string>
    <string name="slide_1_title">SHOP FOR YOUR FAVORITE ITEMS</string>
</resources>
As I mentioned at the beginning of this tutorial, the welcome screen should only be shown the first time the application is launched. To achieve this, create a class named PrefManager.java and call setFirstTimeLaunch(true) when the app is launched for the first time.
package com.example.vaatiesther.animation;
import android.content.Context;
import android.content.SharedPreferences;
/**
 * Created by vaatiesther on 11/8/17.
 */
public class PrefManager {
    SharedPreferences preferences;
    SharedPreferences.Editor editor;
    Context _context;
    int PRIVATE_MODE = 0;

    private static final String PREF_NAME = "welcome";
    private static final String IS_FIRST_TIME_LAUNCH = "IsFirstTimeLaunch";
    public PrefManager(Context context) {
        this._context = context;
        preferences = _context.getSharedPreferences(PREF_NAME, PRIVATE_MODE);
        editor = preferences.edit();
    }

    public void setFirstTimeLaunch(boolean isFirstTime) {
        editor.putBoolean(IS_FIRST_TIME_LAUNCH, isFirstTime);
        editor.commit();
    }

    public boolean isFirstTimeLaunch() {
        return preferences.getBoolean(IS_FIRST_TIME_LAUNCH, true);
    }
}
Lastly, add the following code to WelcomeActivity.java:
package com.example.vaatiesther.animation;
import android.support.v7.app.AppCompatActivity;
import android.os.Bundle;
import android.content.Context;
import android.content.Intent;
import android.support.v4.view.PagerAdapter;
import android.support.v4.view.ViewPager;
import android.view.LayoutInflater;
import android.view.View;
import android.view.ViewGroup;
import android.widget.Button;
import android.widget.LinearLayout;
public class WelcomeActivity extends AppCompatActivity {
    private ViewPager viewPager;
    private PrefManager prefManager;
    private MyViewPagerAdapter myViewPagerAdapter;
    private int[] layouts;
    private LinearLayout welcomeLayout;
    private Button btnSkip, btnNext;
    @Override
    protected void onCreate(Bundle savedInstanceState) {
        super.onCreate(savedInstanceState);
        // Checking for first time launch - before calling setContentView()
        prefManager = new PrefManager(this);
        if (!prefManager.isFirstTimeLaunch()) {
            launchHomeScreen();
            finish();
        }
        setContentView(R.layout.activity_welcome);
        viewPager = (ViewPager) findViewById(R.id.view_pager);
        welcomeLayout = (LinearLayout) findViewById(R.id.welcomeLayout);
        btnSkip = (Button) findViewById(R.id.btn_skip);
        btnNext = (Button) findViewById(R.id.btn_next);
        //add welcome slide layouts
        layouts = new int[]{
                R.layout.slide1,
                R.layout.slide2,
                R.layout.slide3};
        myViewPagerAdapter = new MyViewPagerAdapter();
        viewPager.setAdapter(myViewPagerAdapter);
        viewPager.addOnPageChangeListener(viewPagerPageChangeListener);
        btnSkip.setOnClickListener(new View.OnClickListener() {
            @Override
            public void onClick(View v) {
                launchHomeScreen();
            }
        });
        btnNext.setOnClickListener(new View.OnClickListener() {
            @Override
            public void onClick(View v) {
                // checking for last page
                // if last page home screen will be launched
                int current = getItem(+1);
                if (current < layouts.length) {
                    // move to the next screen
                    viewPager.setCurrentItem(current);
                } else {
                    launchHomeScreen();
                }
            }
        });
    }
    private int getItem(int i) {
        return viewPager.getCurrentItem() + i;
    }
    private void launchHomeScreen() {
        prefManager.setFirstTimeLaunch(false);
        startActivity(new Intent(WelcomeActivity.this, MainActivity.class));
        finish();
    }
    //  viewpager change listener
    ViewPager.OnPageChangeListener viewPagerPageChangeListener =
                               new ViewPager.OnPageChangeListener() {
        @Override
        public void onPageSelected(int position) {
            // changing the next button text 'NEXT' / 'GOT IT'
            if (position == layouts.length - 1) {
                // for the last page, make button text to GOT IT
                btnNext.setText(getString(R.string.start));
                btnSkip.setVisibility(View.GONE);
            } else {
                // still pages are left
                btnNext.setText(getString(R.string.next));
                btnSkip.setVisibility(View.VISIBLE);
            }
        }
        @Override
        public void onPageScrolled(int arg0, float arg1, int arg2) {
        }
        @Override
        public void onPageScrollStateChanged(int arg0) {
        }
    };
    /**
     * View pager adapter
     */
    public class MyViewPagerAdapter extends PagerAdapter {
        private LayoutInflater layoutInflater;
        public MyViewPagerAdapter() {
        }
        @Override
        public Object instantiateItem(ViewGroup container, int position) {
            layoutInflater = (LayoutInflater) getSystemService(Context.LAYOUT_INFLATER_SERVICE);
            View view = layoutInflater.inflate(layouts[position], container, false);
            container.addView(view);
            return view;
        }
        @Override
        public int getCount() {
            return layouts.length;
        }
        @Override
        public boolean isViewFromObject(View view, Object obj) {
            return view == obj;
        }
        @Override
        public void destroyItem(ViewGroup container, int position, Object object) {
            View view = (View) object;
            container.removeView(view);
        }
    }
}
Don’t forget to set the WelcomeActivity as the launcher in the manifest file:
<activity android:name=".WelcomeActivity">
    <intent-filter>
        <action android:name="android.intent.action.MAIN" />
        <category android:name="android.intent.category.LAUNCHER" />
    </intent-filter>
</activity>
Animating Buttons
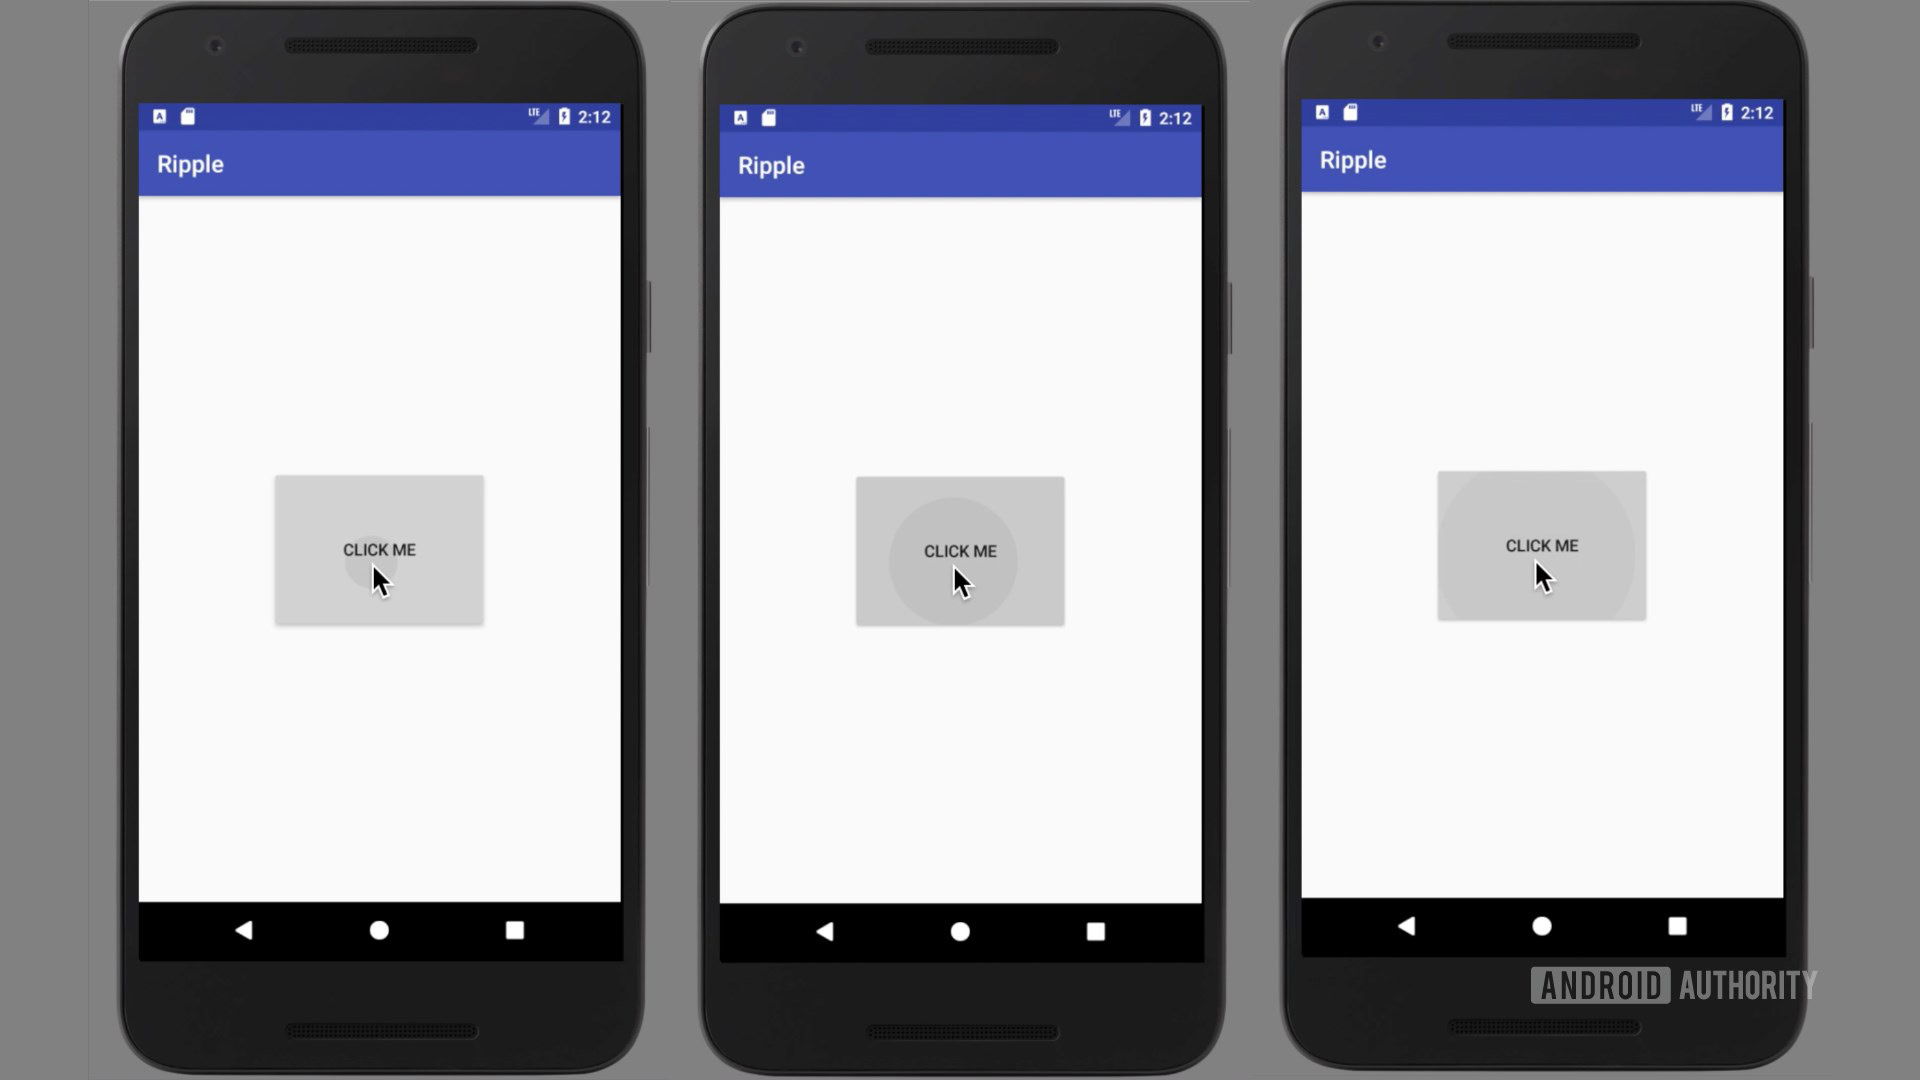
Buttons are an integral part of any application because they communicate and give feedback when clicked. Let’s see how we can animate a button to show the correct feedback after it has been pressed.
In your drawable folder, add a drawable XML (drawable/ripple.xml) file which we will use as our background for the button to achieve the ripple effect:
<?xml version="1.0" encoding="utf-8"?>
<ripple xmlns:android="http://schemas.android.com/apk/res/android"
    xmlns:tools="http://schemas.android.com/tools"
    android:color="#f816a463"
    tools:targetApi="lollipop">
    <item android:id="@android:id/mask">
        <shape android:shape="rectangle">
            <solid android:color="#f816a463" />
        </shape>
    </item>
</ripple>
Edit the button to use the ripple XML as the background, as shown below.
<Button
    android:layout_width="match_parent"
    android:layout_height="wrap_content"
    android:background="@drawable/ripple"
    android:padding="16dp"
    android:text="Click Me" />
Now our button will show ripples when touched.
Wrap-up
It is possible to add interesting and helpful animations to your app with some simple techniques. It’s worth noting that although animations are important to enhance the user experience, overusing animations or using them inappropriately can diminish the quality of experience, too.