Affiliate links on Android Authority may earn us a commission. Learn more.
Create a GPS tracking application with Firebase Realtime Database

There are many different ways that you can use location data in your Android apps. Previously, we’ve seen how you can display the user’s location on a Google Map; reverse geocode coordinates into a street address; and how to combine location data with the Places API.
All of these examples have one thing in common: the location data only ever exists locally on the user’s device. In this tutorial I’m going to show you how to record the device’s location to Firebase Realtime Database, so you can view this information remotely.
While an app that essentially acts as a GPS tracker may sound invasive, this functionality forms the basis of lots of different applications, including social apps such as Find My Friends, and safety-focused applications like Family GPS tracker. The ability to view a device’s location remotely is also essential for any app that helps reunite owners with their lost or stolen device.
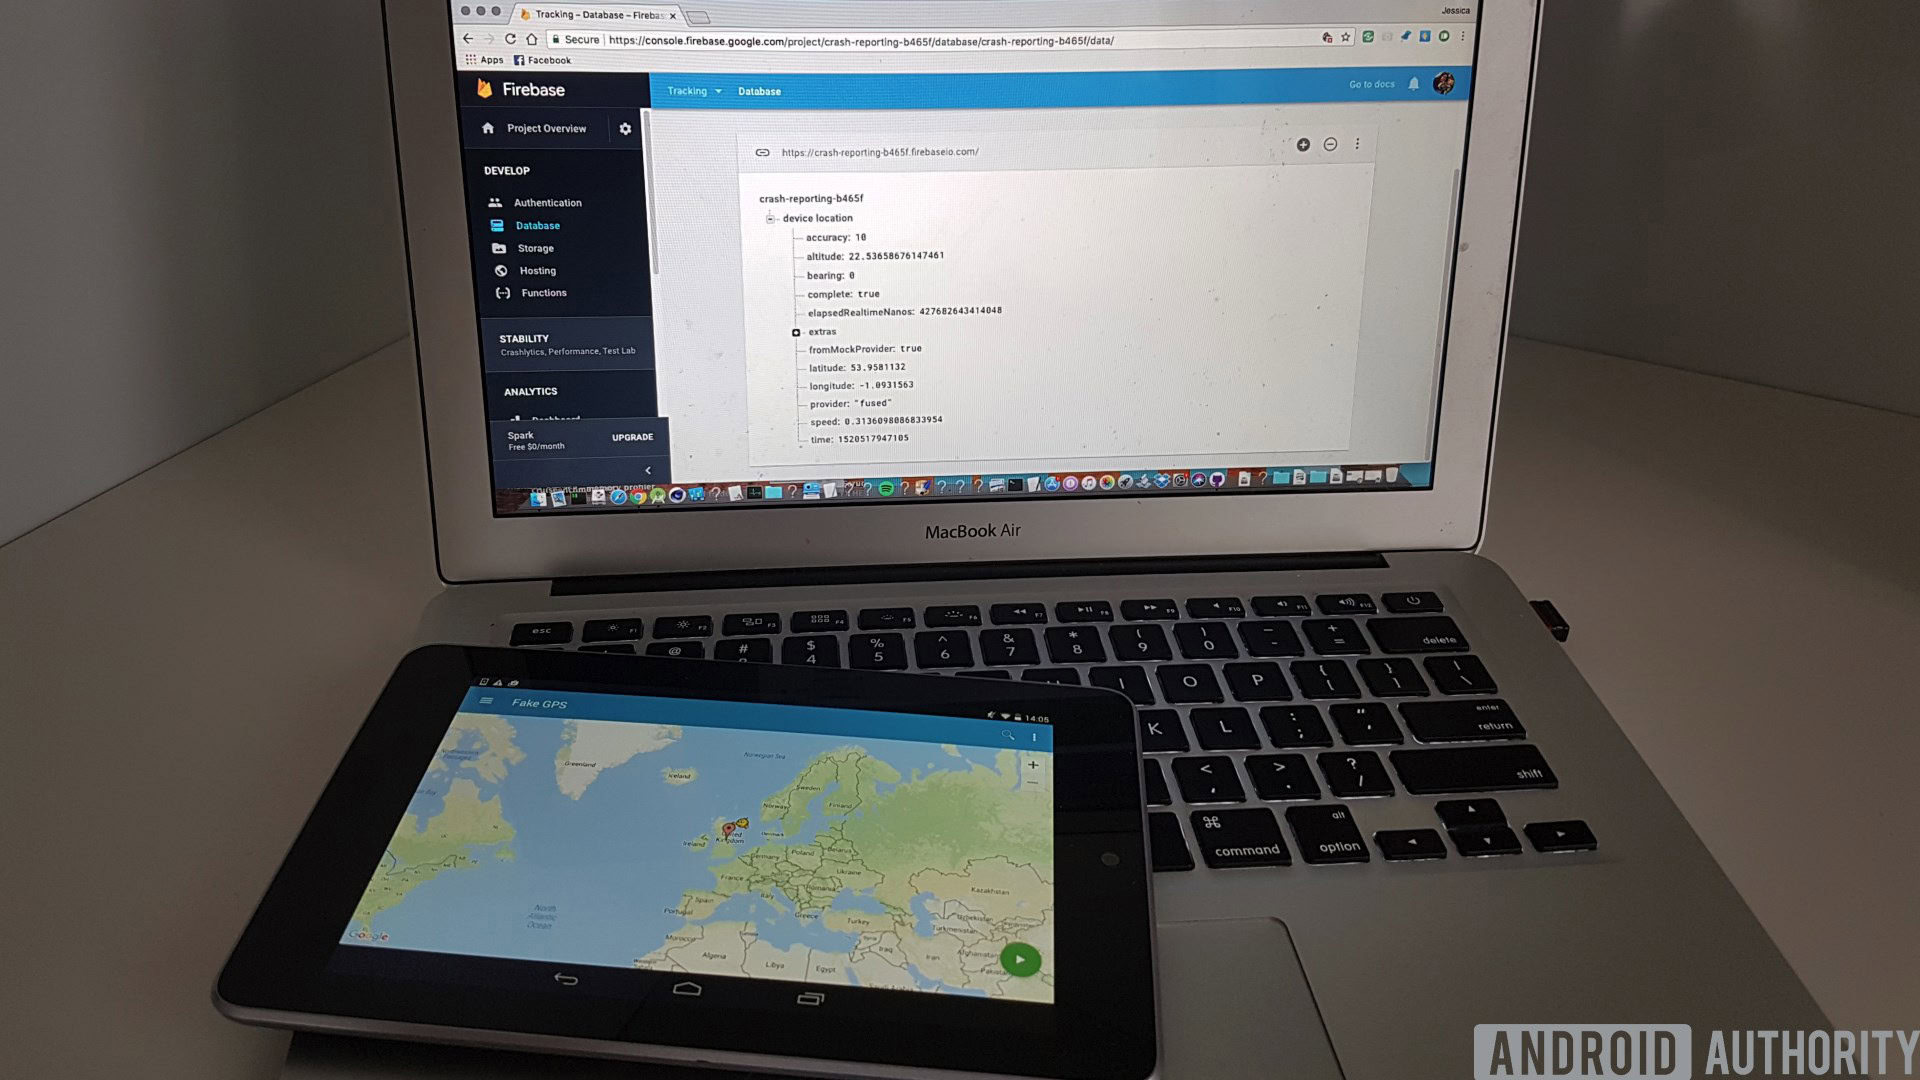
By the end of this tutorial, you’ll have created a simple app that monitors the device’s location and then records this information to a Firebase Realtime Database. Since Firebase Realtime Database receives data in, well, realtime, you’ll be able to view the device’s exact coordinates at any time, simply by logging into the Firebase Console.
Create a new Firebase project
The Firebase Realtime Database is a NoSQL, cloud-hosted database that uses data synchronization to automatically receive new information in realtime from every connected client, without requiring you to setup your own application server.
Since Realtime Database is a Firebase service, the first step is creating a connection between our project and the Firebase Console. I’m also going to register a user account in the Firebase Console, which we’ll eventually use to test our project.
- Head over to the Firebase console and select “Add project.”
- Give your project a name and then click “Create Project,” followed by “Continue.”
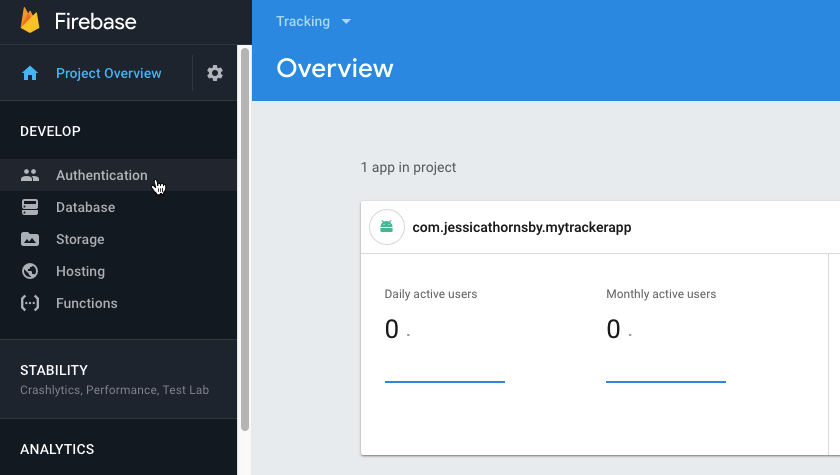
- Select “Authentication” from the left-hand menu.

- Select “Set up sign-in method.”
- Choose “Email/password” and then push the slider into the “On” position. Click “Save.”
- Select the “Users” tab and then click “Add User.”
- Enter the email and password for the test user; I’m opting for test@test.com and testpassword.
- Click “Add User.”
Connect your app to Firebase
Next, you need to connect this project to your application, and add support for both Firebase Realtime Database and Firebase Authentication.
- Create a new Android project and then open the Firebase Assistant, by selecting Tools > Firebase from the Android Studio toolbar.
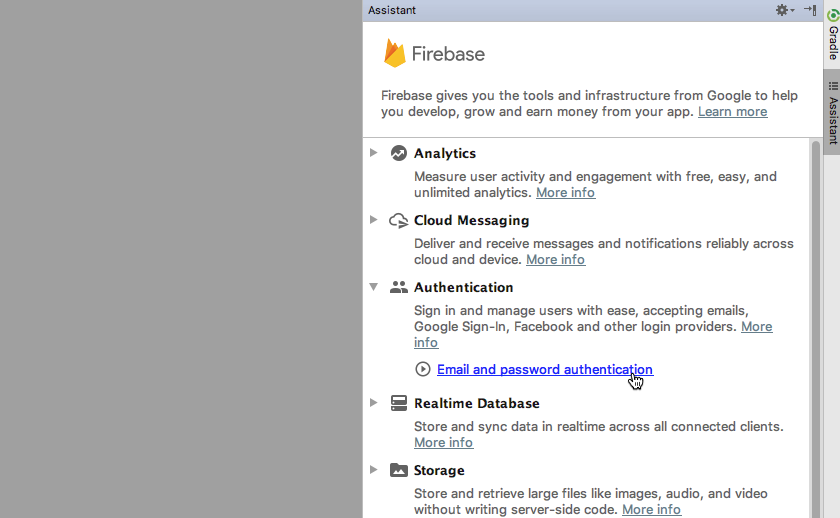
- In the Firebase Assistant, expand the “Authentication” section and then select “Email and password authentication.”

- Select “Connect to Firebase.”
- In the subsequent dialog, select “Choose an existing Firebase or Google project.”
- Select the project that you just created, and then click “Connect to Firebase.”
- Click “Add Firebase Authentication to your app.”
- Check the subsequent popup, and if you’re happy to proceed then click “Accept Changes.”
- Once the Firebase Assistant is displaying the “Dependencies set up correctly” message, exit this part of the Assistant by clicking the little backwards-arrow in its upper-left corner.
- Expand the “Realtime Database” section, and then select the “Save and retrieve data” link.
- Select “Add the Realtime Database to your app.”
- Check the changes that Android Studio is about to make to your project, and then click “Accept Changes.”
- Even though Android Studio should have added Firebase support to your project successfully, it’s still worth opening the build.gradle file and checking that it’s added the latest versions of firebase-auth and firebase-database. Update to a newer version of these libraries, if available.
- Add play-services-location as a project dependency. Your project’s “dependencies” section should now look something like this:
dependencies {
   implementation fileTree(dir: 'libs', include: ['*.jar'])
   implementation 'com.android.support:appcompat-v7:26.1.0'
   implementation 'com.android.support.constraint:constraint-layout:1.0.2'
   implementation 'com.google.firebase:firebase-auth:11.8.0'
   implementation 'com.google.android.gms:play-services-location:11.8.0'
   implementation 'com.google.firebase:firebase-database:11.8.0'
   testImplementation 'junit:junit:4.12'
   androidTestImplementation 'com.android.support.test:runner:1.0.1'
   androidTestImplementation 'com.android.support.test.espresso:espresso-core:3.0.1'
}
Getting access to the location
Since our app is going to access the device’s location and then send this information to a remote database, it needs the location and internet permissions, so add the following to the Manifest:
<?xml version="1.0" encoding="utf-8"?>
<manifest xmlns:android="http://schemas.android.com/apk/res/android"
   package="com.jessicathornsby.mytrackerapp">

   <uses-permission android:name="android.permission.ACCESS_FINE_LOCATION"/>
   <uses-permission android:name="android.permission.INTERNET"/>
Make sure the user knows they’re being tracked!
Every app that uses location data needs to request either the ACCESS_COARSE_LOCATION or the ACCESS_FINE_LOCATION permission. However, when an app is capable of tracking the user and sharing this information outside of the device, simply issuing a permission request isn’t enough. Your app should provide a visual indication the entire time it’s recording and sharing this potentially sensitive information, and the user must be able to suspend tracking at any time.
I’m going to create a persistent notification that’ll be onscreen the entire time this application is recording the device’s location. The user can suspend tracking by tapping this notification — which will be the only way of dismissing the notification.
Let’s create the icon and text that we’ll use in this notification. The easiest way to add notification icons to your project, is via Android Studio’s built-in Asset Studio:
- Control-click your project’s “res/drawable” folder and then select New > Image Asset.
- Open the “Icon Type” dropdown and then select “Notification Icons.”
- Click the little button that appears alongside the “Clip Art” label.
- Choose the icon you want to use; I’m opting for “My Location.” Click “OK.”
- Name this icon “tracking_enabled,” and then click “Next.”
- Check the information on the subsequent screen, and then click “Finish.”
Next, open the strings.xml file and create the notification text. While the strings.xml file is open, I’m also adding a firebase_path label that’ll appear alongside the data in Firebase, plus the email and password for the test user we registered in the Firebase Console. While it’s never a good idea to store usernames and passwords as plain text in production apps, in this instance it’ll make our project easier to test.
<string name="tracking_enabled_notif">Tracking is currently enabled. Tap to cancel.</string>
<string name="test_email">test@test.com</string>
<string name="test_password">testpassword</string>
<string name="firebase_path">location</string>
Start tracking the device’s location
We’ll perform most of the heavy lifting in a separate location tracking service, but there’s still a few things we need to do in MainActivity:
- Request access to the device’s location. In Android 6.0 and higher, applications need to request permissions at runtime, and the user can revoke previously-granted permissions at any point. MainActivity will need to check whether it currently has access to the user’s location, every single time it’s launched.
- Start location tracking. The MainActivity should check whether location tracking is enabled, and then start the location tracking service if necessary.
- Display a toast. Any app that tracks the user’s location has the potential to feel invasive, so you need to make it very clear when your app is gathering this information. In addition to the persistent notification, MainActivity should display a toast when location tracking is first enabled.
- Exit the app. Once MainActivity has started the location tracking service, its work is done. Rather than waiting for the user to close the application, MainActivity should take the initiative and shut itself down automatically.
import android.app.Activity;
import android.support.v4.app.ActivityCompat;
import android.os.Bundle;
import android.support.v4.content.ContextCompat;
import android.content.Intent;
import android.location.LocationManager;
import android.Manifest;
import android.content.pm.PackageManager;
import android.widget.Toast;

public class MainActivity extends Activity {

   private static final int PERMISSIONS_REQUEST = 100;

   @Override
   protected void onCreate(Bundle savedInstanceState) {
       super.onCreate(savedInstanceState);

//Check whether GPS tracking is enabled//

       LocationManager lm = (LocationManager) getSystemService(LOCATION_SERVICE);
       if (!lm.isProviderEnabled(LocationManager.GPS_PROVIDER)) {
           finish();
       }

//Check whether this app has access to the location permission//

       int permission = ContextCompat.checkSelfPermission(this,
               Manifest.permission.ACCESS_FINE_LOCATION);

//If the location permission has been granted, then start the TrackerService//

       if (permission == PackageManager.PERMISSION_GRANTED) {
           startTrackerService();
       } else {

//If the app doesn’t currently have access to the user’s location, then request access//

           ActivityCompat.requestPermissions(this,
                  new String[]{Manifest.permission.ACCESS_FINE_LOCATION},
                  PERMISSIONS_REQUEST);
       }
   }

   @Override
   public void onRequestPermissionsResult(int requestCode, String[] permissions, int[]
            grantResults) {

//If the permission has been granted...//

       if (requestCode == PERMISSIONS_REQUEST && grantResults.length == 1
              && grantResults[0] == PackageManager.PERMISSION_GRANTED) {

//...then start the GPS tracking service//

            startTrackerService();
       } else {

//If the user denies the permission request, then display a toast with some more information//

           Toast.makeText(this, "Please enable location services to allow GPS tracking", Toast.LENGTH_SHORT).show();
       }
   }

//Start the TrackerService//

   private void startTrackerService() {
       startService(new Intent(this, TrackingService.class));

//Notify the user that tracking has been enabled//

      Toast.makeText(this, "GPS tracking enabled", Toast.LENGTH_SHORT).show();

//Close MainActivity//

       finish();
   }

}
Create a location-tracking service
We now need to create the service that’s responsible for sending the device’s location to Firebase. I’m also going to create the persistent notification that’ll provide that all-important visual reminder that the user is currently being tracked.
Create a new service, by selecting File > New > Service > Service from the Android Studio toolbar. Name the service “TrackingService,” and then add the following:
import com.google.firebase.auth.AuthResult;
import com.google.firebase.auth.FirebaseAuth;
import com.google.android.gms.location.FusedLocationProviderClient;
import com.google.android.gms.location.LocationCallback;
import com.google.android.gms.location.LocationRequest;
import com.google.android.gms.location.LocationResult;
import com.google.android.gms.location.LocationServices;
import com.google.android.gms.tasks.OnCompleteListener;
import com.google.android.gms.tasks.Task;

import com.google.firebase.database.DatabaseReference;
import com.google.firebase.database.FirebaseDatabase;

import android.content.BroadcastReceiver;
import android.content.Context;
import android.support.v4.content.ContextCompat;
import android.os.IBinder;
import android.content.Intent;
import android.content.IntentFilter;
import android.util.Log;
import android.Manifest;
import android.location.Location;
import android.app.Notification;
import android.content.pm.PackageManager;
import android.app.PendingIntent;
import android.app.Service;

public class TrackingService extends Service {

   private static final String TAG = TrackingService.class.getSimpleName();

   @Override
   public IBinder onBind(Intent intent) {
       return null;
   }

   @Override
   public void onCreate() {
       super.onCreate();
       buildNotification();
       loginToFirebase();
   }

//Create the persistent notification//

   private void buildNotification() {
       String stop = "stop";
       registerReceiver(stopReceiver, new IntentFilter(stop));
       PendingIntent broadcastIntent = PendingIntent.getBroadcast(
               this, 0, new Intent(stop), PendingIntent.FLAG_UPDATE_CURRENT);

// Create the persistent notification//
       Notification.Builder builder = new Notification.Builder(this)
               .setContentTitle(getString(R.string.app_name))
               .setContentText(getString(R.string.tracking_enabled_notif))

//Make this notification ongoing so it can’t be dismissed by the user//

               .setOngoing(true)
               .setContentIntent(broadcastIntent)
               .setSmallIcon(R.drawable.tracking_enabled);
       startForeground(1, builder.build());
   }

   protected BroadcastReceiver stopReceiver = new BroadcastReceiver() {
       @Override
       public void onReceive(Context context, Intent intent) {

//Unregister the BroadcastReceiver when the notification is tapped//

           unregisterReceiver(stopReceiver);

//Stop the Service//

          stopSelf();
        }
   };

   private void loginToFirebase() {

//Authenticate with Firebase, using the email and password we created earlier//

       String email = getString(R.string.test_email);
       String password = getString(R.string.test_password);

//Call OnCompleteListener if the user is signed in successfully//

       FirebaseAuth.getInstance().signInWithEmailAndPassword(
               email, password).addOnCompleteListener(new OnCompleteListener<AuthResult>() {
           @Override
           public void onComplete(Task<AuthResult> task) {

//If the user has been authenticated...//

               if (task.isSuccessful()) {

//...then call requestLocationUpdates//

                   requestLocationUpdates();
               } else {

//If sign in fails, then log the error//

                  Log.d(TAG, "Firebase authentication failed");
               }
           }
       });
   }

//Initiate the request to track the device's location//

   private void requestLocationUpdates() {
       LocationRequest request = new LocationRequest();

//Specify how often your app should request the device’s location//

     request.setInterval(10000);

//Get the most accurate location data available//

       request.setPriority(LocationRequest.PRIORITY_HIGH_ACCURACY);
       FusedLocationProviderClient client = LocationServices.getFusedLocationProviderClient(this);
       final String path = getString(R.string.firebase_path);
       int permission = ContextCompat.checkSelfPermission(this,
               Manifest.permission.ACCESS_FINE_LOCATION);

//If the app currently has access to the location permission...//

     if (permission == PackageManager.PERMISSION_GRANTED) {

//...then request location updates//

           client.requestLocationUpdates(request, new LocationCallback() {
               @Override
               public void onLocationResult(LocationResult locationResult) {

//Get a reference to the database, so your app can perform read and write operations//

                   DatabaseReference ref = FirebaseDatabase.getInstance().getReference(path);
                   Location location = locationResult.getLastLocation();
                   if (location != null) {

//Save the location data to the database//

                     ref.setValue(location);
                   }
               }
           }, null);
        }
   }
}
You can find the entire code for the GPS tracker on GitHub.
Testing the application
When testing any application that uses location data, it can help to spoof your location.
With our tracking app, just walking around your home or office won’t dramatically alter the longitude and latitude coordinates, which can make it difficult to spot whether the information in Firebase really is changing. By spoofing your location, you can send dramatically different coordinates to Firebase, so you don’t have to scour long strings of numbers, looking for a single digit that might have changed.
If you’re testing your app on a physical Android smartphone or tablet, then the easiest way to spoof your location is by installing a third party app, such as Fake GPS Location.
If you’re using Android Virtual Device (AVD) then you already have everything you need to fake a location:
- Select “More” from the strip of buttons that appears alongside the emulator window (where the cursor is positioned in the following screenshot).
- Select “Location” from the left-hand menu.
- Enter your new coordinates into the “Longitude” and “Latitude” fields, and then click “Send.” The emulator will now use these new coordinates.
To check that your app is recording the device’s location to Firebase:
- Install the project on your Android device.
- When prompted, grant the app access to your location. You should see a toast, informing you that GPS tracking is now enabled.
- Open the notification drawer, and check that the persistent notification has been created.
- In your web browser, head over to the Firebase Console and open the project that’s linked to your tracking app.
- In the left-hand menu, select “Database.”
- Select the “Data” tab, and you should see that location data is now appearing in the Firebase Console.
Reading the Firebase Realtime data
Firebase presents its data as JSON objects, which are sets of attribute-value pairs. These pairs can be numbers, strings, true/false Booleans, arrays of zero or more values, collections of name-value pairs, and nulls, so all the following are valid JSON data types:
accuracy : 1.6430000066757202
complete: true
bearing: 0
provider: “fused”
The JSON tree contains lots of data, but the easiest way to check that Firebase is recording data correctly, is to copy/paste the longitude and longitude values into Google Maps. If this data is correct, then it should return your current location, or the location you’re currently spoofing.
We’re sending location data to Firebase using the setValue() method, which replaces the previous data entry. This means that Firebase Realtime Database will only ever contain the user’s last known location. You can even see new data replacing the old data, if you have the Firebase database open in your web browser while spoofing different locations on your Android device.
When working with Firebase in your own projects, you may sometimes want to record more than a single piece of data. You can add data to Firebase without replacing the previous values, by using any of the following methods instead of setValue():
- setRawJsonValueAsync(). Replaces data with raw JSON.
- push(). Adds a new child to a list of data. Each time you call push(), Firebase generates a unique key based on a timestamp, so even if multiple clients add children to the same location at the same time, it won’t cause a write conflict.
- updateChildAsync(). Writes data to the specified location, without writing over other child nodes. By specifying different paths, you can perform simultaneous updates in multiple areas of the JSON tree, with a single call to UpdateChildrenAsync().
- runTransaction(). You should use this method if you need to update complex data that could become corrupted by concurrent updates.
If you do store multiple sets of child data within your JSON tree, then you should carefully structure your database to make sure it doesn’t get too complex.
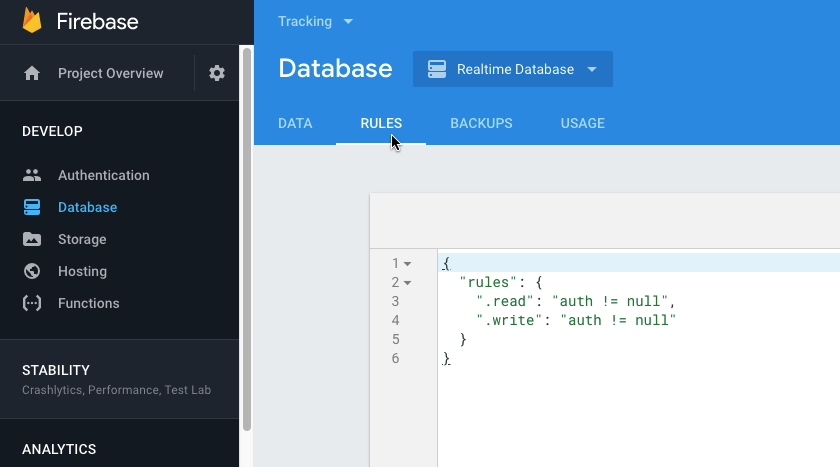
In addition, when using the Firebase Realtime Database in your own projects, you may want to setup some Database Security Rules, which define how your data should be structured, indexed, and when your data can be read and written to. You can also use rules to specify who has access to your Firebase database, although Firebase already restricts access to authenticated users by default.
You can view your Database Security Rules, by selecting the “Rules” tab in the Firebase Console.

Wrapping up
In this article, we looked at how to record the user’s location to a remote database. Once this information is available in Firebase, you can use it in lots of different ways, for example, you could help the user locate their family and friends; record their daily run to Google Maps, or even send them unique content based on their changing location.
Have you seen any apps that use GPS tracking in a unique way? Or do you have any ideas about how you might use this feature in your future projects? Let us know in the comments!
Thank you for being part of our community. Read our Comment Policy before posting.