Affiliate links on Android Authority may earn us a commission. Learn more.
How to implement Autofill in your Android apps

Typing on the smaller screen of a smartphone or tablet is always time-consuming and frustrating, but this is amplified when applications keep asking for the same information, over and over again. How many times have you typed your email into an app’s login screen? Or entered your credit card number in a payment Activity?
And if you’re a developer, then displaying a form or even a simple login screen, can be a risky business; potentially resulting in users exiting your app, never to return.
However, with the introduction of Android Oreo’s Autofill Framework, data entry is set to become far easier than it’s ever been on the Android platform, and the benefits for developers are two-fold: you can provide a better experience to your users while simultaneously increasing your chances of capturing useful user data.
In this article I’m going to show you how to ensure that all of your app’s “autofillable” fields are ready to receive data from whatever autofill service the user has installed on their device, as well as sharing best practices to ensure you’re making the most out of this Android Oreo feature.
How does autofill work?
The Autofill Framework can detect and store the data types that applications are most likely to request, including passwords, postal addresses and credit card details.
Although the Autofill Framework is an Android 8.0 feature, the user also needs to install a dedicated “autofill service” app that can communicate with this framework. Then, when the Android system detects that the user has entered some new information into an autofillable field, it’ll present a dialog asking whether they want to save this information to their chosen autofill service, at which point it’ll be available to other applications. If they tap ‘Save,’ then the next time the user selects a View that’s requesting the same information, the system will display an autofill picker containing all the relevant datasets stored in the autofill service.

When your app requests information from, or supplys information to an autofill service, it’s known as an autofill client.
Providing hints for autofill
If your app uses standard Views, then by default it should work with any autofill service that uses heuristics to determine the type of data that each View expects. However, not all autofill services use these kind of heuristics; some rely on the View itself to declare the type of data that it expects.
To ensure your app can communicate with the Autofill Framework regardless of the autofill service that the user has installed on their device, you’ll need to add an “android:autofillHints” attribute to every View that’s capable of sending and receiving autofill data.
Let’s take a look at how you’d update a project to provide autofill hints. Create a new project that targets Android Oreo, and then create a basic login screen consisting of two EditTexts that accept a username and a password:
<?xml version="1.0" encoding="utf-8"?>
<android.support.constraint.ConstraintLayout xmlns:android="http://schemas.android.com/apk/res/android"
   xmlns:app="http://schemas.android.com/apk/res-auto"
   xmlns:tools="http://schemas.android.com/tools"
   android:layout_width="match_parent"
   android:layout_height="match_parent"
   tools:context="com.jessicathornsby.myapplication.MainActivity">

   <TextView
       android:layout_width="wrap_content"
       android:layout_height="wrap_content"
       android:textSize="30sp"
       android:text="Login"
       app:layout_constraintBottom_toBottomOf="parent"
       app:layout_constraintHorizontal_bias="0.462"
       app:layout_constraintLeft_toLeftOf="parent"
       app:layout_constraintRight_toRightOf="parent"
       app:layout_constraintTop_toTopOf="parent"
       app:layout_constraintVertical_bias="0.032" />

   <EditText
       android:id="@+id/username"
       android:layout_width="wrap_content"
       android:layout_height="wrap_content"
       android:hint="Enter Name"
       app:layout_constraintBottom_toTopOf="@+id/password"
       app:layout_constraintEnd_toEndOf="parent"
       app:layout_constraintHorizontal_bias="0.056"
       app:layout_constraintStart_toStartOf="parent"
       app:layout_constraintTop_toTopOf="parent"
       app:layout_constraintVertical_bias="0.76" />

  <EditText
       android:id="@+id/password"
       android:layout_width="wrap_content"
       android:layout_height="wrap_content"
       android:layout_marginBottom="324dp"
       android:hint="Password"
       android:inputType="textPassword"
       app:layout_constraintBottom_toBottomOf="parent"
       app:layout_constraintEnd_toEndOf="parent"
       app:layout_constraintHorizontal_bias="0.054"
      app:layout_constraintStart_toStartOf="parent" />

</android.support.constraint.ConstraintLayout>
You’ll then need to add an android:autofillHints attribute to each View, and set it to one of the supported autofill constants:
- The Username EditText expects a username, so add android:autofillHints=”username”
- The Password EditText expects a password, so we need to add android:autofillHints=”password”
Later in this article we’ll be covering different ways of optimizing your app for autofill, but since this is enough to provide basic autofill support, let’s look at how you’d put this updated application to the test.
Testing your app with autofill
You can only test the autofill feature on a device that’s running Android Oreo, so if your smartphone or tablet hasn’t received the Android 8.0 update, then you’ll need to create an Android Virtual Device (AVD) that’s running Android API level 26 or higher. You’ll then need to install your project on this device, by selecting ‘Run > Run’ from the Android Studio toolbar.
Finally, you’ll need an application that’s capable of providing autofill data. While you could use one of the third-party autofill services that are available via Google Play, Google have created a dedicated Android Autofill Framework sample app that includes several features designed to help you test your app’s autofill support, so this is the service I’m going to use.
Build and install Google’s Autofill Framework sample project
- Select ‘File > New > Import Sample’ from the Android Studio toolbar.
- Select ‘Android O Preview > Autofill Framework.’
- Click ‘Next > Finish.’
Android Studio will now import the Autofill Framework app as a new project. If Android Studio prompts you to upgrade your Gradle plugin, select ‘Update.’
At the time of writing, this project still uses the Java 8.0 support provided by the deprecated Jack compiler, so open the module-level build.gradle file and remove the following:
jackOptions {
   enabled true
}
If you look at the Manifest, you’ll see that this project has two launcher Activities:
<application
   android:allowBackup="true"
   android:icon="@mipmap/ic_launcher"
   android:label="@string/app_name"
   android:supportsRtl="true"
   android:theme="@style/Theme.AppCompat.Light">

//First launcher Activity//

   <activity
       android:name=".app.MainActivity"
       android:taskAffinity=".MainActivity">
       <intent-filter>
           <action android:name="android.intent.action.MAIN" />

           <category android:name="android.intent.category.LAUNCHER" />
       </intent-filter>
   </activity>
   <activity
...
...
...

//Second launcher Activity//

<activity
   android:name=".multidatasetservice.settings.SettingsActivity"
   android:exported="true"
   android:label="@string/settings_name"
   android:taskAffinity=".SettingsActivity">
   <intent-filter>
       <action android:name="android.intent.action.MAIN" />

       <category android:name="android.intent.category.LAUNCHER" />
   </intent-filter>
</activity>
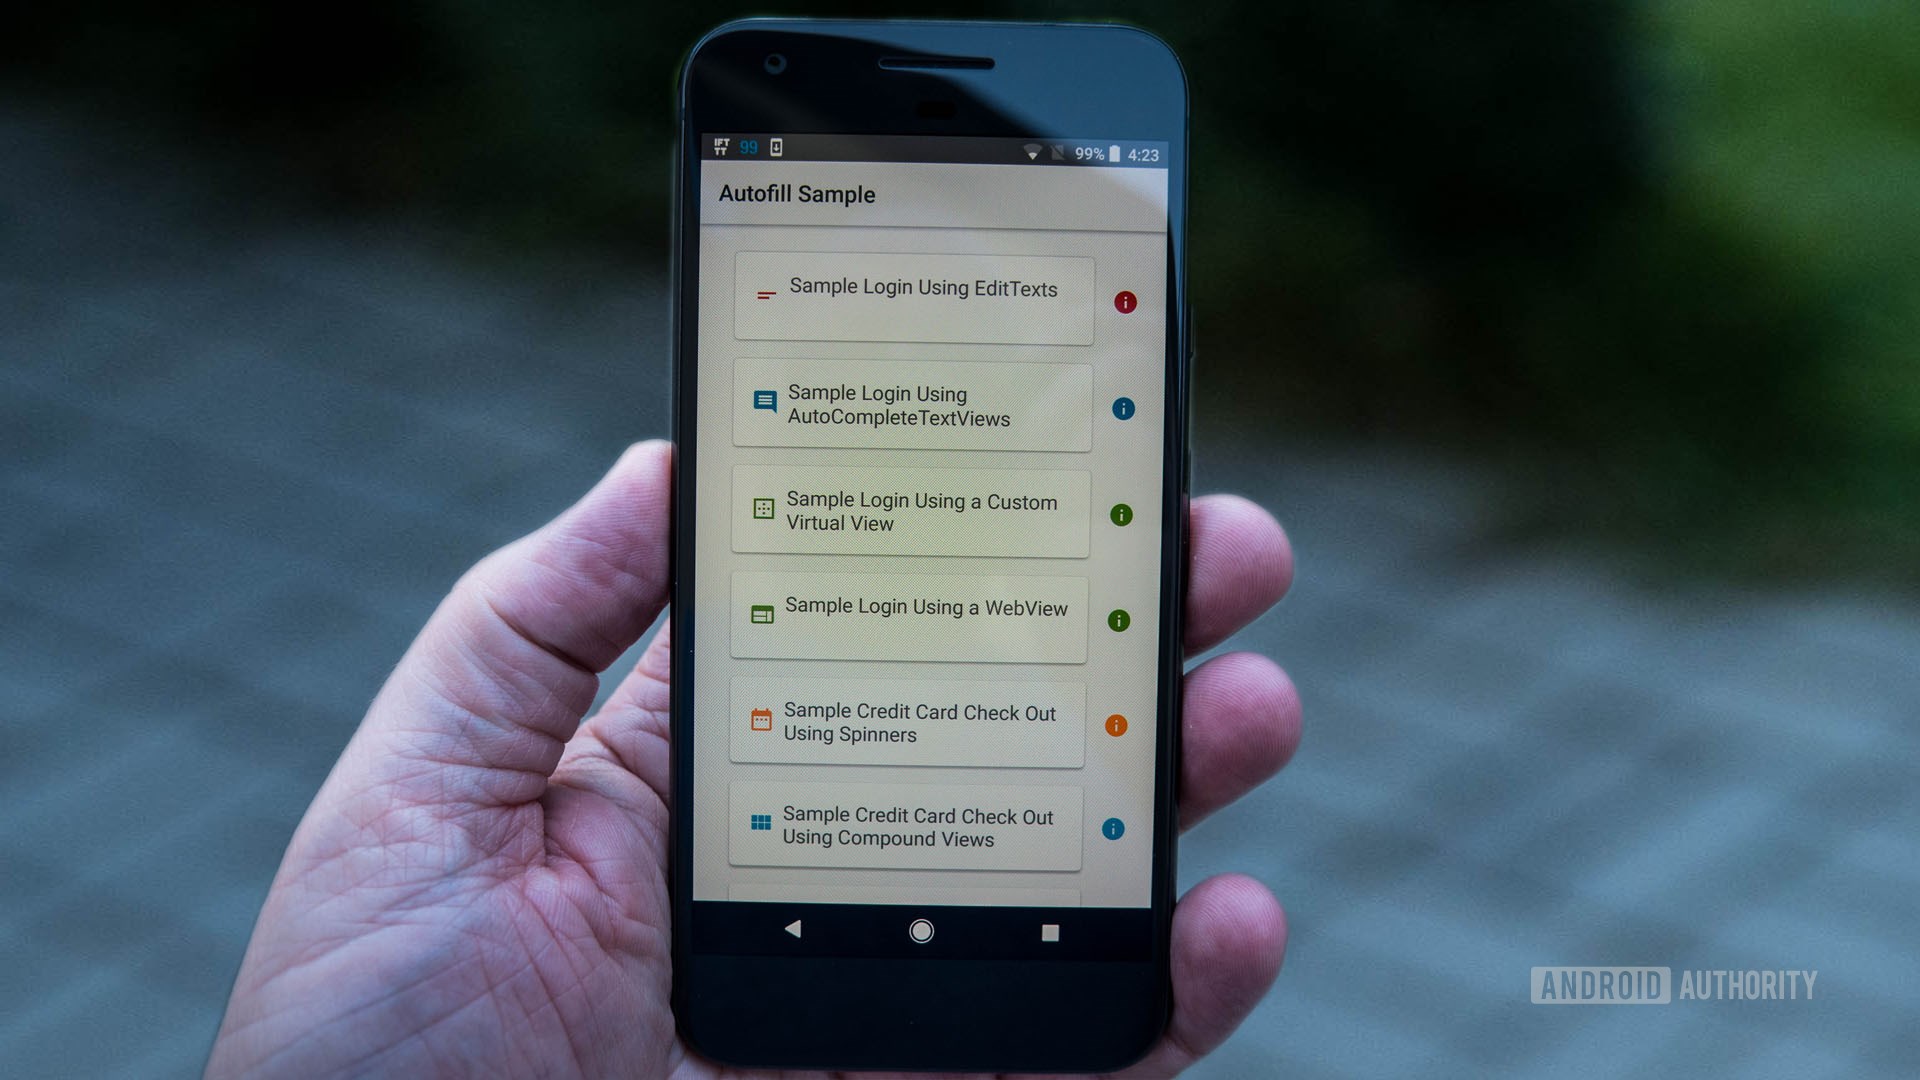
Install this project on your AVD or Android device, and you’ll see that it translates into two stand-alone apps:

The Autofill Settings app is the actual autofill service, while the Autofill Sample app consists of various activities demonstrating scenarios where you’ll commonly use autofill functionality, such as login and payment screens.
Activate Android Oreo’s Autofill
Autofill is disabled by default; to enable it, you’ll need to specify the autofill service that you want to use:
- Open your device’s ‘Settings’ app.
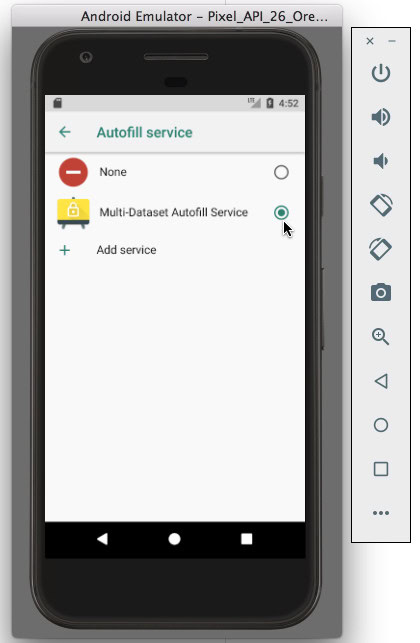
- Navigate to ‘System > Languages & input > Advanced > Autofill service.’
- Select ‘Multi-Dataset Autofill Service,’ which is Google’s autofill service application.

Read the onscreen warning, and if you’re happy to proceed click ‘OK.’
Supply some data
If we’re going to test our app’s ability to receive data from an autofill service, then the autofill service is going to need some data that it can supply to this application.
There’s an easy way to feed data to an autofill service:
- Load any other application that expects the data in question – in this instance, that’s any application where we can enter a username and password.
- Enter this data into the application.
- When prompted, save this data to the autofill service.
- Switch to the application that you want to test.
- Select the View that you want to test, and then see whether autofill kicks in and offers to complete this View for you.
Conveniently, the Autofill Sample app contains a login Activity that expects a username and password combo:
- Launch the Autofill Sample app.
- Select ‘Sample Login Using EditTexts.’

- Enter a fake username and password. Note that a quirk of this Activity is that the username and password must be exactly the same for it to accept your input, so if you use “testing” as your username, then you’ll also have to use “testing” as your password. Also be aware that Google’s autofill service stores its data in SharedPreferences, so anyone with root access to your device can potentially see this data.
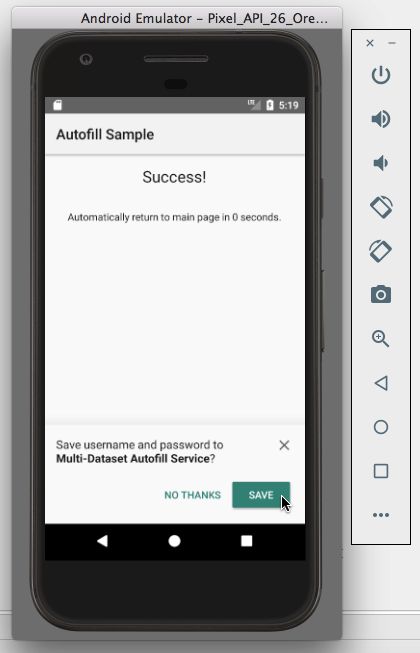
- Typically, you’ll need to submit data before the autofill service offers to save it, so give the ‘Login’ button a click.
- Click ‘Save.’

Put your application to the test
- Launch the login screen application we created earlier in this tutorial.
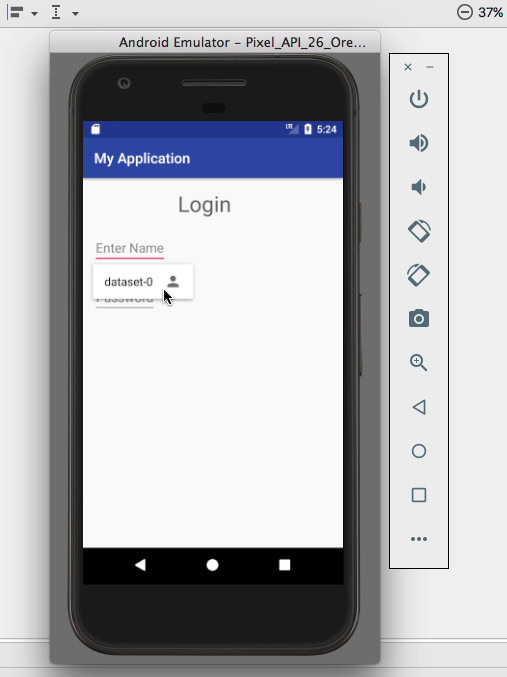
- Tap the ‘username’ View. At this point the autofill picker should appear.
- Select the dataset you want to use, and all Views present in this dataset will be autofilled, so the username and password Views should be autofilled simultaneously.
Optimizing your app for autofill
While this is enough to implement basic autofill functionality in your app, there’s some additional steps you can take to ensure your application is providing the best possible autofill experience.
In this final section I’m going to look at several ways that you can optimize your app for autofill.
Is a View important, or unimportant?
By default, the Android operating system is responsible for determining whether a View is “important” or “unimportant” for autofill.
If the system decides that a View is important and the autofill service has at least one relevant dataset, then focusing on this View will trigger an autofill request. If the View is important but there’s no relevant data available, then when the user enters some data into this field they’ll be prompted to save that information to their autofill service.
While Android should be able to correctly identify “important” autofillable Views, relying on the system to interpret the behaviour you want means there’s always room for misinterpretation, plus there’s no guarantee that Android’s default behaviour won’t change in a future update.
To help ensure that your app interacts with autofill correctly, you should clarify which Views are important for autofill, using android:importantForAutofill and one of the following values:
- “auto.” Android is free to decide whether this View is important for autofill – essentially, this is the system’s default behavior.
- “yes.” This View and all of its child Views are important for autofill.
- “no.” This View is unimportant for autofill. Occasionally, you may be able to improve the user experience by marking certain Views as unimportant, for example if your app includes a CAPTCHA, then focusing on this field could trigger the autofill picker menu, which is just unnecessary onscreen clutter, distracting the user from what they’re trying to accomplish. In this scenario, you can improve the user experience by marking this View as android:importantForAutofill=“no.”
- “noExcludeDescendants.” The View and all of its children are unimportant for autofill.
- “yesExcludeDescendants.” The View is important for autofill, but all of its child Views are unimportant.
Alternatively, you can use the setImportantForAutofill method, which accepts the following:
- IMPORTANT_FOR_AUTOFILL_AUTO.
- IMPORTANT_FOR_AUTOFILL_YES.
- IMPORTANT_FOR_AUTOFILL_NO.
- IMPORTANT_FOR_AUTOFILL_YES_EXCLUDE_DESCENDANTS
- IMPORTANT_FOR_AUTOFILL_NO_EXCLUDE_DESCENDANTS.
For example:
.setImportantForAutofill(View.IMPORTANT_FOR_AUTOFILL_NO_EXCLUDE_DESCENDANTS);Force an autofill request
Most of the time, the autofill lifecycle is started automatically in response to notifyViewEntered(View), which is called when the user enters a View that supports autofill. However, sometimes you may want to trigger an autofill request in response to user action, for example if the user long-presses a field.
You can force an autofill request using requestAutofill(), for example:
public void eventHandler(View view) {
    AutofillManager afm = context.getSystemService(AutofillManager.class);
    if (afm != null) {
        afm.requestAutofill();
    }
}
Check whether autofill is enabled
You may decide to offer additional features when autofill is enabled, for example an ‘Autofill’ item in your app’s contextual overflow menu. However, since it’s never a good idea to mislead users by offering features that your app can’t currently deliver, you should always check whether autofill is currently enabled and then adjust your application accordingly, for example removing ‘Autofill’ from your context menu if autofill is disabled.
You can check whether autofill is available, by calling the isEnabled() method of the AutofillManager object:
if (getSystemService(android.view.autofill.AutofillManager.class).isEnabled()) {

//Do something//
Sharing data between your website and application
It’s becoming increasingly common for developers to offer the same functionality via a dedicated mobile app and via their website, for example there may be a Facebook for Android app, but you can also log into www.facebook.com on your mobile web browser.
If you have a website that’s related to your application, then you may want to give the Autofill Framework a heads-up that it should share autofill data between these two environments.
To create this association between your app and your website, you’ll need to generate a Digital Asset Links file, and then upload this file to your domain:
- Open the Android project that you want to associate with your website.
- Select ‘View > Tools Window > Assistant’ from the Android Studio toolbar, which launches the App Links Assistant window.
- Click the ‘Open the Digital Asset Links File Generator’ button.
- Enter the domain that you want to associate with your application.
- Enter your app’s signing config, or select a keystore file. Note that if you use a debug config or keystore, then eventually you’ll need to generate and upload a new Digital Asset Links file that uses your app’s release key.
- Click the ‘Generate Digital Asset Links file’ button.
- Download the Digital Asset File (assetlinks.json file), by clicking the ‘Save file’ button.
- Upload the subsequent assetlinks.json file to this exact address: https://<yoursite>/.well-known/assetlinks.json.
Wrapping Up
Autofill adds some new benefits to Android for end users. As a developer you must need to make sure your app takes full advantage of those benefits and as you can see, it isn’t too much work. Have you already implemented any Oreo features in your own projects? Let us know in the comments below!