Affiliate links on Android Authority may earn us a commission. Learn more.
Android customization - voice activated camera control using Tasker and an Android Wear smartwatch
Last week on our Android customization series we rounded up a handful of apps that not only push your SMS from your Android device over to your PC or tablet, but allow you to respond to messages as well. Sending and receiving SMS without having to pull your phone out of your pocket is pretty slick, let’s see what else can be done remotely.
Today, we would like to begin a multi-week project, the goal is to learn more about using Tasker, Pushbullet, a new app called Tasker Now for Android Wear and more, and we will be doing so by creating voice controlled and remote camera controls between two Android devices, between your Android device and Android Wear device and between your Android device and a PC. It sounds like a lot, but it will be worth it, if only to learn more about using the services.
We’ll start with some of the ground work today, let’s look at building the Tasker Task to fire the camera, another Task to accept voice command, then we’ll look at the new app Tasker Now that runs on your Android Wear smartwatch.
Before we begin


Use Tasker to take a photo
We took a look at using Tasker to take a photo in a previous tutorial, at that time we focused on discreetly using the front camera to capture an image of any person accessing your device without your permission. To take a full quality photo from the rear camera is very similar in procedure, just a few differing settings.
Create your new Tasker Task to take a photo, I called mine “QualityPhoto.”
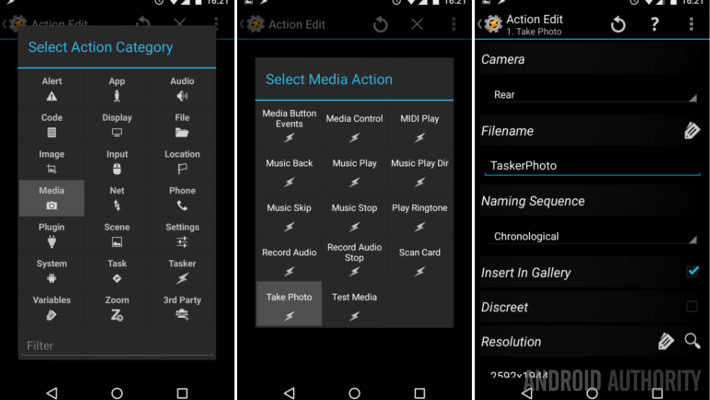
Tap the “+” button to add an action.
Select Media.
Select Take Photo.
Leave it set to Rear.
Add a base Filename, I’ll put “TaskerPhoto.”
I like to change Naming Sequence to Chronological, but you can choose another option if you wish.
The above two settings will result in a file name in the format “TaskerPhotoFeb4_2015_160255.jpg.” It will be a little different than that, but it will take your base Filename and append the date and time down to the second.
It is up to you if you would like to leave Insert in Gallery turned on, I will.
I will leave Discreet turned off, meaning the screen will display the photo as it is being taken.
Change Resolution to the quality you desire, I want mine as high quality as possible. Tap the magnifying glass icon on the right hand side, choose your photo resolution. My camera is only capable of 3280×2460, but that should be good enough for most needs.
I recommend leaving the remaining settings on Auto. We can always come back here later to edit the settings if the photos just are not working out.
Tap the system Back button to save and exit. That is all for this Task, feel free to hit the play button to see how things work, or just tap that system Back button again to save and close the Task.
Create voice command input
We are going to do a few things in this Tasker Task. First, we will collect voice input, next we will validate the input and either halt the Task or proceed if the right words are spoken. Finally, we’ll need to trigger the “QualityPhoto” Task created above. Let’s do it.
Start a new Task, name it concisely and uniquely, I’ll call mine “VoicePhoto.”
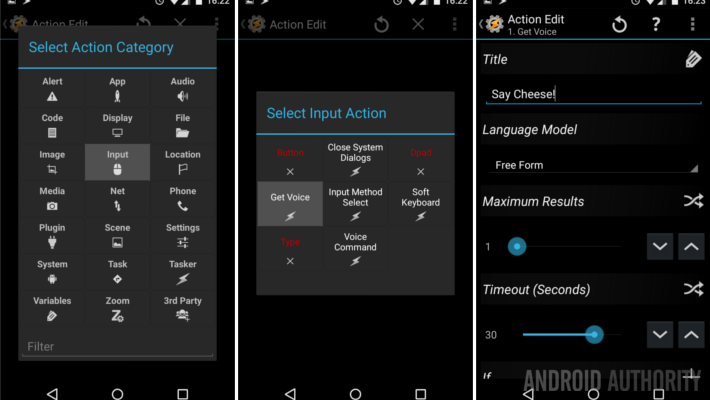
Tap the “+” button to add your first action.
Choose Input.
Choose Get Voice.
The default settings are just fine, tap that system Back button to save and exit.

Tap “+” for the next action.
Choose Task.
Choose Stop.
Tap the + button beside If.
Enter %VOICE in the first field, or tap the label icon to find Voice Results from the long list of available variables.
Tap the center comparison button and choose Doesn’t Match. It will change the text on the button itself to “!~”.
In the right hand text field, enter the word or phrase that you would use to trigger the photo capture. I’ll keep it simple, I am entering the word “cheese“.
Tap the system Back button to save and exit.
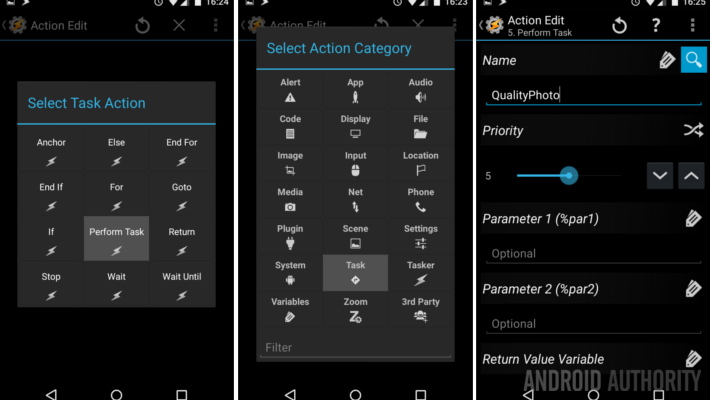
Tap the “+” button one last time.
Choose Task.
Choose Perform Task.
Tap the magnifying glass icon to the right of the Name field.
Choose your photo capture Task, mine was called “QualityPhoto.”
Tap the system Back button to save and exit.
One last thing before we call this Task complete, tap the icon button in the very bottom right of the screen to add an icon to this Task. You can skip this if you wish, it will ask you to input one later if you try to use the Task as a widget.
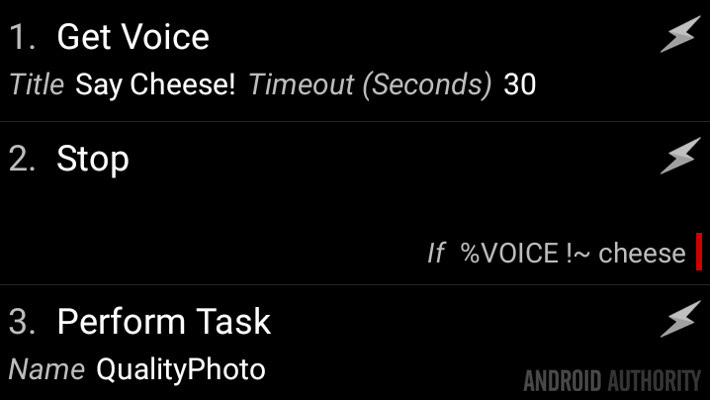
That’s it for the creation process. I highly recommend testing things out before you move on, just in case. If things don’t seem to be working, try adding an Alert->Flash after the initial Get Voice above, put %VOICE as the popup message. This will show you what the microphone is picking up. Chances are, it will be a collecting the word “cheese” in lower case, and failing to match if you entered the Task->Stop validation as a capitalized “Cheese”.
You could now consider placing the VoicePhoto Task as a Widget on your Homescreen. This gives you one tap access to the voice command controlled photo capture. If you are thinking that this is a little silly aside from testing purposes, don’t worry, our next step is to create realistic and functional triggers.
Tasker Now is a newer Android app designed for your Android Wear powered devices. Specifically, you’ll do best to run it on a smartwatch. The app serves just one purpose, to collect your voice input from your Android Wear device and fire it over to your connected Android phone or tablet to be interpreted by Tasker, which will fire off an action on your device.
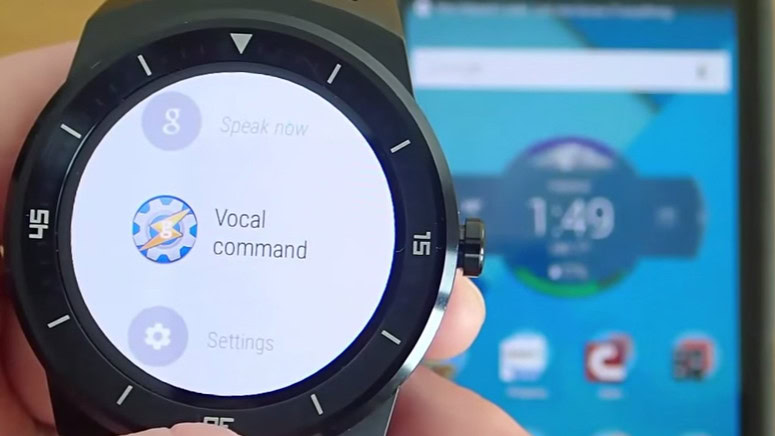
As you might imagine, this gives you the power to perform any Tasker command on your device all by a quick tap and talk into your smartwatch.
I don’t know about you, but if you’ve ever tried to use your Android device to take a group photo, and be in the photo yourself, having to tap the camera button and try to run to your position in frame within the 10 seconds it gives as a delay time, can be tough. Wouldn’t a remote shutter control be awesome? Of course it would.
Start a Tasker Profile to accept the Tasker Now input, call it something appropriate, like “TaskNowCamReceiver.”
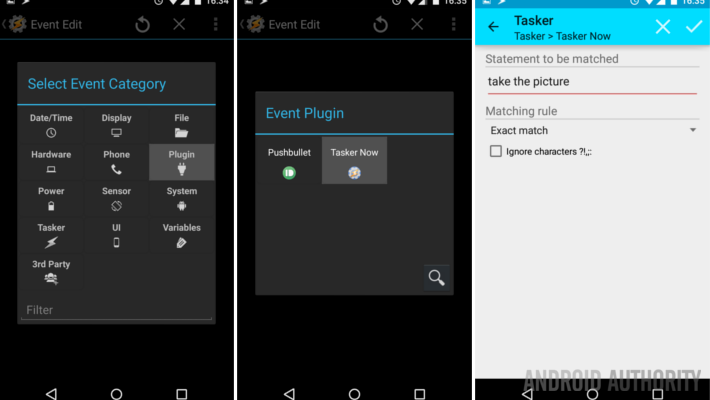
Choose Event.
Choose Plugin.
Choose Tasker Now.
Tap the pencil icon to configure the input.
Enter your statement to be matched. In the free version you will only be able to enter a 4 character phrase, and it will be locked to requiring an Exact Match. Pro users can input a full text string, more important, they can choose from a handful of Matching rules, including searching the collected voice input for one specific word, an exact match, starting words, ending words and more.
I have entered “take the picture” and stuck with the Exact match rule.
Tap the Done button in the top right to save and exit.
Tap the system Back button to save and exit out of the Profile editor.
Now, you do not want to choose your voice input Task created above, that would just make you have to talk again. Instead, choose your “QualityPhoto” Task.
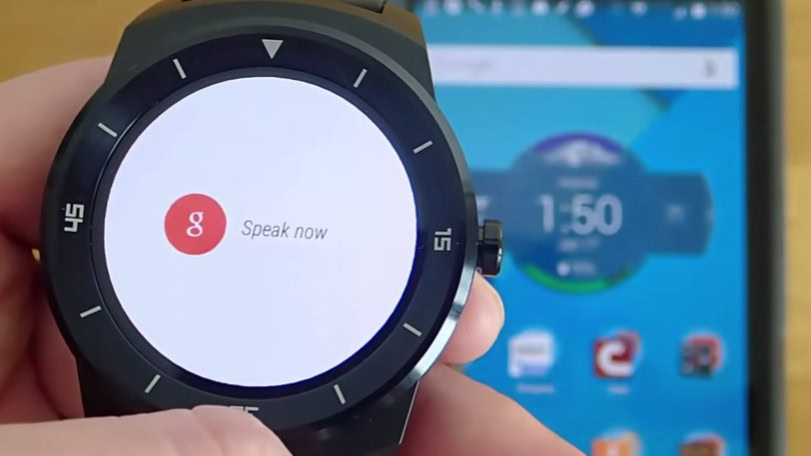
Go ahead and give it a try now.
What’s next
We created a Task to take a picture, it should work pretty good by default, but I do urge you to head back into the Task itself and play with the settings, you can control the flash, scene mode and more. Find the right combination for your device and environment.
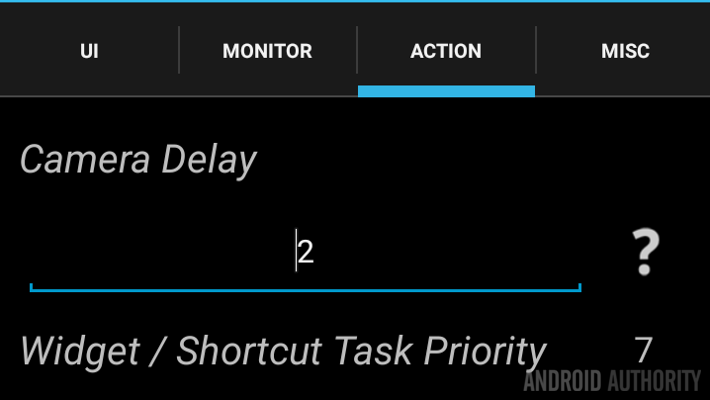
From there, if you find that the photos are not in focus, try heading into Tasker’s main Preferences settings menu, in the Action tab you’ll find a Camera Delay setting. The value is set in seconds. Newer devices work just fine at as low as 1 second, but older devices may need 3 or 4 to gain focus before the photo snaps.
We also created a Task that accepts voice input, validates it, and fires off the above picture taking Task. This was a great exercise, but I will fully admit that it serves little purpose when run on the same device as the photo taking Task. I am hoping you can think of other things, besides a Christmas count down timer, to use this voice input procedure.
Finally, we needed an effective way to trigger the camera taking Task from a distance, so we used the Android Wear app called Tasker Now. But what if you do not have an Android powered smartwatch? No worries folks, we’ll get you hooked up next week.
Next week
Android Wear users may be all ready to roll after today’s Android customization post. Next week we’ll explore methods to fire off the camera remotely without the need for a smartwatch. I’ll give you a little hint, Pushbullet will be on the list.
Aside from selfies and group photos, how will you use a remote trigger to take photos on your Android device?