Affiliate links on Android Authority may earn us a commission. Learn more.
Build an automated time card for work, school or... whatever, part 1 - Android customization
Did you get the chance to build last week’s Android customization project? It was a real time battery usage alarm system, of sorts, made entirely in Tasker to inform you when your device is discharging too quickly.
This week we will utilize many of the same tools, just with a new task in mind. Let’s build a time card to track how you spend your time, like at work or at school, and then we’ll automate it.
First and foremost, I want to inform you that this will be a two-part project. You will need to tune in next week as well if you desire instruction to completely finish the project. I’ll try to leave off today with something that functions, but the actual automation aspect of it all will have to wait until next time.
Before we begin
Build a time card using Tasker
Before we dive in, allow me to explain the approach. For you advanced Tasker users, this should be almost enough to head off on your own.
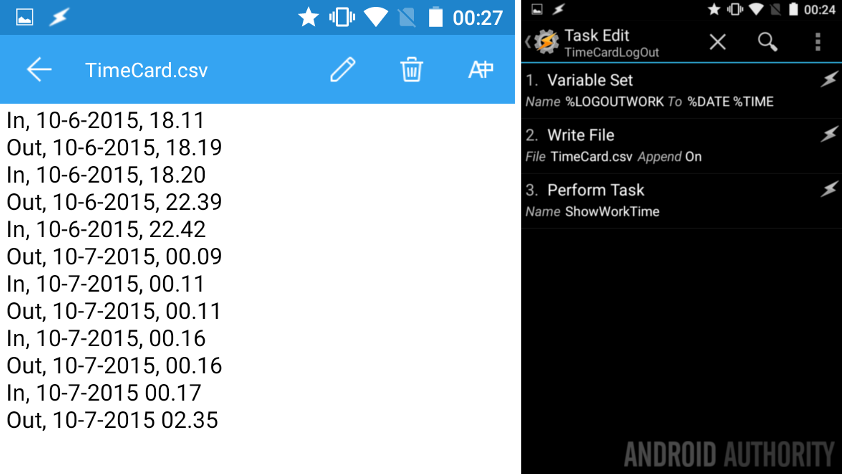
First, we are going to follow the file writer approach that we’ve used for a few projects in a row now. That is, we’ll write to a .txt file when we start work/school/gaming/etc. with a message indicating the date and time we began. Then, simply enough, we’ll write again to that .txt file when we are finished our tasks.
Second, we’ll perform a few calculations on those numbers, to come up with our total time spent between start and stop.
Third, we’ll look at ways to automate these Tasks, in order to eliminate the effort required to track our comings and goings. This is the part of it all that will have to wait for next week, it can be more complicated than it sounds.
If you know me, there will be more to it than just the ideas above, so be sure to put on your thinking caps, I don’t plan on being gentle for this project.
Create your text file
To make things easy later, the first thing you’ll want to do is create and save a blank text file to your Android device. I’m pretty lazy, I just called it “TimeCard.csv”. Hint: if you didn’t notice, I will use a .csv file, you can use .txt if you want, it’s all the same for our needs today.
Save your start time
The first thing we’ll do when we fire up Tasker is to take note of when you start your day/project/etc. Simple enough, we’ll save the date and time to a variable, then write that variable to a file. We’ve done this before, haven’t we?!?
Start a new Task, name it something appropriate, like “TimeCardLogin“.
Add your first action.
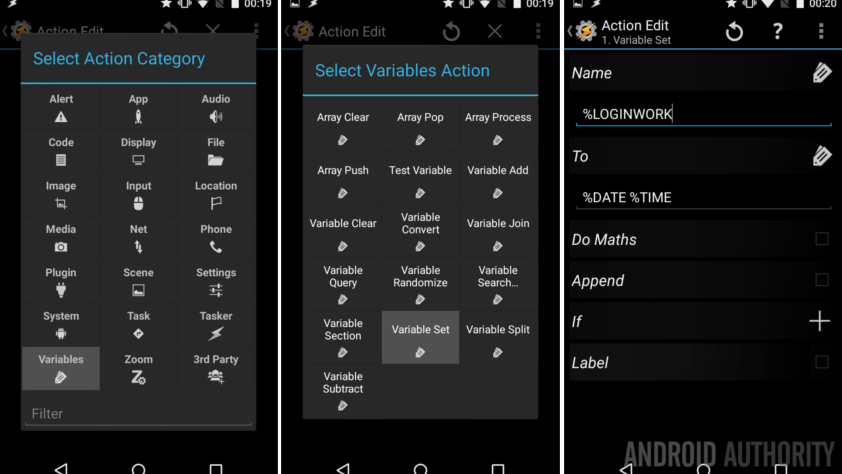
Select Variables.
Select Variable Set.
Give the variable a global name, something like “%LOGINWORK‘.
In the To section, enter “%DATE %TIME“. Normally I would encourage you to play with this text, add other info, not this time folks, copy it just as I have it.
Hit that system Back button, you’re done there and ready to add your next action.
Add your second action.
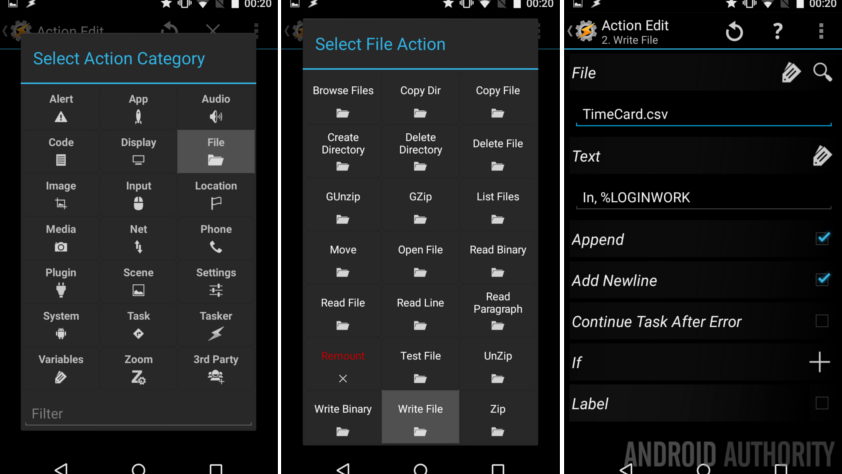
Select File.
Select Write File.
Beside File, tap the magnifying glass to look for your “TimeCard.csv” file.
In the Text field, enter your variable from above, plus an identifier that this is the starting time, I have “In, %LOGINWORK“.
This is where you could add other variables and info, if you want. For example, you could add your current battery status and maybe even pull in the weather, just for fun. You play with it later, for now, enter the text above and let’s move on.
Be sure to turn on the check boxes beside both Append and Add Newline.
Hit the system Back button. You’re done here.
Save your stop time
This is going to be quick, you will ultimately duplicate the start time Task, you know there is a Clone option in the long press menu of a Task, right? OK, good, do that, then we just rename a bunch of stuff.
I called my stop task “TimeCardLogOut“.
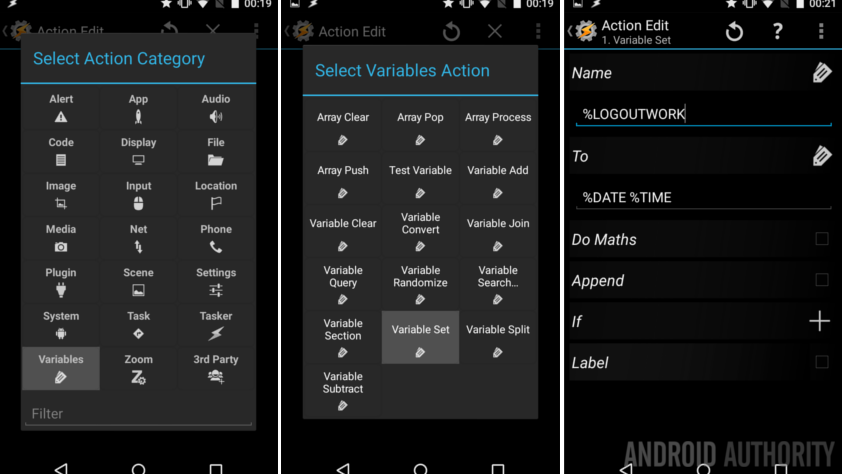
My first action is that Variable, I called it “LOGOUTWORK” and made sure it had the value “%DATE %TIME“.
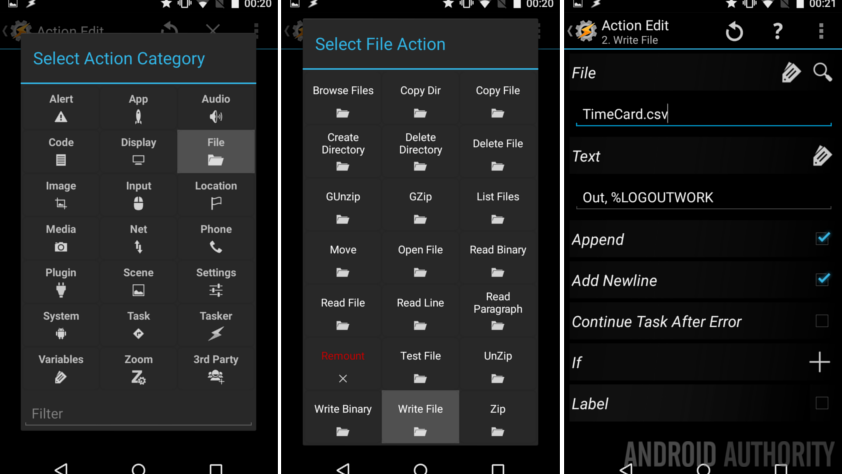
My second action is the Write File, writing to “TimeCard.csv” again, I gave it text “Out, %LOGOUTWORK“. Also, make sure Append and Add Newline are turned on.
That was short and sweet, I hope you got it.
Close out of this Task, you are good to move on.
Is that all?
Here’s the thing, if you want to keep this project super simple, you can add Tasker Task Widgets to your Homescreen to trigger the two above Tasks. Nice and simple, hit the start button when you get to work, hit the stop button when you are leaving, then check out your .csv or .txt file later to actually calculate your time.

You know I want to do more, so let’s push forward and have some fun.
First up, and this is more difficult than it sounds, I want to pop up an on-screen notification of my total time for the day. Good news, we are about to play with the Variable Convert function, just like when we asked ourselves how many days until Christmas?
Start a new Task, I’ll call mine “ShowWorkTime“.
Now buckle in, I’ve got eight actions coming your way, and I’m going to blow through most of them pretty quickly.
First action. We take our log in time, and convert it to seconds, so that we can compare it to the log out time.
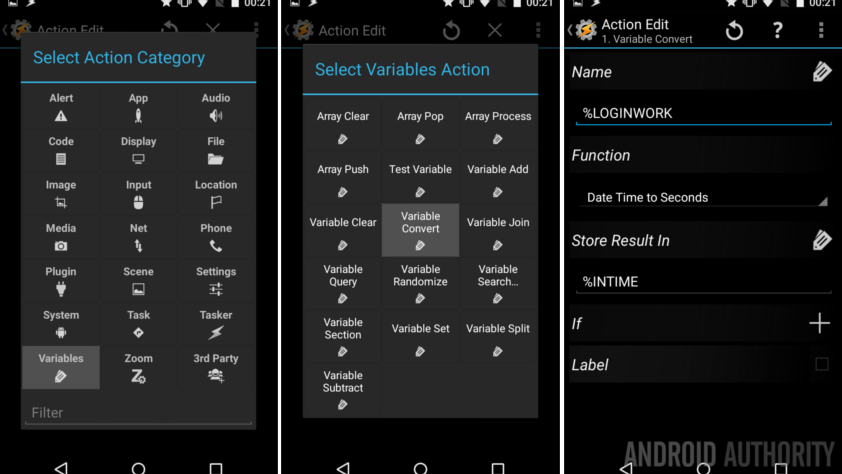
Select Variables.
Select Variable Convert.
Name “%LOGINWORK“.
Function: Date Time to Seconds. (This is why we had to enter “%DATE %TIME” in the variables earlier.)
Finally, Store Result In a new variable name, I’ll call mine “%INTIME“.
Good, now Back out of action one.
Second action, repeat the previous for our log out time.
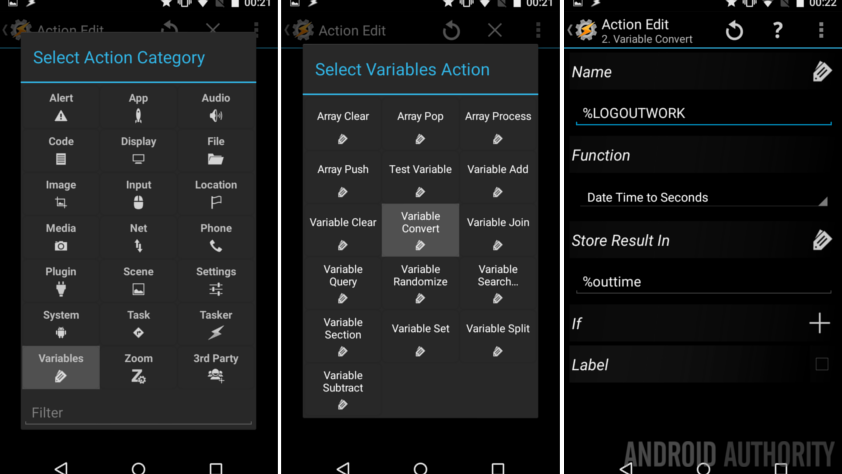
Select Variables -> Variable Convert.
Name: “%LOGOUTWORK”
Function: Date Time to Seconds.
Store Result In “%outtime“. (This one can be a local variable, denoted by it being all lower case characters.)
Back out of action two.
Third action, the calculations. We’ll just save them into a new variable.
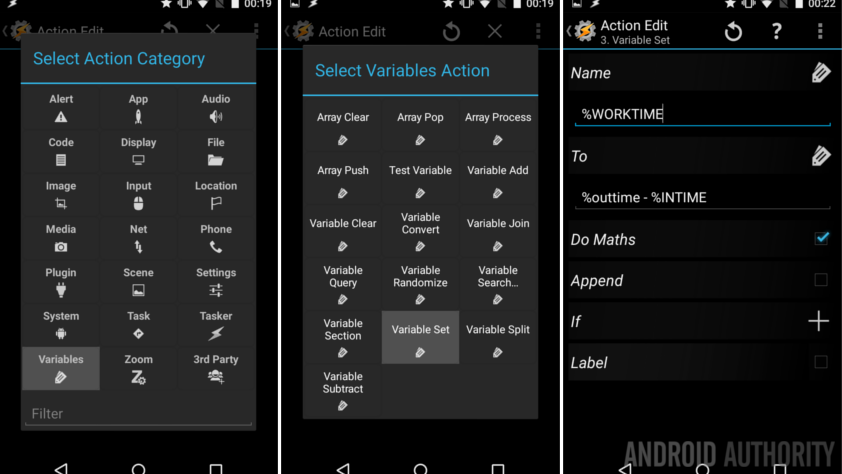
Select Variables -> Variable Set.
Name: “%WORKTIME“.
To: “%outtime – %INTIME“.
Turn on the toggle beside Do Maths.
Back out of action three.
Fourth action, display the results.
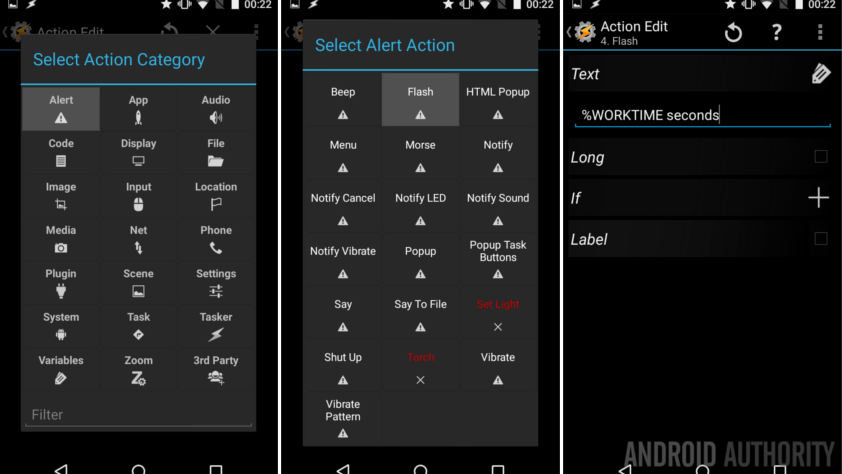
Select Alert.
Select Flash.
Text: “%WORKTIME seconds.”
Back out of action four.
OK, let me stop right here, the following 4 actions are frivolous. Seriously, I took the time to, in order, Action 5. convert the value from seconds into minutes, Action 6. flash that to the display, then Action 7. convert it to hours and Action 8. flash that to the screen. Let’s look at it all in an image.
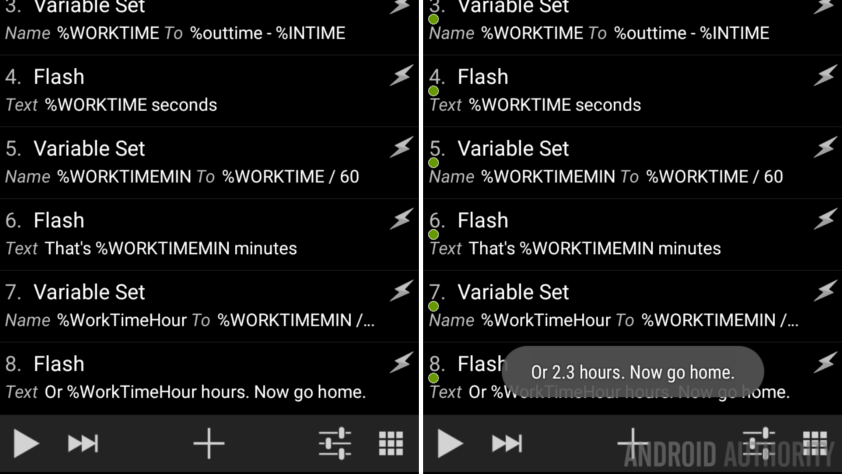
Truth is, you can see all of the pertinent info in the screenshot of my Task above. You may choose to clean up your work, perhaps convert straight to hours in one Variable Set, then only display that. I invite you to play around, especially since my project puts info on the display three times in a row, that’s just not a friendly thing to do.
However, see how I created a global variable in there, “%WORKTIMEMIN”? This is for a reason! I won’t have time today to dive deeper on this, but I’ll tell you that when Tasker writes to your Google Calendar, it uses time values stored in minutes. Hint, hint.
OK, finish up this Task as you see fit. I wouldn’t blame you for keeping it simple and following all of my steps. I would be proud of you if you took the time to use Variable Split to clean up your output. You know, instead of displaying “8.33 hours,” display “8 hours, 19 minutes” instead. If you want to see how this is done, I plan to go into detail on the Variable Split in a few weeks.
Finally, we have one last thing to do for cleanup.
Run the display Task from the Log Out Task
To make things easy, we will make it so that the “ShowWorkTime” Task runs automatically when you run your “TimeCardLogOut” Task. The idea is simple, when you tell Tasker to log out, it write to the file and then displays the info on the screen, all in one move.
Head back into your “TimeCardLogOut” Task.
Tap the “+” button to add a new action.
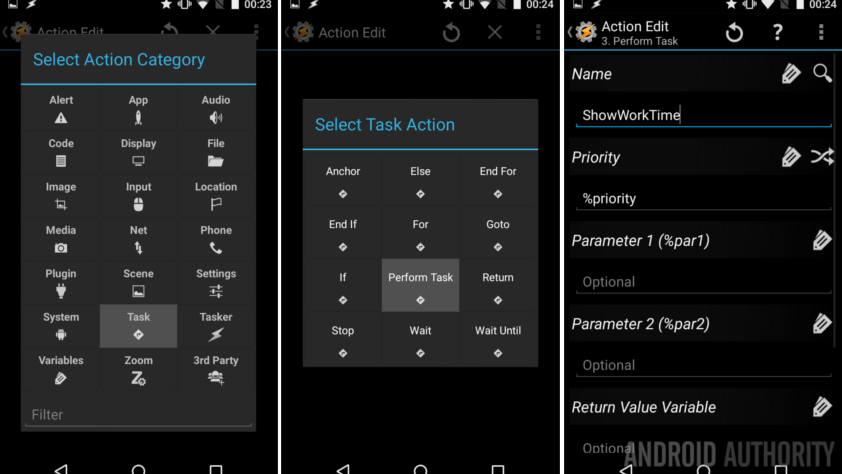
Select Task.
Select Perform Task.
Tap the magnifying glass beside Name and find your new “ShowWorkTime” Task.
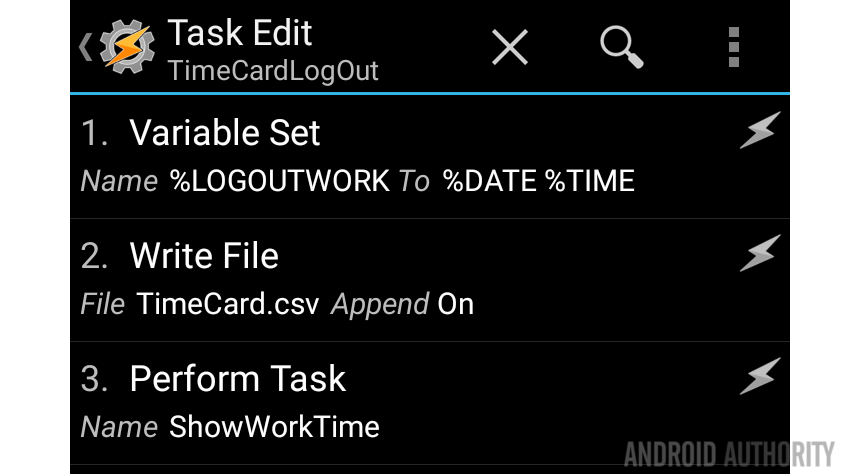
That’s it, hit the system Back button to save and exit.
What’s next
Notes:
- Make sure you run the “TimeCardLogIn” Task before you run the “TimeCardLogOut” Task. If not, the first variables will be empty and will cause errors when it tries to calculate your time.
- Because our variables %DATE %TIME only collect time to the nearest minute, you will not see your seconds counted. There are variables that you can add for that, if your time tracking needs require that level of precision.
Now, all we did with our data today was write it to a local file and show it on the screen. As always, I urge you to think outside the box and try new and different things with your data. Of course, you can open your .txt file and extract the data, even import it into a spreadsheet and make some graphs or an invoice.

Maybe you would like to skip the whole text file thing and dump your data right into Google Calendar. Create your variables, collect your time, then create a Task with App -> Calendar Insert. I won’t go into details on how that all works, but it can be done.
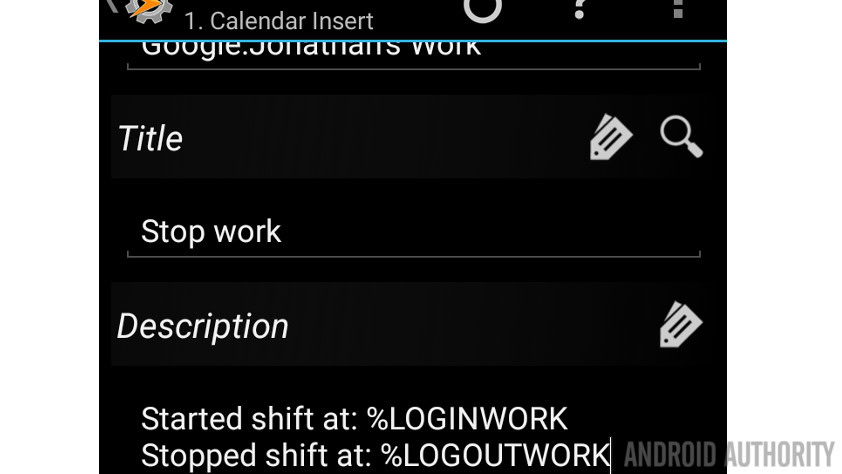
Also, Pushbullet can be your friend if you wish to push notification of the data to your PC automatically.
Lunch. If you like to leave the office for lunch, or any other reason throughout your day, keep in mind that you will have extra Ins and Outs to handle. Your .txt file will accurately show your in and out times, but you’ll have to add in extra variable management to calculate your full time, including the stoppage time.
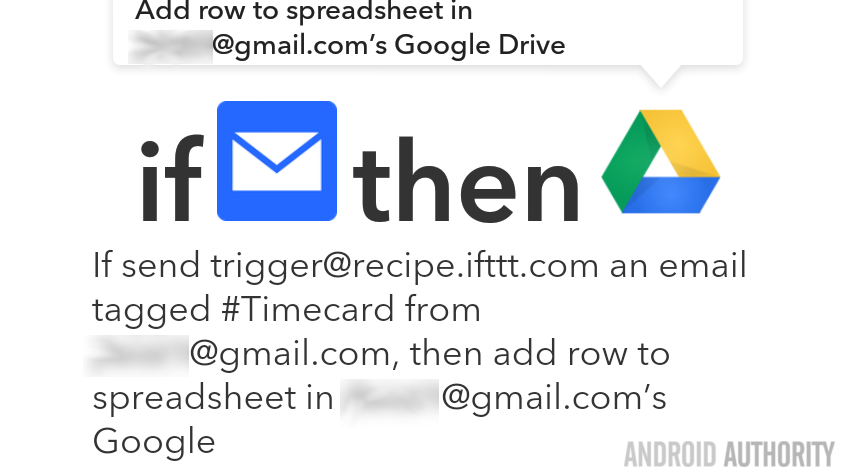
Last thought, you could use Tasker to send an email or SMS to IF by IFTTT, which can then take the data and insert it right into a Google Sheets document. This is just an idea, I haven’t thoroughly tested it, and probably won’t for my own needs.
Next week
I hope you are off and running with this Android customization project, obviously, you can tweak it to track any length of time important to you. Maybe you need to track your video game playing time, your sleep or a workout, whatever it is, you’ve got the first half of it all, next week we’ll finish up. Specifically, join us next week to look at building triggers for this project, such as using NFC tags, automatically based on your location or maybe connecting to a specific WiFi network.
There are so many ways you can go with this project, what do you have in mind?