Affiliate links on Android Authority may earn us a commission. Learn more.
Update your apps for Oreo: Autosizing Text, Custom Fonts, Adaptive Icons & Notification Channels
Published onSeptember 6, 2017
In this tutorial, I’m going to show you how to implement a number of Android 8.0’s new features in your own Android projects. By the end of this tutorial, you’ll know how to:
- Create TextViews that can autosize their contents automatically to better suit the current layout.
- Use custom fonts in your app without increasing the size of your APK.
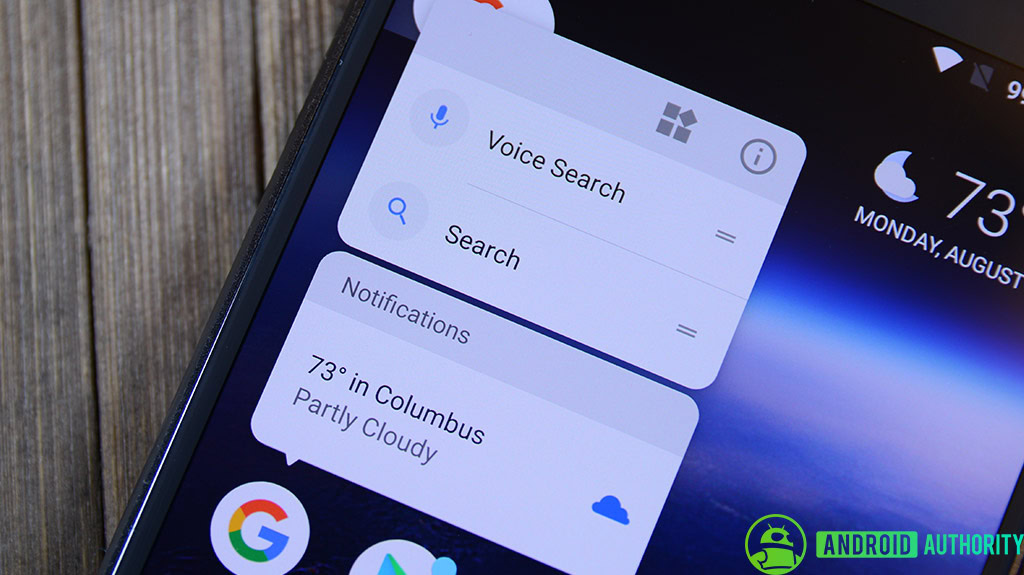
- Offer shortcuts to your app’s most important content, which the user can then pin to their homescreen.
- Create multiple notification channels that each have their own unique behavior.
- Update your app icon to be compatible with the new adaptive icon masking feature.
Prepare your development environment
Before you can implement any Android 8.0 features, you need to make sure your development environment is up to date. For the best results, you should be using Android Studio 3.0 or higher, which currently means installing the Android Studio 3.0 Beta.
Next, open the Android SDK Manager and make sure you have the following installed:
- The Android O SDK.
- SDK Build Tools 26.0.1 or higher.
- SDK Platform Tools 26.0.0 or higher.
- Android Emulator 26.1.4 or higher.
- Android Support Library 26.0.2 or higher.
To help keep things simple, I’m going to be adding Oreo features to a project that’s designed to support Android 8.0, so create a new project using the ‘Empty Activity’ template, and set the target SDK to Android O (API 26).
Before you can update an existing project with these features, you’ll need to open your build.gradle file, and then change its compileSdkVersion and targetSdkVersion to 26, and its buildToolsVersion to 26.0.0.
Autosizing TextViews
Android Oreo’s autosizing TextViews feature is designed to help you combat one of the biggest challenges of developing for Android: creating a single user interface (UI) that’s flexible enough to handle the wide range of screens your app may encounter.
Autosizing TextViews are capable of resizing their text to better suit the current layout; when the TextView has a small amount of text to display in a large area, it may scale your text up to avoid leaving awkward empty spaces in your layout, and when an autosizing TextView has a large amount of text to display it’ll scale that text down rather than cut it off mid-sentence.
When you select the ‘Empty Activity’ template, Android Studio generates a ‘Hello World’ TextView by default, so let’s look at the two different ways that we can add autosizing functionality to this TextView.
1. Granularity
Granularity is where you define the biggest your text can be (autoSizeMaxTextSize), the smallest it can be (autoSizeMinTextSize), and the scaling increment (android:autoSizeStepGranularity).
In the following code, the text can scale between 20 scale-independent pixels (sp) and 50sp, in increments of 5sp. We’re also adding the android:autoSizeTextType=”uniform” line, which is something you’ll need to add to every TextView where you want to use autosizing:
<TextView
   android:layout_width="wrap_content"
   android:layout_height="wrap_content"
   android:text="Hello World!"
   app:layout_constraintBottom_toBottomOf="parent"
   app:layout_constraintLeft_toLeftOf="parent"
   app:layout_constraintRight_toRightOf="parent"
   app:layout_constraintTop_toTopOf="parent"
   android:autoSizeTextType="uniform"
   android:autoSizeMinTextSize="20sp"
   android:autoSizeMaxTextSize="50sp"
   android:autoSizeStepGranularity="5sp"/>
2. Preset sizes
If you want to be more specific then you can create an array of exact sp values; your TextView will then select the most appropriate text size from these available values.
If your project doesn’t already contain an arrays file, then you’ll need to create one:
- Control-click your project’s ‘Values’ file.
- Select ‘New > Values resource file.’’
- Give this file the name ‘arrays,’ and then click ‘OK.’
Open your res/values/arrays file and define the values you want to use:
<?xml version="1.0" encoding="utf-8"?>
<resources>
  <array name="autosize">
   <item>15sp</item>
   <item>20sp</item>
   <item>35sp</item>
   <item>36sp</item>
   <item>37sp</item>
   <item>38sp</item>
   <item>39sp</item>
   <item>50sp</item>
  </array>
</resources>
You then just need to reference this array using autoSizePresetSizes – and don’t forget to add that all-important android:autoSizeTextType line!
<TextView
   android:layout_width="wrap_content"
   android:layout_height="wrap_content"
   android:text="Hello World!"
   app:layout_constraintBottom_toBottomOf="parent"
   app:layout_constraintLeft_toLeftOf="parent"
   app:layout_constraintRight_toRightOf="parent"
   app:layout_constraintTop_toTopOf="parent"
   android:autoSizeTextType="uniform"
   android:autoSizePresetSizes="@array/autosize"/>
Downloadable custom fonts
In Android 8.0 custom fonts are now a fully-supported resource type, which is good news if you regularly use custom fonts to add extra personality to your app, or to emphasize important text.
There are two ways that you can add custom fonts to your applications: import the font’s .ttf file into your project, or add code that will request your chosen font from a font provider. If you opt for the latter, then once your app is installed on the user’s device it’ll request the custom font from the font provider, which will then fetch the necessary files and cache them locally. This means that you can use custom fonts without significantly increasing the size of your APK.
If you do want to use a font provider, then Google Fonts currently seems to be the best option, as the entire library is available via Google Play Services’ font provider.
Let’s look at how you’d apply one of the Google Fonts to our ‘Hello World’ TextView:
- Open your project’s activity_main.xml file, and select the ‘Design’ tab.
- Select the ‘Hello World’ TextView, and the Properties menu should open along the left-hand side of the Android Studio window.
- Scroll to the textAppearance heading, open the ‘fontFamily’ dropdown and select ‘More fonts…’
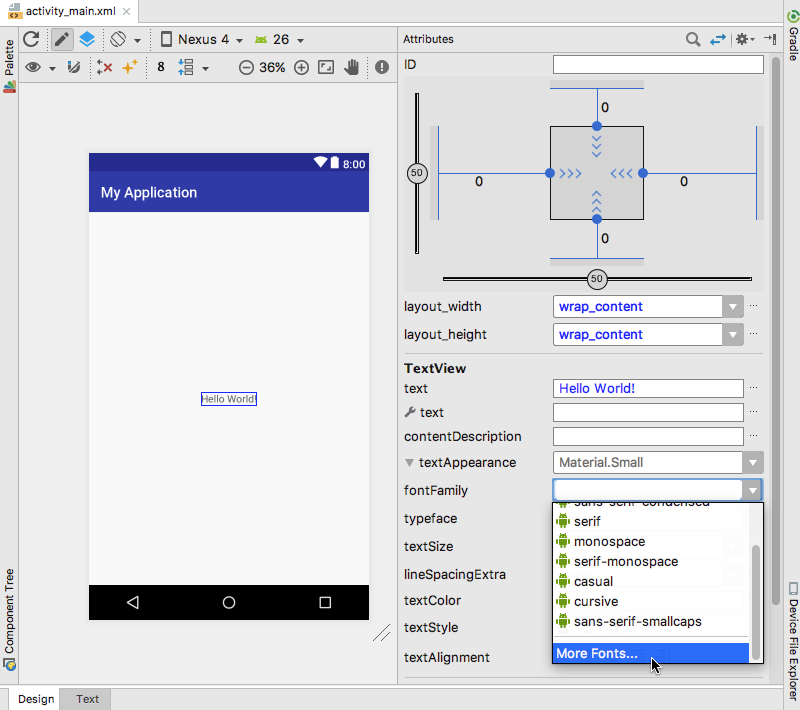
- In the subsequent ‘Resource’ window, open the ‘Source’ dropdown and select ‘Google Fonts.’
- Browse the list of ‘Downloadable’ fonts until you find a font you want to use – you can preview any font by selecting it in the left-hand menu.
- Some fonts are available in multiple styles, for example Cinzel is available in Regular, Bold or Black.
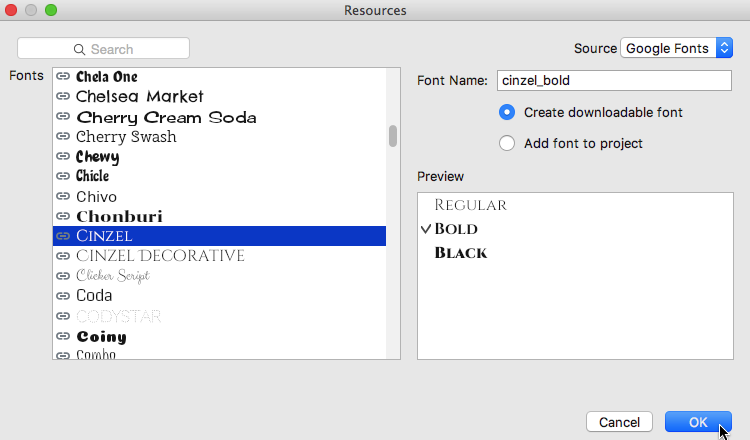
- At this point, you can choose to ‘Create a downloadable font’ or ‘Add font to project.’ If you want to use a font provider, then select ‘Create a downloadable font.’ To include the font in your APK instead, select ‘Add font to project,’ although this will increase the size of your APK. Make your selection, then click ‘OK.’
- If you selected ‘Create a downloadable font,’ then open your project’s res/font folder and you’ll see that Android Studio had generated an XML file containing all the code your app needs in order to request this font from the font provider.
- You apply this font to your TextView, using android:fontFamily=”@font/name-of-your-font” for example:
<TextView
   android:layout_width="wrap_content"
   android:layout_height="wrap_content"
   android:text="Hello World!"
   app:layout_constraintBottom_toBottomOf="parent"
   app:layout_constraintLeft_toLeftOf="parent"
   app:layout_constraintRight_toRightOf="parent"
   app:layout_constraintTop_toTopOf="parent"
   android:autoSizeTextType="uniform"
   android:autoSizeMinTextSize="20sp"
   android:autoSizeMaxTextSize="50sp"
   android:autoSizeStepGranularity="5sp"
   android:fontFamily="@font/aldrich” />
Pinned Shortcuts
Pinned shortcuts are a way of providing the user with easy access to your app’s most important content and functionality, via a shortcut that they can place on their homescreen.
If you want your app to offer one or more pinned shortcuts, then you need to start by verifying that the user’s default launcher actually supports pinned shortcuts:
//Create an instance of ShortcutManager//

ShortcutManager myShortcutManager = getSystemService(ShortcutManager.class);
if (myShortcutManager.isRequestPinShortcutSupported()) {
If the ShortcutManager returns TRUE, then the next step is creating a ShortcutInfo object that defines the properties of the shortcut you want to create:
- The shortcut’s unique string ID.
- A short label, which will be visible when the shortcut is pinned to the launcher. Space within this menu is limited, so you should limit the short label to 10 characters or under.
- A long label, which is visible when the user opens the shortcut list. You should limit this to 25 characters.
- An intent, which is the action that’ll be performed whenever the user taps this shortcut.
- An icon, which will represent your pinned shortcut on the user’s launcher.
//Define the shortcut's string ID//

ShortcutInfo pinShortcutInfo = ShortcutInfo.Builder(context, "shortcut-Id");

//Set the short label//

  .setShortLabel(getString(R.string.short_label))

//Set the long label//

  .setLongLabel(getString(R.string.long_label))

//Define the action that you want this shortcut to perform//

  .setIntent(new Intent(Intent.ACTION_DIAL, mostFrequentContact))

//Set the icon//

  .setIcon(Icon.createWithResource(context, R.mipmap.ic_contactProfile))
  .build();
You pin your shortcut to the user’s homescreen, by implementing requestPinShortcut(). Here, I’m also ensuring that our app will receive a notification whenever this shortcut is pinned successfully, by creating a PendingIntent:
Intent pinnedShortcutCallbackIntent =
           createShortcutResultIntent(pinShortcutInfo);

PendingIntent resultPendingIntent = PendingIntent.createBroadcast(context, 0,
           pinnedShortcutCallbackIntent);

mShortcutManager.requestPinShortcut(pinShortcutInfo,
           resultPendingIntent.getIntentSender());
Once you’ve created a pin, you can update its content using updateShortcuts().
Adaptive Icons
Adaptive icons are Google’s latest attempt to bring a consistent shape to application icons. In Android 8.0, Original Equipment Manufacturers (OEMs) such as Samsung and HTCcan provide a mask, which is applied to all the application icons across their device – if an OEM provides a rounded mask, then all icons on this device will be round. If your app doesn’t support the adaptive icons feature and it winds up on a device that uses a mask, then your application is going to stand out – and not in the good way!
A rendered adaptive icon consists of three layers: a mask, which is provided by the OEM, and a background and foreground layer, which are provided by the developer.
If you created your project to target API 26, then it should already have a res/mipmap-anydpi-v26/ic_launcher.xml file, which contains all the code you need to specify which resources you want to use as your adaptive icon’s background and foreground layers:
<?xml version="1.0" encoding="utf-8"?>
<adaptive-icon xmlns:android="http://schemas.android.com/apk/res/android">
   <background android:drawable="@drawable/ic_launcher_background" />
   <foreground android:drawable="@mipmap/ic_launcher_foreground" />
</adaptive-icon>
If you’re working with a pre-Android 8.0 project, then you’ll need to create the res/mipmap-anydpi-v26 directory and ic_launcher.xml file manually, although you can still use the above block of code.
To create an adaptive icon, you just need to replace drawable/ic_launcher_background and mipmap/ic_launcher_foreground, with your own resources.
Any drawables you use for these layers must be 108×108 dpi, although only the inner 72×72 dpi will appear inside the mask. The system also reserves the outer 18 dpi for animations that the device may display when the user interacts with application icons, such as parallax or pulsing, so bear this in mind when designing your layers!
Once you’ve created your drawable(s), you can use the Asset Studio to build your adaptive icon:
- Control-click your project’s ‘res’ folder and select ‘New > Image Asset.’
- Open the ‘Icon Type’ dropdown and selection ‘Launcher Icons (Adaptive and Legacy).’
- Select the ‘Foreground Layer’ tab.
- Select the ‘Image’ checkbox.
- Click the little dotted icon that appears to the right of the ‘Path’ field (where the cursor is positioned in the following screenshot).
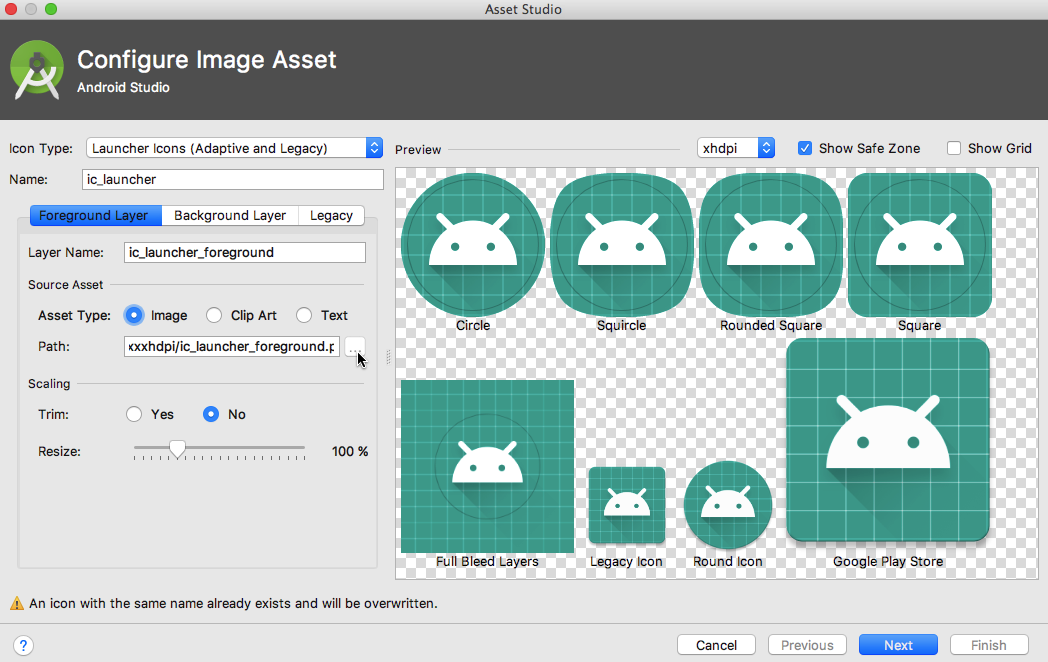
- Select the image you want to use as your foreground layer, and click ‘OK.’ The Asset Studio will display a preview of how this image will appear when rendered with various masks.
- Select the ‘Background Layer’ tab.
- If you’re using an image as your background layer, select the ‘Image’ checkbox and repeat the previous steps. If you want to use a color instead, then select the ‘Color’ checkbox, click the field that’s displaying the hex code and make your selection from the color picker.
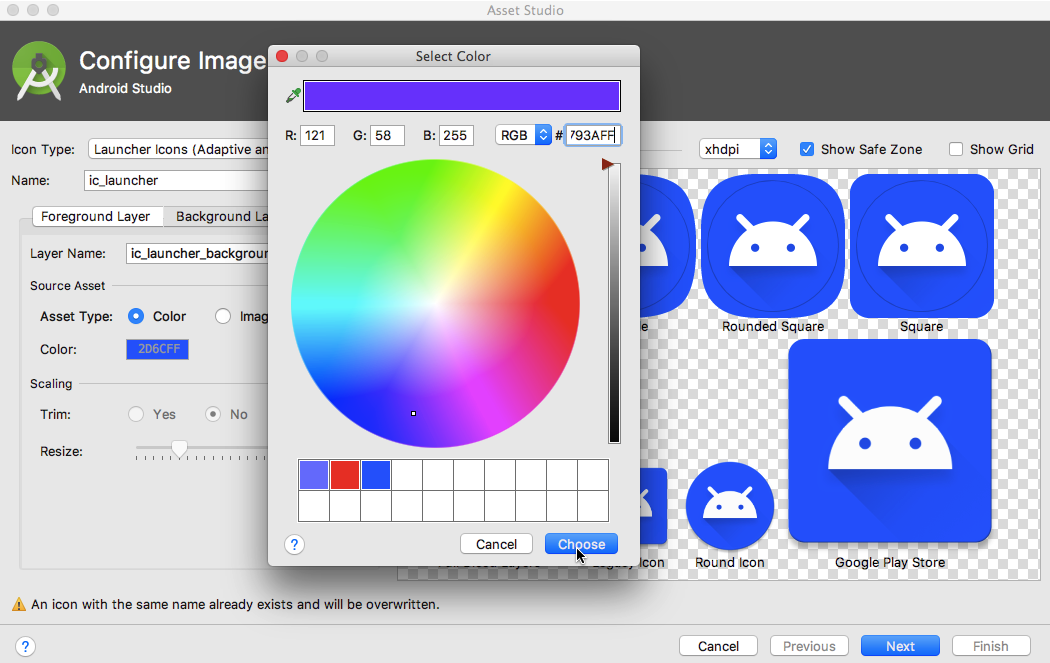
- Click ‘Next.’
- At this point Android Studio will display information about any resources that you’re about to overwrite. If you’re happy to proceed, click ‘Finish.’
- If you’re using a Preview or Beta version of Android Studio 3.0 then it’s possible that the Asset Studio may not update your code to use these new drawable resources, so check the contents of your mipmap-anydpi-v26 directory/ic_launcher.xml file, and make any necessary adjustments.
Notification Channels
Notification channels allow you to group related notifications into dedicated channels, and then define a different behavior for each of these channels. If your app targets API level 26, then notifications channels are mandatory. You cannot post a notification without specifying a valid notification channel ID, so you’ll need to create at least one notification channel for your app. However, for the best results you should create a channel for each distinct “type” of notification that your app creates, and then assign different characteristics to each channel, for example different vibration patterns, alert sounds, and levels of importance (in Oreo you can no longer set a priority level for individual notifications). However, the user can modify a channel’s characteristics, so there’s no guarantee that your channel will have these exact settings forever.
You create a notification channel, by completing the following steps:
import android.app.Notification;
import android.app.NotificationChannel;
import android.app.NotificationManager;
...
...
...
NotificationManager notificationManager =
        (NotificationManager) getSystemService(Context.NOTIFICATION_SERVICE);

//Define the channel’s ID//

String channelId = "my_notification_channel";

//Define the channel’s user-visible name//

CharSequence channelName = getString(R.string.channel_name);

//Set the channel’s priority level//

int channelImportance = NotificationManager.IMPORTANCE_HIGH;

NotificationChannel notificationChannel = new NotificationChannel(channelId, channelName, channelImportance);

//Define your notification channel’s initial characteristics//

notificationChannel.enableLights(true);
notificationChannel.setLightColor(Color.GREEN);

//Submit the notification channel object to the notification manager//

notificationManager.createNotificationChannel(notificationChannel);
When you’re creating a notification, you specify the channel this notification belongs to, using setChannelId():
String channelId = "my_notification_channel";

NotificationCompat.Builder mBuilder = new NotificationCompat.Builder(this)
        .setContentTitle(“Notification")
        .setSmallIcon(R.drawable.notification_icon)
        .setContentText("You’ve been notified!")

//Assign this notification to the channel we created earlier//

        .setChannelId(channelId);
        .build();
Wrapping-Up
In this tutorial, we looked at how to implement autosizing TextViews, downloadable fonts, pinned shortcuts, adaptive icons and notification channels.
Have you started updating your apps to support Android Oreo yet? And if so, what’s your favourite feature from the 8.0 release? Let us know in the comments below!