Affiliate links on Android Authority may earn us a commission. Learn more.
Build a custom PokéStop timer with Tasker - Android customization
A few years ago, I had built myself a 5 minute timer to help me with my Ingress efforts, I never got around to turning this project into an Android customization piece, but since it works great for Pokémon Go as well, let’s take a look today. For the non-Niantic AR game enthusiasts out there, this is just a simple 5 minute timer that you can use as well.
The idea is simple, if you’ve spent any time out farming PokéStops you know that, despite turning blue again, a tower may not yet be ready for a spin. Remove the guesswork and wasted time on extra clicks, build a floating button that is just a simple 5 minute timer.
Before we begin
Custom PokéStop timer with Tasker
Let’s look this over one more time before we begin. In the new Pokémon Go game, when you are out exploring the real world, you will encounter what are called PokéStops, these are real world landmarks that coincide with virtual world towers that you can interact with. In the game, you tap on the tower, swipe a spinning wheel and collect goodies.
There is a 5 minute refresh timer on each PokéStop before you can spin the wheel again to collect more stuff. These are blue pillars in the game. While the tower is hot, it will display as purple in the game, then, as it cools it turns blue again. Here’s the thing, a PokéStop will turn completely blue before it is actually time to spin again, leaving you guessing and waiting for the next spin.
This is where we step in, wouldn’t it be nice to have a dedicated timer to see exactly when the PokéStop is ready to spin again? Best of all, wouldn’t it be great if this timer were visible outside of the game, so you can respond to a text or keep reading Android Authority while you wait for the tower to be ready again? Yes it would, let’s do it.
We are going to piggyback off of previous customization projects today, we’ll deal with Scenes, variables and For loops. Here are a few links to remind you how those work:
Tasker PokéStop timer Scene
Fire up Tasker, head over to the Scenes tab and tap the “+” button to add a new Scene. Name it something appropriate, I’ll call mine “PokeStopTimer.”
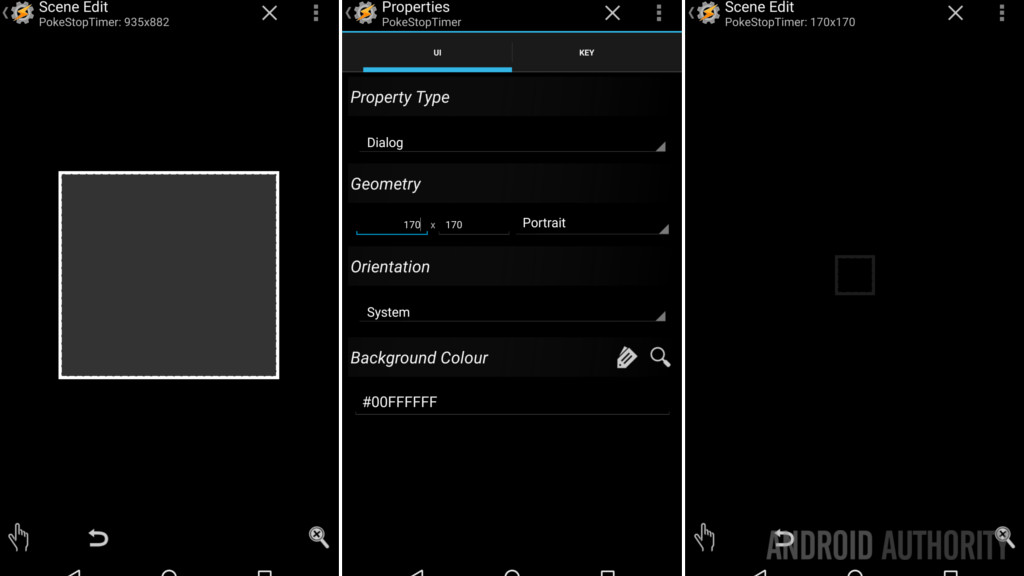
Resize the Scene area to about 170×170 and change the background color to be completely transparent. (Remember to hit the three dots menu icon in the top right to access the Properties of the Scene.)
Add an Image element to the scene, make it as big or small within the area as you’d like, but keep in mind that it will force the perspective of your actual image. My chosen images are square, so I’ll keep my Image element square as well.
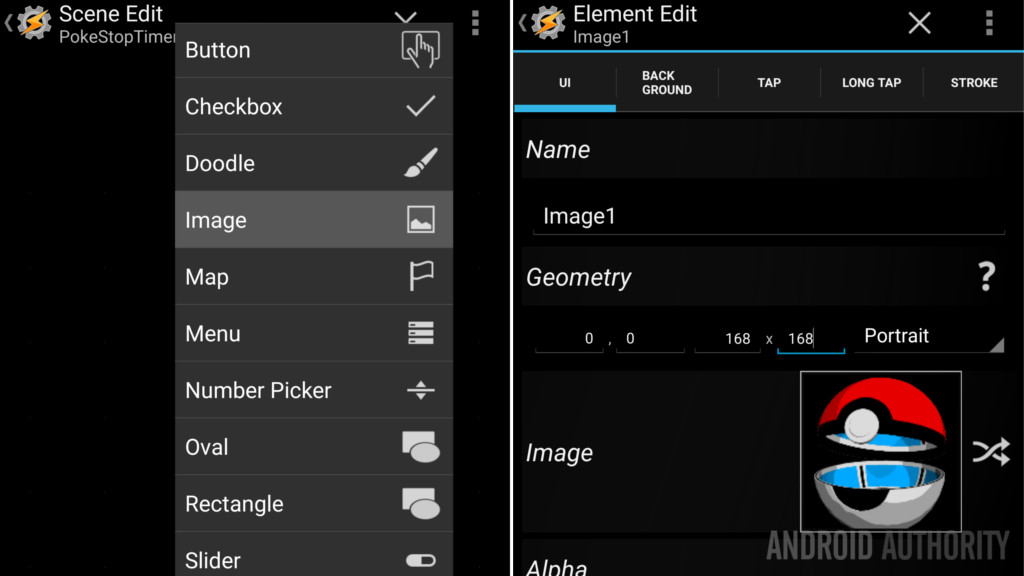
In the image properties, assign your ready to roll image. That is, your image that indicates that your timer is complete.
Head over to the Long Tap tab, I want the first thing we do to be the creation of a close task. A way to make this button go away when we’re done with it.
Tap the “+” button to add an action.

Select Scene.
Select Hide Scene. (Or Destroy Scene, up to you.)
Use the magnifying glass icon to search for your Scene name, if it is not showing already.
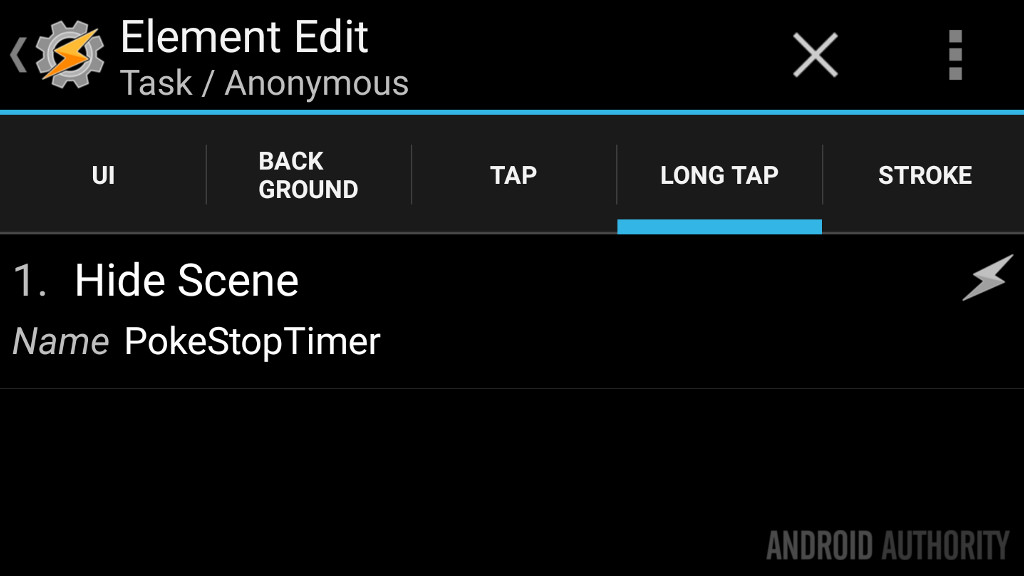
Hit that system Back button, done here.
Head over to the Tap tab and hit the “+” button to add our first action.
Here’s the idea, when you tap on the image, we will change the image to the ‘timer active’ image, then we’ll start a timer. Finally, you’ll need a notification when time’s up.
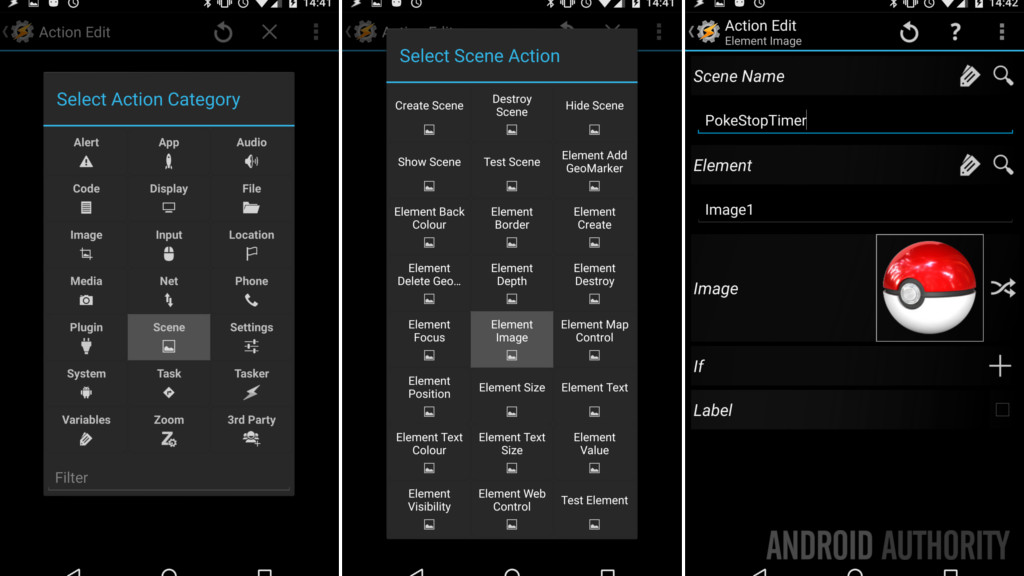
Select Scene.
Select Element Image.
Apply your timer active image.
Back out to save.
Tap the “+” button for your next action.
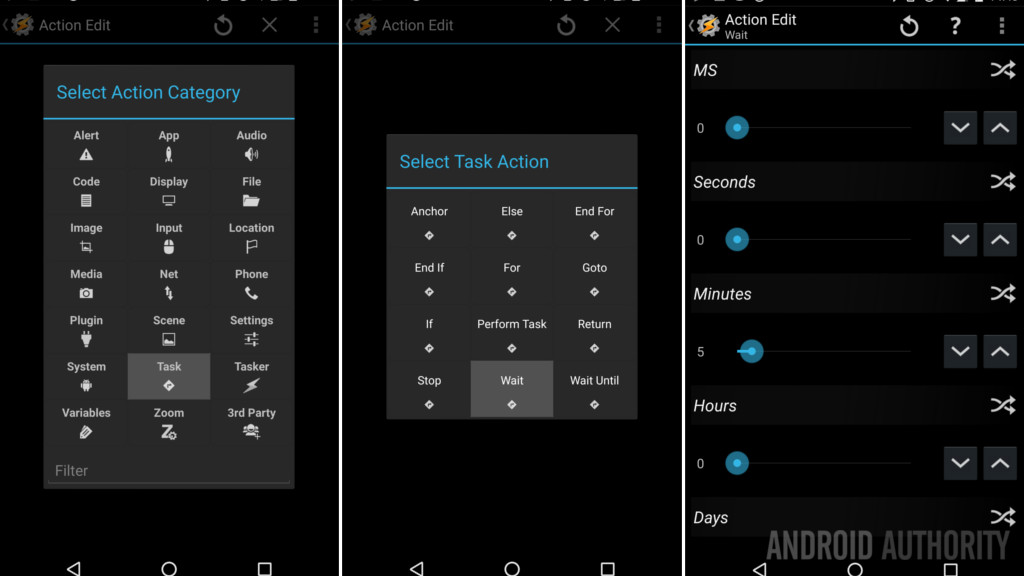
Select Task.
Select Wait.
Set the time to 5 minutes, or 300 seconds.
Back out to save.
Tap the “+” button to add your notification action.
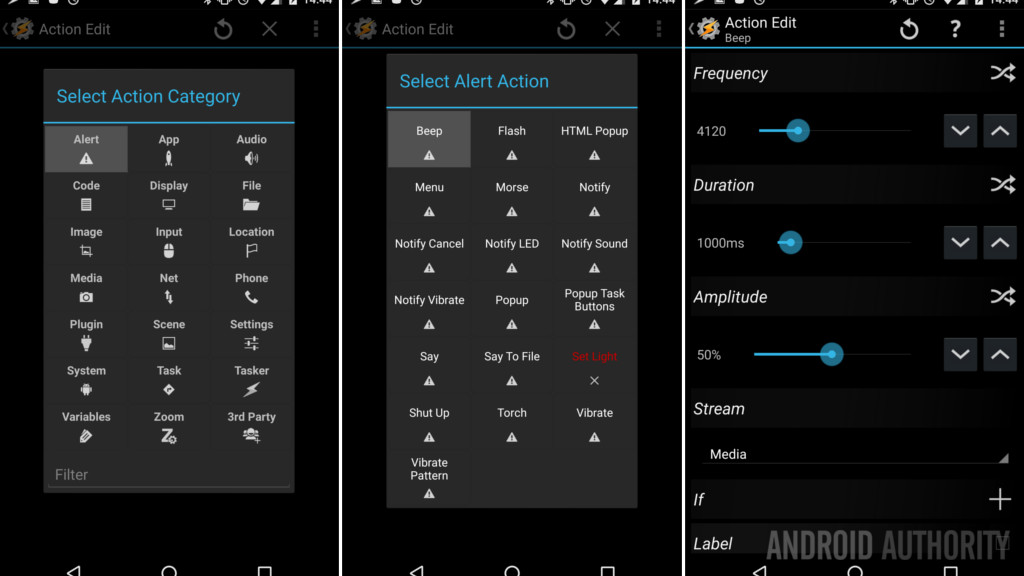
Select Alert.
Select Beep.
Play with the settings to your liking. Hit the Back button to save out.
You may add as many notifications as you’d like. My old Ingress timer included a Flash alert telling me things were ready, as well as a custom vibration, just for the fun of it. Yes, I had audio, visual and tactile feedback, the trifecta of smartphone notifications.
Finally, we want to revert the image to the ‘ready to go’ image.
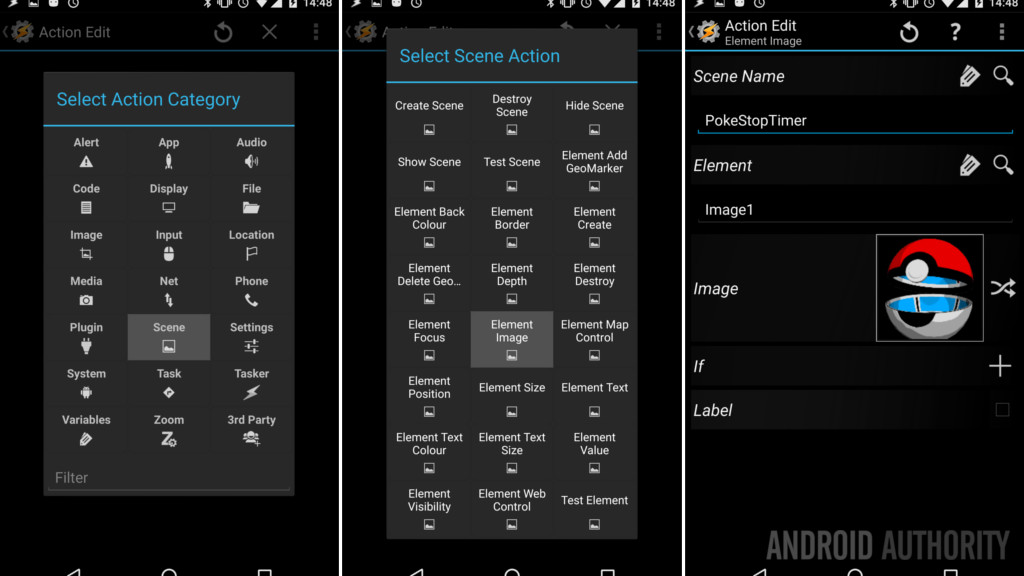
Same as before, tap the “+” button -> select Scene -> select Element Image -> apply your image.
Back out to save.
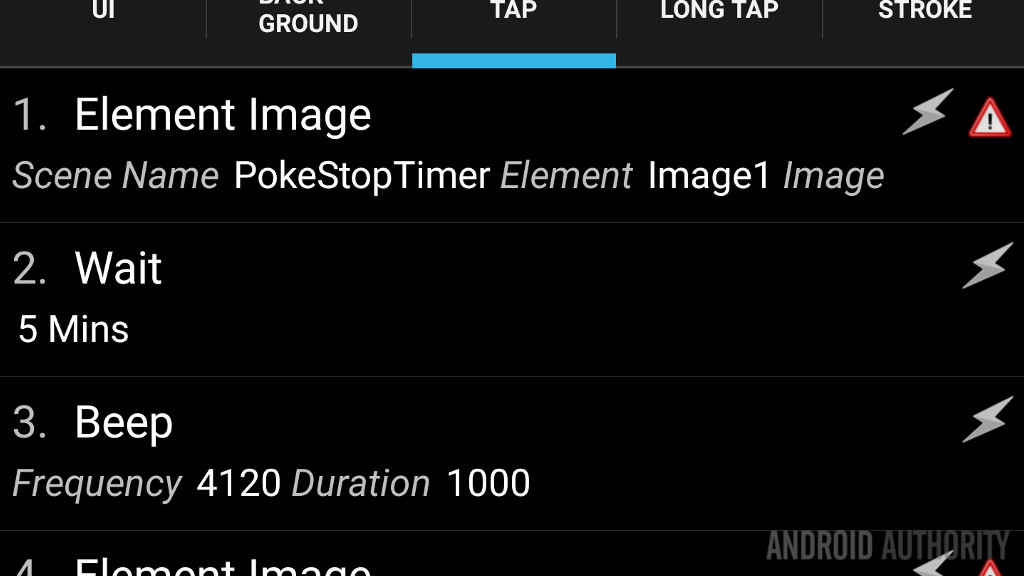
That is the bulk of your setup within the Scene, go ahead and back out and head over to the Tasks tab in Tasker.
Tasker PokéStop timer Task
Head over to the Tasks tab, if you haven’t done so already.
Create a new Task and name it something like “RunPokeTimer.”
Tap the “+” button.
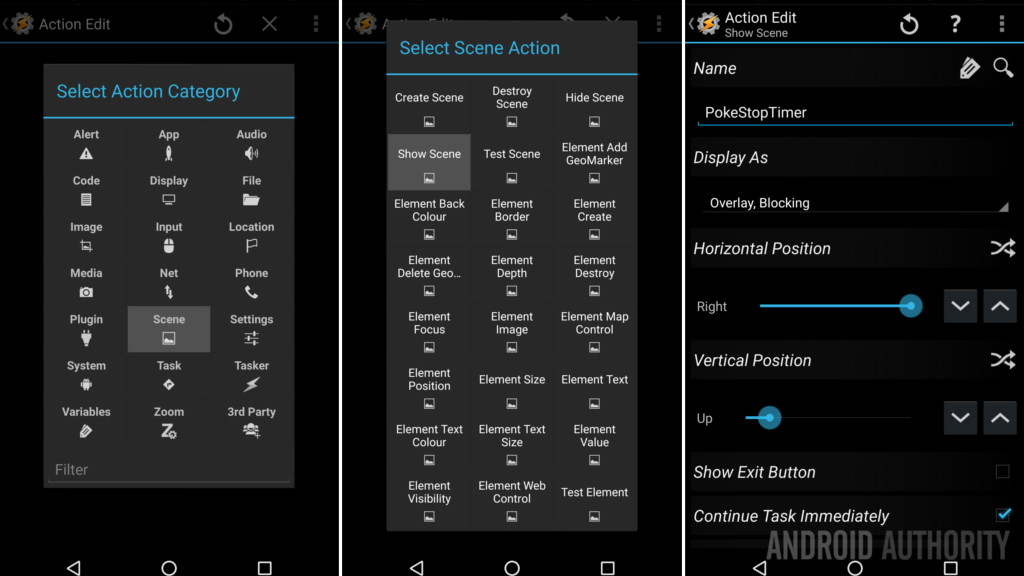
Select Scene.
Select Show Scene.
Tap the magnifying glass icon to find your Scene.
Under Display As, choose Overlay, Blocking.
You’ll have to play around with the Horizontal and Vertical Positions, I like mine to be off to the right edge and down just a bit. On my display these settings place the Scene just below the compass icon in the game.
Finally, turn off Show Exit Button, we handled this in the Long Press action of the Scene.
Tap the system Back button to save and exit. This is all there is to the Task.
Start your Tasker PokéStop timer Scene
Now that you have that all done, you need to figure out a way to start the Scene when you need it. You could experiment with a Profile that runs the Task to fire up the Scene when Pokémon Go is running on your device, but that may terminate the Scene when you close the app.
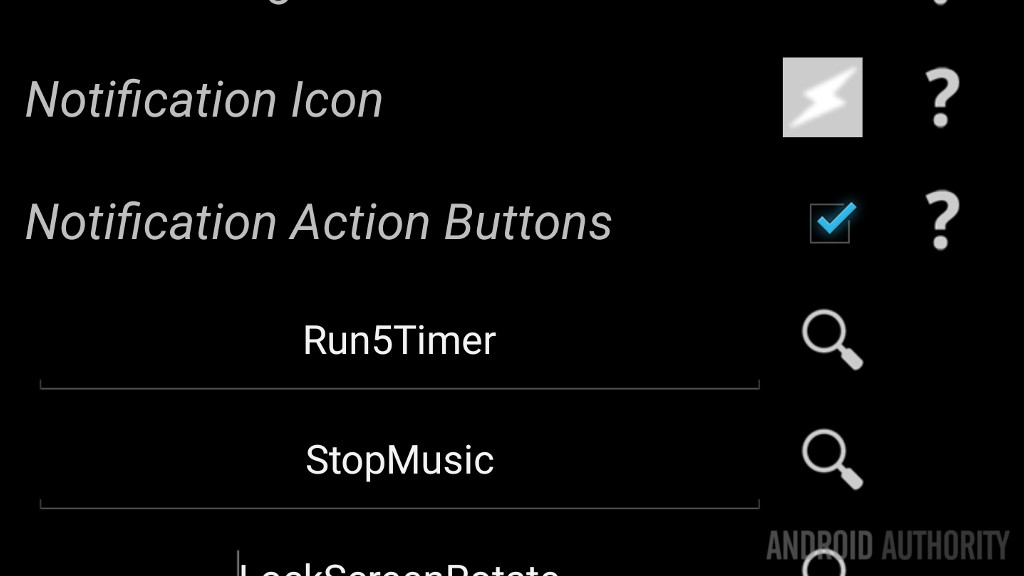
Myself, I have chosen to place my PokeStopTimer startup Task right in the main Tasker notification on the device. With just a quick swipe I have instant access to the timer, and it is not tied to any other Profile or process that might close it out on me.
To do this, hit the triple dots menu icon in the top right of the screen when in the main area of Tasker. Select Preferences and in the Monitor tab you’ll find the Notification Action Buttons option. Turn it on and select up to three Tasks. We’ve explored this before:
What’s next?
Did you notice that my project has a text element added? Simply add the Text element in the Scene, then in the Tap action, add an action that updates the Scene -> Element Text value as the timer goes.
The way the project is set now, you can have add on so that the text says something like “Wait” when active, then “Ready” when the timer expires, or you could create a For loop that changes the text every minute, like I have. Just remember, Tasker acts in a linear fashion, so if your For loop accounts for 5 minutes of Wait time, you’ll want to disable or delete your other 5 minute Wait action. The following image is of my Timelapse For loop tutorial, I hope that’s enough to help you get this down.

Finally, there was a version of this project I built once that included text input and a slider, allowing me to use either as a method to create a timer of any length of time. I found that it was just easier to use the default Clock app for these sorts of timers, but hey, it can be done.
Next week
There is a point when there is too much Pokémon coverage on a particular site, I am sorry I did not bring you this Android customization timer project a couple years ago when I was using it with Ingress. For that version I extracted the voice files from the game itself, so that the game voice counted down and notified me it was time to hack again. I thought it was cool.
Next week will be more of the same mystery projects as we’ve been seeing lately. The simple truth is that I have not decided what to write about yet, I’m open to persuasion if you have any suggestions?

Until next time, remember to go team Valor, it’s the smart thing to do.
More Android customization projects: