Affiliate links on Android Authority may earn us a commission. Learn more.
Android customization - notification counts from any app with Tasker and Zooper Widget
Published onOctober 30, 2014
If you’ve been following along the last couple Android customization tutorials, you’ve seen how to collect incoming notifications and pop them up as a simple flash over your screen using Tasker. You’ve also seen how to put a custom Gmail and SMS count/indicator on your Homescreen through Zooper Widget. No better time then to marry the two and put any and all notifications on the Homescreen.
The idea is simple enough, we collect notifications using Tasker, based on the principles learned a couple weeks back. Then we take action on them by displaying a counter on the Homescreen using Zooper Widget, similar to how we used Gmail and SMS last week. This project will require that we utilize variables within both apps and have Tasker and Zooper Widget work together, like we’ve done in the past.
If you haven’t gathered yet, today’s project accomplishes something pretty solid by pulling together bits and pieces of our previous work. If this were a TV show, it would be one of those recap episodes that spends its time replaying past scenes to tell a new story.
Before we get started
You will require two pieces of software today, Tasker is $2.99 in the Google Play Store and Zooper Widget Pro is $2.49 in the Google Play Store.
If this is your first time out, you might be thinking that five bucks is pretty expensive to tackle this simple project, and I would completely agree. However, I would urge you to check out all of the other great things that Tasker and Zooper Widget can do. Coming from a guy that cannot justify spending even a penny on in-app purchases for games, I have had no regrets whatsoever on purchasing these two apps, and I got in when Tasker was $7.
First and foremost, please understand that we will be working off of collected incoming notifications to your Android device. This project does not connect to your various services and is not designed to be a full service notification tool, it is designed simply to display an indicator that a notification has arrived for a given app, without regard to what that notification should be.
Today’s example will work from the familiar designs we started with last week. I will focus on the Google+ app, but the same steps apply to absolutely every app on your device.
Let’s talk this through before we dive into the code.
First, you will need to create a Zooper Widget for this project. Perhaps you already have a widget, like a clock, that you would like to just add a tiny counter on the side, or maybe you want a full dedicated widget, the choice is yours.
Once the widget is setup, we collect the notifications, store their count as a variable in both Tasker and Zooper Widget, then act on those variables by displaying an indicator, or the count itself on your widget. With that out of the way, we will require cleanup tasks, basically, we must decide when to return the variables and counter back to zero.
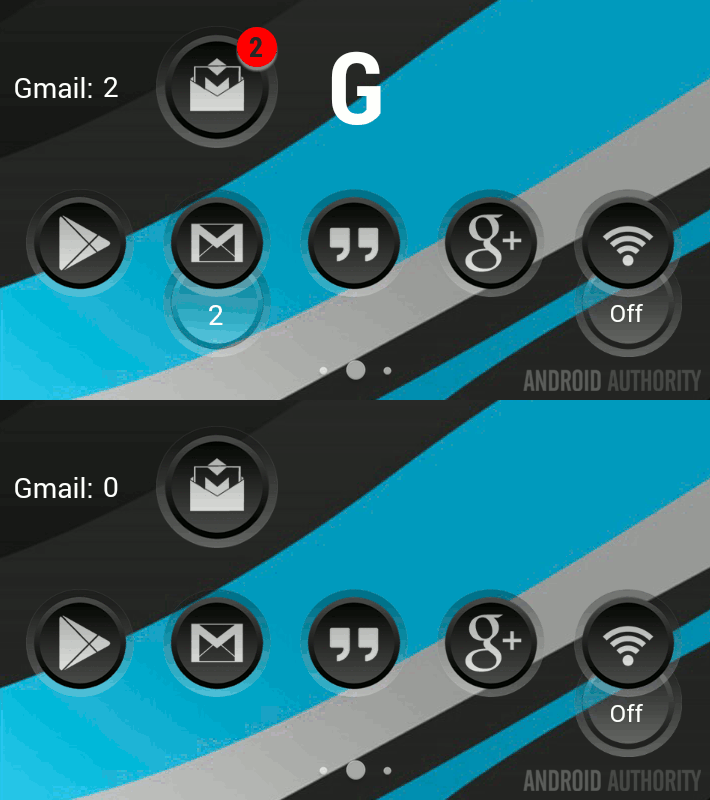
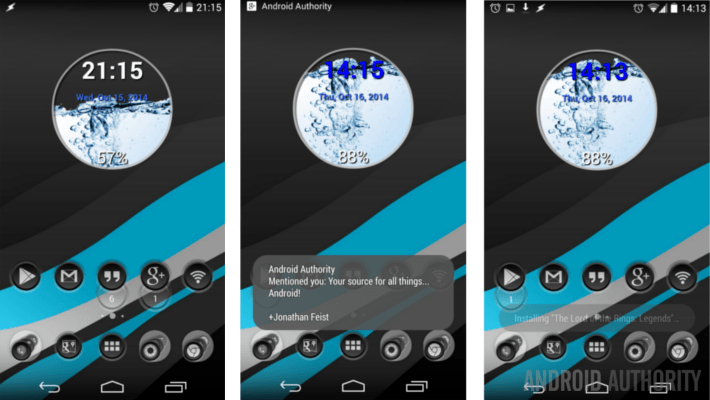
Please follow along last week’s tutorial to create your Zooper Widget on your Homescreen. You won’t need to enter the Advanced Parameter code from last week, just the design of your widget.
Take a quick look through the Tasker project we did two weeks ago, at that time, we collected all incoming notifications and flashed them to screen. This time around we will be a little bit more picky, collecting only notifications from a single app and storing them in a variable.
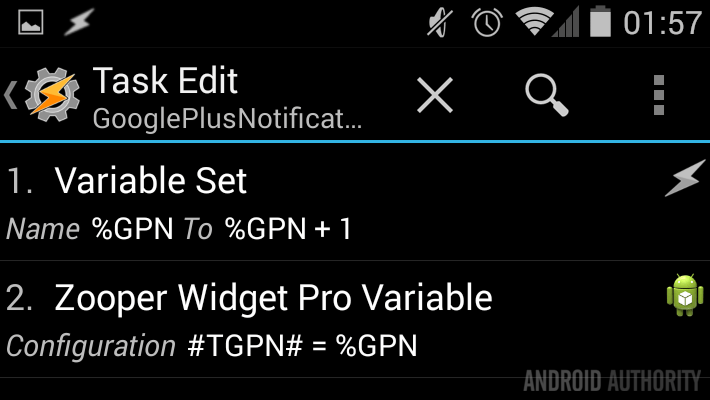
We will create a simple Tasker Task with just two actions. Start your Task and give it an appropriate name, I will call mine “GooglePlusNotification.”
Tap the “+” bottom to add an action.

Select Variables.
Select Variable Set.
In the Name field, enter a unique and concise variable name for within Tasker, preceded by the % symbol. I will call mine “%GPN“.
Special note: it is crucial that you consider your use-case when creating variables in Tasker. A full uppercase variable name designates it a global variable, accessible by other aspects of Tasker. If you include even a single lowercase character, the variable will be locked in scope to only operate within this particular Tasker Task. This can be an invaluable advantage for some projects, but will prevent our project today from operating. If in doubt, use all uppercase characters.
In the To field, we want to incrementally increase the value of the variable, so you will enter “your variable name + 1”. So, mine looks like “%GPN + 1“.
Finally, we’ll need that to evaluate, so check the box beside Do Maths.
Tap the system Back button to save and exit.
Now we create action two in this Task.

Tap the “+” button to add our second action.
Select Plugin.
Select Zooper Widget Pro.
Tap the pencil icon in the top right, beside Configure.
In the ZW Variable field, enter a unique and concise variable name for Zooper Widget, I will risk confusing myself by simply calling mine “GPN“.
In the ZW Text field, we want to assign the value of the matching Tasker variable, enter your Tasker variable name, mine was called “%GPN“.
Tap the save icon at the bottom of the screen.
Tap the system Back button to save and exit out of the action, then out of the Tasker Task. We are finished here.
I know you have now looked back over our Android customization post from two weeks prior to this one, where we collected all incoming notifications. This is very similar, with just a couple minor changes.
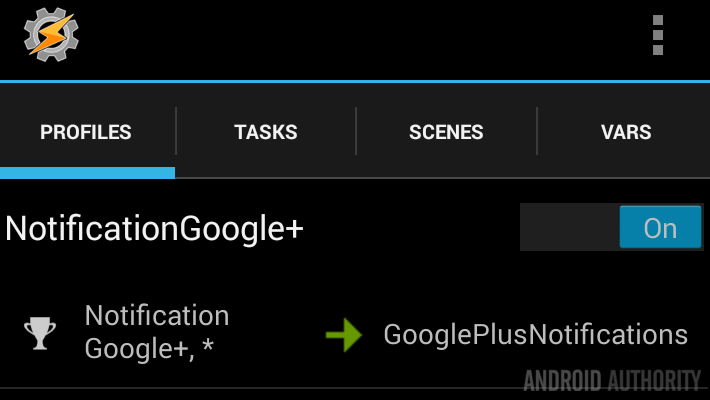
Start your Tasker Profile, if asked, give it an appropriate name, I’ll be calling mine “NotificationGoogle+“.

Select Event.
Select UI.
Select Notification.
Tap the rocket ship to choose an Owner Application.
Select Google+, or whichever app you are building your project for.
Tap the system Back button to save and exit.
Choose your Tasker Task, you’ll recall I had named mine “GooglePlusNotification.”
Tap your system Back button once again to save and exit right out of Tasker. We will now head to Zooper Widget and collect the variable to work with.
Open up your Zooper Widget that you created above, head into the element that you wish to use to display or change based on the incoming notifications and head into the Advanced Parameters section.
If you are moving an element on and off of the screen, such as the red dot in our example last week, you would use that exact same code, simply swapping out your manually created variable name for the embedded Gmail variable in Zooper Widget. That code will look something like this:
$#TGPN#!=0?[ox]0[/ox]:[ox]10000[/ox]$
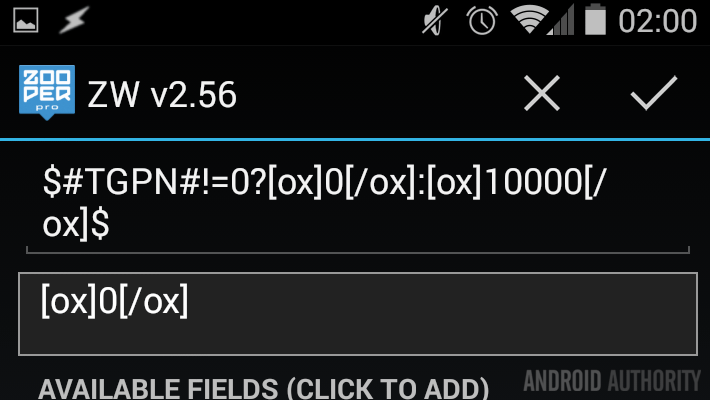
Did you get what happened there? The way Zooper Widget understands that you are receiving the variable from Tasker is by using the format #T…#. Expanding this, you see that I’ve inserted my manually created ZW Variable from above, “GPN.” (Not to be confused with the Tasker variable %GPN.) So you will enter #TYOURVARIABLE#, or #TGPN#, and be certain to maintain case sensitivity.
Tap the checkmark to save and exit.
In my example, I am also using a Text element, take the time to modify the code to operate with whichever setup you desire. If you need examples, you could check out our weather warning system from a while back, in which we look at changing element colors, sizes and more.
For our Text element, your code would look something like:
$#TGPN#=0? :#TGPN#$
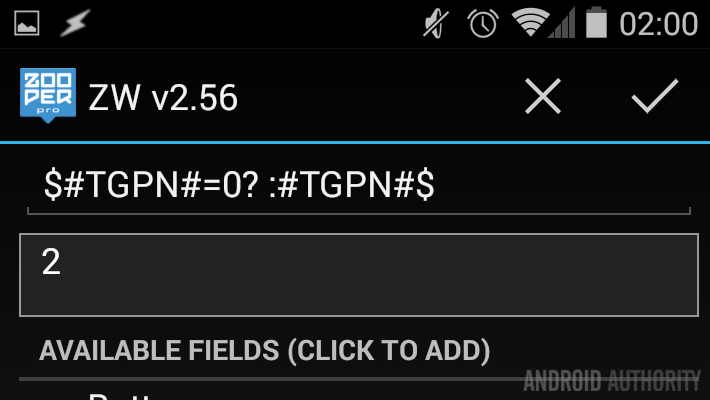
Remember that the ” ” space will display as nothing on the front end and that your custom variable is used in place of the built-in variables of Zooper Widget.
Tap the checkmark to save and exit, then exit your way out of Zooper Widget. The first stages are complete.
Your notification indicator should be fully operational in terms of letting you know that something has arrived. You’ll quickly notice that it simply adds 1 every time something new arrives and it quickly keeps adding up out of control. We need to find a time to head back into Tasker to reset the variables to 0.
Pro Tip: Take the time now to fine tune your design and layout while the elements are visible on screen.
We will basically require a full new Tasker project to proceed. It will be simple enough to create, but deciding when to use it will be critical to your experience. First things first, we will create a Task that resets the variables. After that, we will create multiple Profiles that trigger the reset.
Create your new Tasker Task and name it appropriately. I have called mine “GooglePlusClearNotify“.
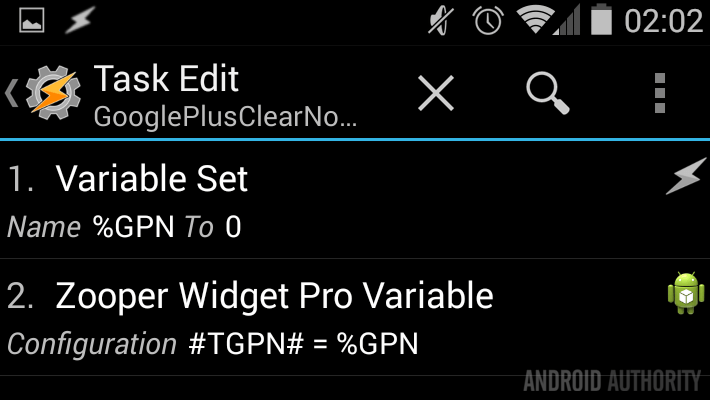
You will almost entirely duplicate everything you did in your “GooglePlusNotification” Task above, this time, instead of your Tasker -> Variable Set -> To being %GPN + 1, it will simply be 0.
Again, assign your ZW Variable to be your Tasker variable, or simple assign it the value 0 as well. Either will do in this scenario.
Tap the Task run button, which looks like a typical normal music play button, the triangle in the bottom of the screen. You won’t notice much here, but when you now tap your system Back button to save and exit all the way out to your Homescreen, you should see that Zooper Widget has reset back to your default 0 notifications state.
Now, we must decide when to run the reset Task above. I have decided to run it every time that I either enter or exit the Google+ app. You may also wish to run the reset Task when a Google+ system notification is clicked, on a timed schedule, at the start of calendar events (clear screen for a meeting) and more.
Trigger reset Task when app opens and closes
Create a new Tasker Profile and give it an appropriate name. You know the drill.

Select Application.
Select Google+, or whichever app you are building on today.
Select your reset Task, mine was called “GooglePlusClearNotify.”
Long press the Task and choose Add Exit Task. Once again, choose your reset Task.
What happens now is that your variable, and therefore Zooper Widget indicator, will change back to zero when you enter Google+. Then, if you receive any new notifications while you are in there, it all gets reset back to 0 again when you exit Google+. The idea is to have a blank slate when you put the app away.
The exit task is much more useful if you are building for an app like the Google Play Store, within which it is fairly common to trigger new notifications by installing or updating other apps.
What’s Next
After using things as described for a short while, you will begin to see another disadvantage of simply acting upon collected incoming system notifications. You will find that checking your messages on a different device will not trigger the notification count to reset on this device.
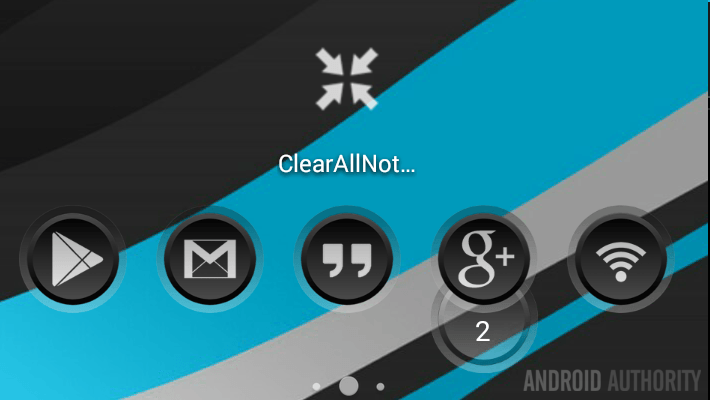
I will now pull you into the mix, please share with the class if you identify a method of clearing our notification counts across devices. Until then, what I have done is to create a dedicated Tasker Task that manually clears all of my variables, resetting all of my notification counts for all of my custom indicators. The code is identical to the reset Task above, except that this single Task includes a version of those two actions for each variable and Zooper Widget I have running.
Next Week
I think you’ve have enough of handling notifications in our Android customization series, at least for a bit. Besides, Android 5.0 Lollipop is set to start shipping to devices, or at least on the Nexus 6 and Nexus 9, before we see each other next. While we take the time to work through Lollipop and its new notification tools, let us look at something else next Thursday.

By request, we would like to revisit Zooper Widget to look specifically at moving objects based on variables. Perhaps the most common implementation of this is in designing a functional analog clock. While a rotating clock is not too hard, if you know your math, we’ll take it a little simpler with an autumn inspired project. Our goal will be to hide functionality behind a touch of class and style, and take another leap forward in Zooper Widget Advanced Parameters.
That was a long one, how did it go for you? Anyone willing to show off their handy work in the comments below?