Affiliate links on Android Authority may earn us a commission. Learn more.
Build a face-detecting app with machine learning and Firebase ML Kit
With the release of technologies such as TensorFlow and CloudVision, it’s becoming easier to use machine learning (ML) in your mobile apps, but training machine learning models still requires a significant amount of time and effort.
With Firebase ML Kit, Google are aiming to make machine learning more accessible, by providing a range of pre-trained models that you can use in your iOS and Android apps.
In this article, I’ll show you how to use ML Kit to add powerful machine learning capabilities to your apps, even if you have zero machine learning knowledge, or simply don’t have the time and resources necessary to train, optimize and deploy your own ML models.
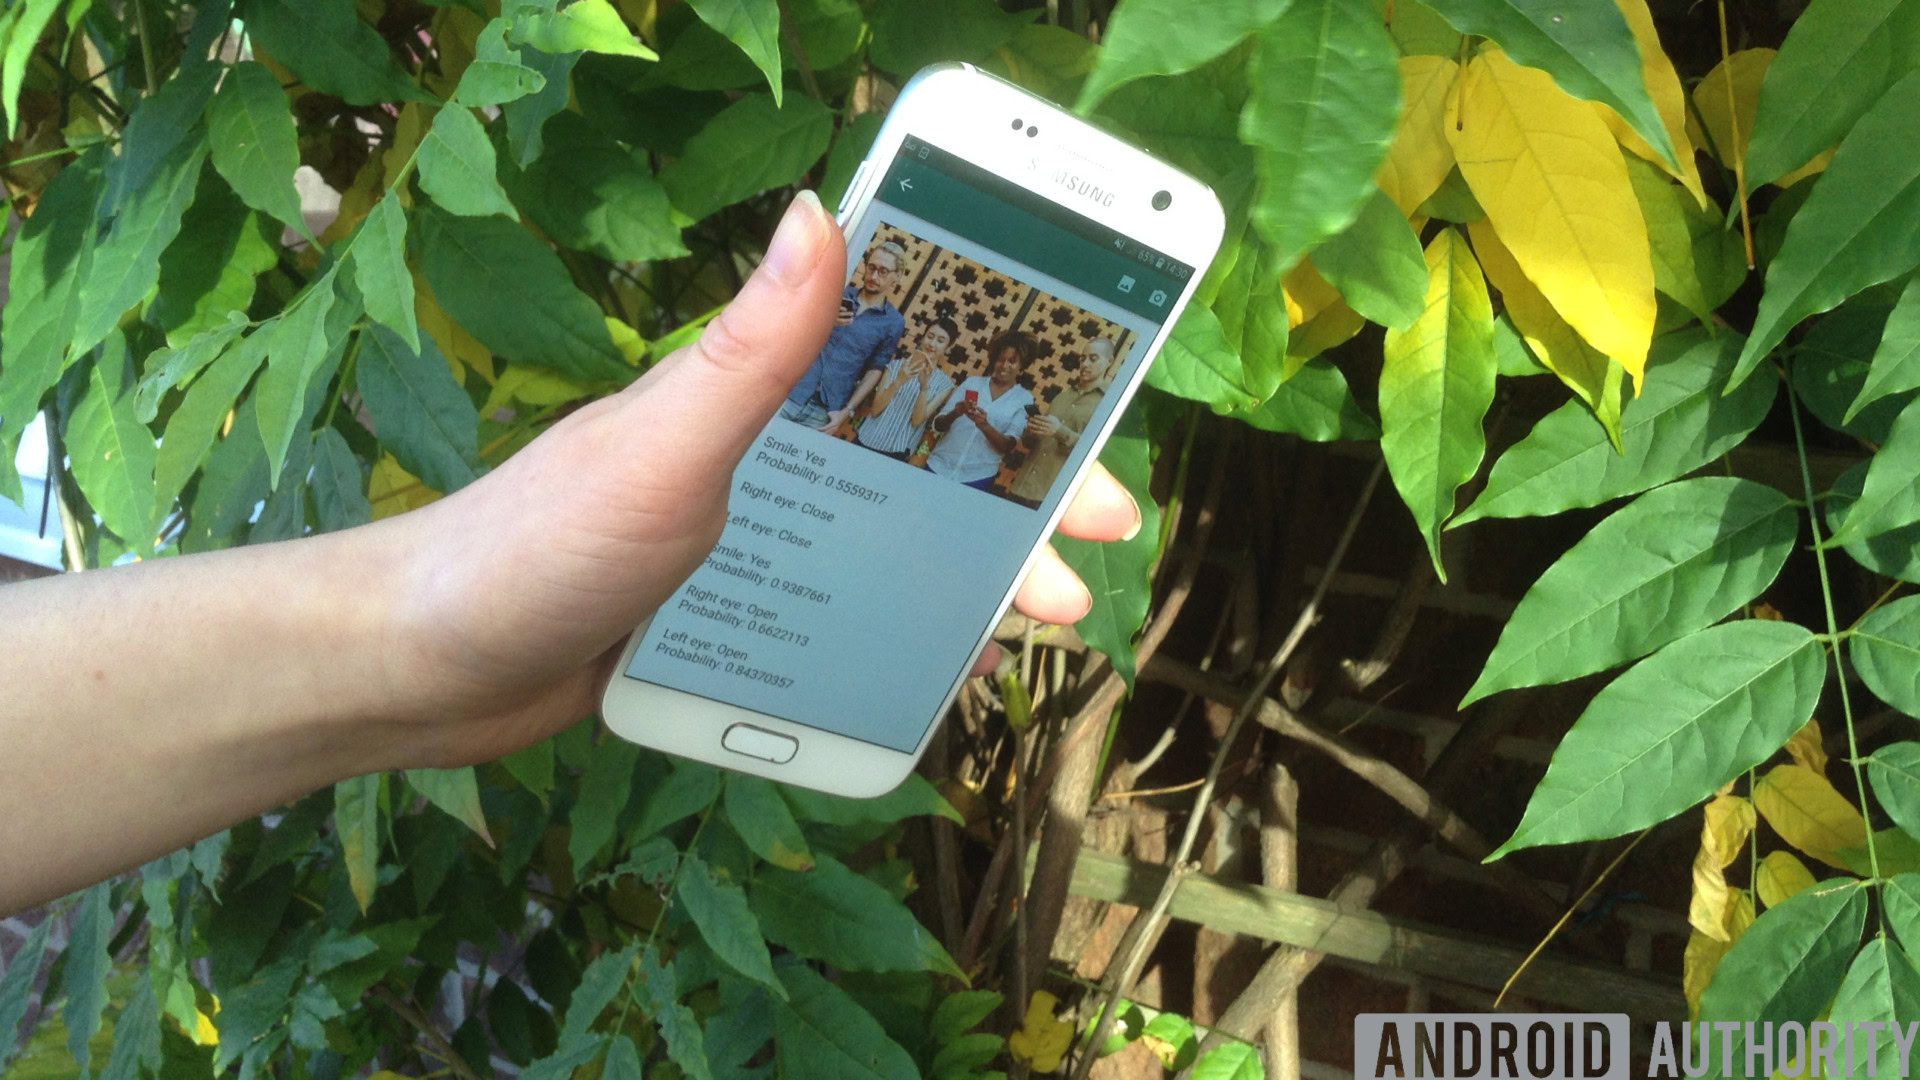
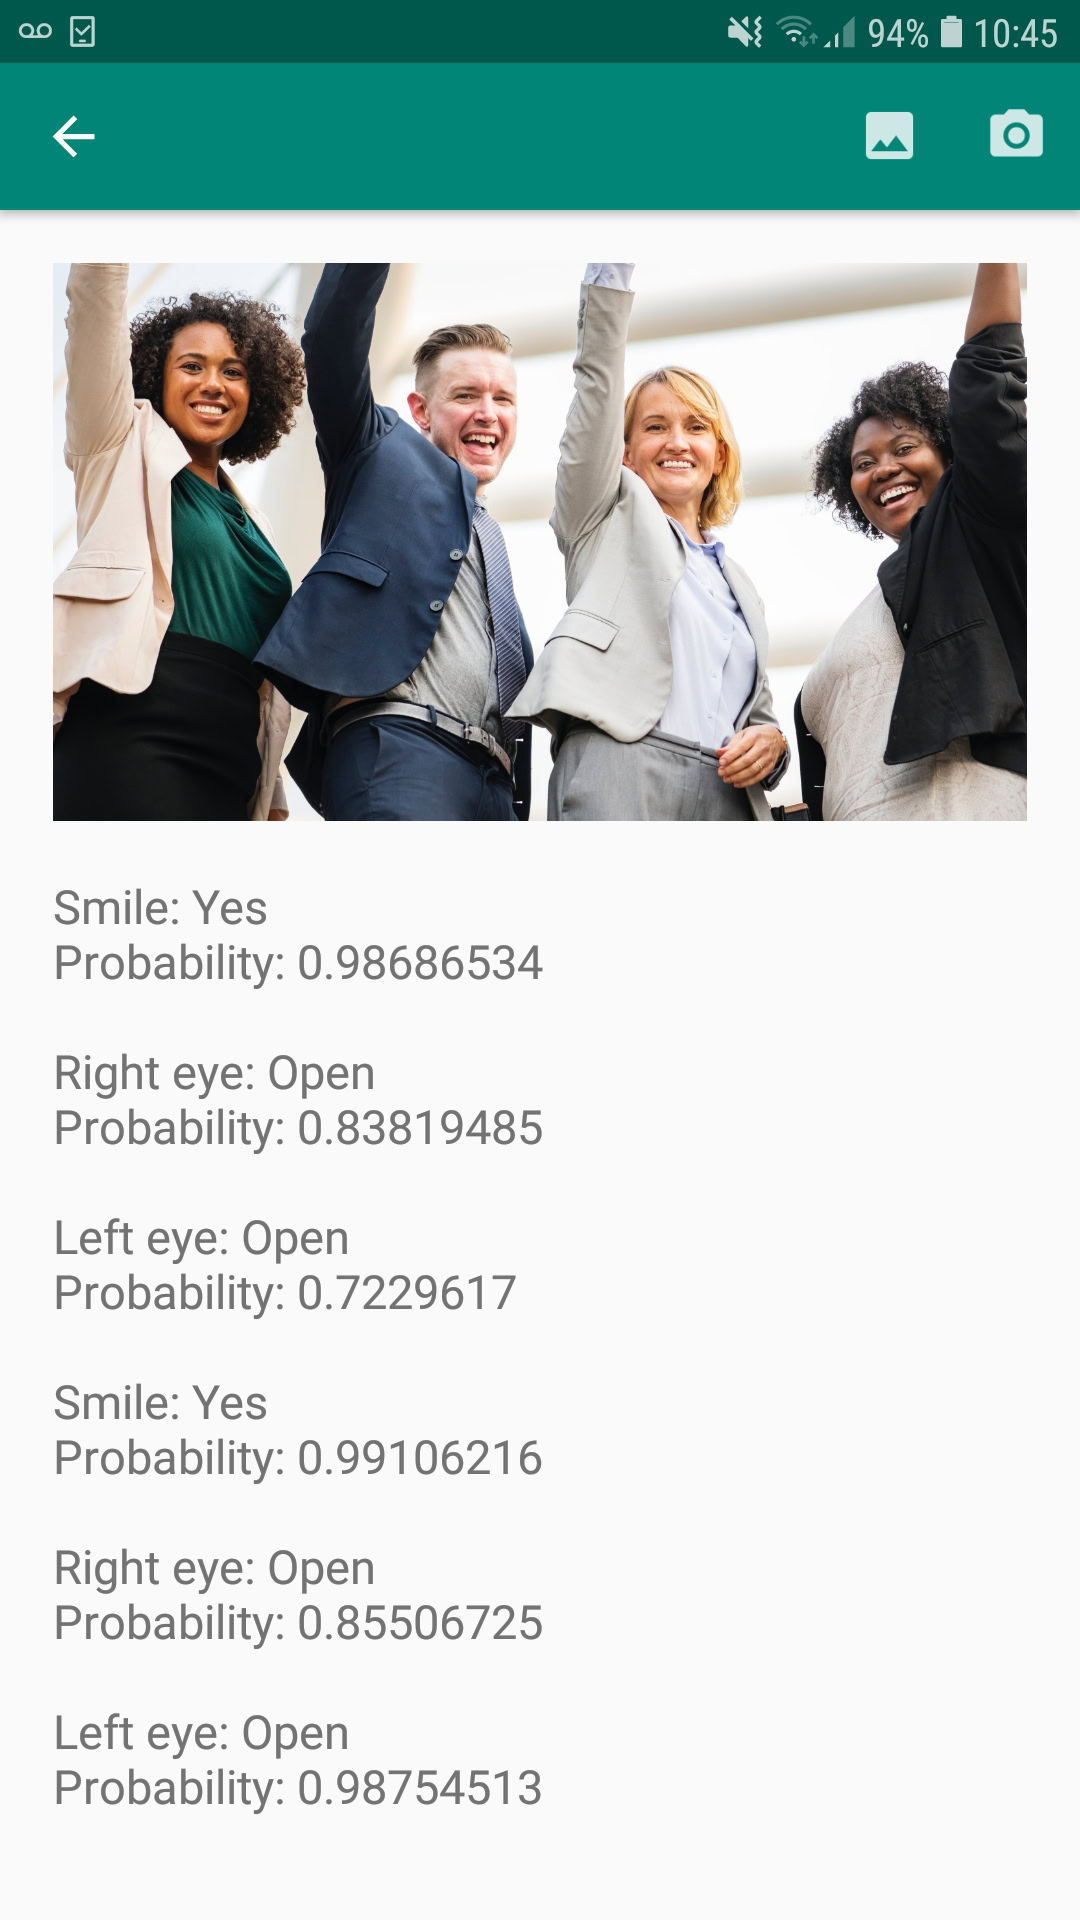
We’ll be focusing on ML Kit’s Face Detection API, which you can use to identify faces in photos, videos and live streams. By the end of this article, you’ll have built an app that can identify faces in an image, and then display information about these faces, such as whether the person is smiling, or has their eyes closed.
What is the Face Detection API?
This API is part of the cross-platform Firebase ML Kit SDK, which includes a number of APIs for common mobile use cases. Currently, you can use ML Kit to recognize text, landmarks and faces, scan barcodes, and label images, with Google planning to add more APIs in the future.
You can use the Face Detection API to identify faces in visual media, and then extract information about the position, size and orientation of each face. However, the Face Detection API really starts to get interesting, when you use it to analyze the following:
- Landmarks. These are points of interest within a face, such as the right eye or left ear. Rather than detecting landmarks first and then using them as points of reference to detect the whole face, ML Kit detects faces and landmarks separately.
- Classification. This is where you analyze whether a particular facial characteristic is present. Currently, the Face Detection API can determine whether the right eye and left eye are open or closed, and whether the person is smiling.
You can use this API to enhance a wide range of existing features, for example you could use face detection to help users crop their profile picture, or tag friends and family in their photos. You can also use this API to design entirely new features, such as hands-free controls, which could be a novel way to interact with your mobile game, or provide the basis for accessibility services.
Just be aware that this API offers face detection and not face recognition, so it can tell you the exact coordinates of a person’s left and right ears, but not who that person is.
Connect your project to Firebase
Now we know what Face Detection is, let’s create an application that uses this API!
Start by creating a new project with the settings of your choice, and then connect this project to the Firebase servers.
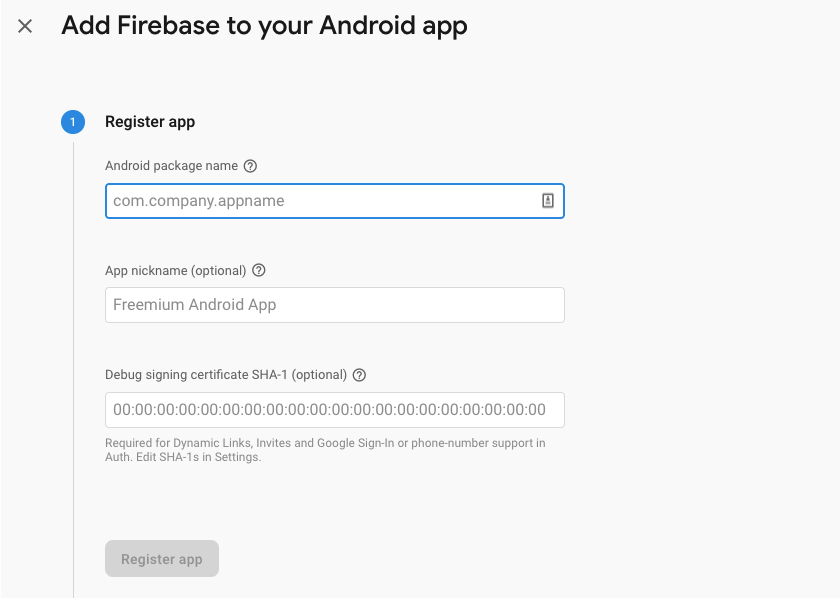
You’ll find detailed instructions on how to do this, in Extracting text from images with Google’s Machine Learning SDK.
Downloading Google’s pre-trained machine learning models
By default, your app will only download the ML Kit models as and when they’re required, rather than downloading them at install-time. This delay could have a negative impact on the user experience, as there’s no guarantee the device will have a strong, reliable Internet connection the first time it requires a particular ML model.
You can instruct your application to download one or more ML models at install-time, by adding some metadata to your Manifest. While I have the Manifest open, I’m also adding the WRITE_EXTERNAL_STORAGE and CAMERA permissions, which we’ll be using it later in this tutorial.
<?xml version="1.0" encoding="utf-8"?>
<manifest xmlns:android="http://schemas.android.com/apk/res/android"
   package="com.jessicathornsby.facerecog">

//Add the STORAGE and CAMERA permissions//

   <uses-permission android:name="android.permission.WRITE_EXTERNAL_STORAGE" />
   <uses-permission android:name="android.permission.CAMERA" />

   <application
       android:allowBackup="true"
       android:icon="@mipmap/ic_launcher"
       android:label="@string/app_name"
       android:roundIcon="@mipmap/ic_launcher_round"
       android:supportsRtl="true"
       android:theme="@style/AppTheme">
       <activity android:name=".MainActivity">
           <intent-filter>
               <action android:name="android.intent.action.MAIN" />

               <category android:name="android.intent.category.LAUNCHER" />
           </intent-filter>
       </activity>

//Download the Face detection model at install-time//

       <meta-data
           android:name="com.google.firebase.ml.vision.DEPENDENCIES"
           android:value="face" />
Creating the layout
Next, we need to create the following UI elements:
- An ImageView. Initially, this will display a placeholder, but it’ll update once the user selects an image from their gallery, or takes a photo using their device’s built-in camera.
- A TextView. Once the Face Detection API has analyzed the image, I’ll display its findings in a TextView.
- A ScrollView. Since there’s no guarantee the image and the extracted information will fit neatly onscreen, I’m placing the TextView and ImageView inside a ScrollView.
Open activity_main.xml and add the following:
<?xml version="1.0" encoding="utf-8"?>
<RelativeLayout xmlns:android="http://schemas.android.com/apk/res/android"
   xmlns:tools="http://schemas.android.com/tools"
   android:layout_width="match_parent"
   android:layout_height="match_parent"
   android:padding="20dp"
   tools:context=".MainActivity">

   <ScrollView
       android:layout_width="match_parent"
       android:layout_height="match_parent">

       <LinearLayout
           android:layout_width="match_parent"
           android:layout_height="wrap_content"
           android:orientation="vertical">

           <ImageView
               android:id="@+id/imageView"
               android:layout_width="match_parent"
               android:layout_height="wrap_content"
               android:adjustViewBounds="true"
               android:src="@drawable/ic_placeholder" />

           <TextView
               android:id="@+id/textView"
               android:layout_width="match_parent"
               android:layout_height="wrap_content"
               android:textAppearance="@style/TextAppearance.AppCompat.Medium"
               android:layout_marginTop="20dp"/>

       </LinearLayout>

   </ScrollView>

</RelativeLayout>
Next, open your project’s strings.xml file, and define all the strings we’ll be using throughout this project.
<resources>
   <string name="app_name">FaceRecog</string>
   <string name="action_gallery">Gallery</string>
   <string name="storage_denied">This app needs to access files on your device.</string>
   <string name="action_camera">Camera</string>
   <string name="camera_denied">This app need to access the camera.</string>
   <string name="error">Cannot access ML Kit</string>
</resources>
We also need to create a “ic_placeholder” resource:
- Select “File > New > Image Asset” from the Android Studio toolbar.
- Open the “Icon Type” dropdown and select “Action Bar and Tab Icons.”
- Make sure the “Clip Art” radio button is selected.
- Give the “Clip Art” button a click.
- Select the image that you want to use as your placeholder; I’m using “Add to photos.”
- Click “OK.”
- In the “Name,” field, enter “ic_placeholder.”
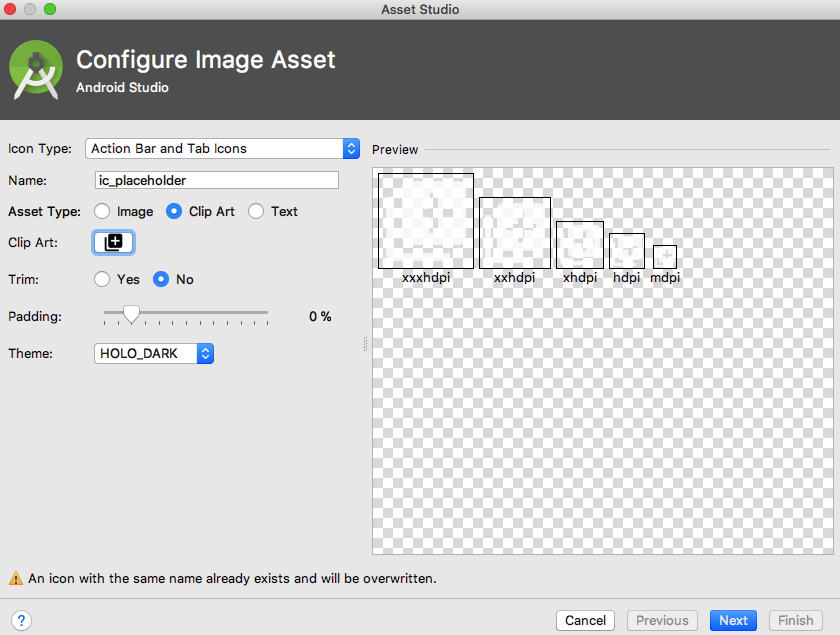
- Click “Next.” Read the information, and if you’re happy to proceed then click “Finish.”
Customize the action bar
Next, I’m going to create two action bar icons that’ll let the user choose between selecting an image from their gallery, or taking a photo using their device’s camera.
If your project doesn’t already contain a “menu” directory, then:
- Control-click your project’s “res” directory and select “New > Android Resource Directory.”
- Open the “Resource type” dropdown and select “menu.”
- The “Directory name” should update to “menu” automatically, but if it doesn’t then you’ll need to rename it manually.
- Click “OK.”
Next, create the menu resource file:
- Control-click your project’s “menu” directory and select “New > Menu resource file.”
- Name this file “my_menu.”
- Click “OK.”
- Open the “my_menu.xml” file, and add the following:
<?xml version="1.0" encoding="utf-8"?>
   <menu xmlns:android="http://schemas.android.com/apk/res/android"
       xmlns:app="http://schemas.android.com/apk/res-auto"
       xmlns:tools="http://schemas.android.com/tools" >

       <item
           android:id="@+id/action_gallery"
           android:orderInCategory="101"
           android:title="@string/action_gallery"
           android:icon="@drawable/ic_gallery"
           app:showAsAction="ifRoom"/>

   <item
       android:id="@+id/action_camera"
       android:orderInCategory="102"
       android:title="@string/action_camera"
       android:icon="@drawable/ic_camera"
       app:showAsAction="ifRoom"/>

</menu>
Next, create the “ic_gallery” and “ic_camera” drawables:
- Select “File > New > Image Asset.”
- Set the “Icon Type” dropdown to “Action Bar and Tab Icons.”
- Click the “Clip Art” button.
- Choose a drawable. I’m using “image” for my “ic_gallery” icon.
- Click “OK.”
- To ensure this icon will be clearly visible in the action bar, open the “Theme” dropdown and select “HOLO_DARK.”
- Name this icon “ic_gallery.”
- “Click “Next,” followed by “Finish.”
Repeat this process to create an “ic_camera” resource; I’m using the “photo camera” drawable.
Handling permission requests and click events
I’m going to perform all the tasks that aren’t directly related to Face Detection in a separate BaseActivity class, including instantiating the menu, handling action bar click events, and requesting access to the device’s storage and camera.
- Select “File > New > Java class” from Android Studio’s toolbar.
- Name this class “BaseActivity.”
- Click “OK.”
- Open BaseActivity, and then add the following:
import android.app.Activity;
import android.os.Bundle;
import android.content.DialogInterface;
import android.content.Intent;
import android.content.pm.PackageManager;
import android.Manifest;
import android.provider.MediaStore;
import android.view.Menu;
import android.view.MenuItem;
import android.provider.Settings;
import android.support.annotation.NonNull;
import android.support.annotation.Nullable;

import android.support.v4.app.ActivityCompat;
import android.support.v7.app.ActionBar;
import android.support.v7.app.AlertDialog;
import android.support.v7.app.AppCompatActivity;
import android.support.v4.content.FileProvider;

import android.net.Uri;

import java.io.File;

public class BaseActivity extends AppCompatActivity {

   public static final int WRITE_STORAGE = 100;
   public static final int CAMERA = 102;
   public static final int SELECT_PHOTO = 103;
   public static final int TAKE_PHOTO = 104;
   public static final String ACTION_BAR_TITLE = "action_bar_title";
   public File photoFile;

   @Override
   protected void onCreate(@Nullable Bundle savedInstanceState) {
       super.onCreate(savedInstanceState);
       ActionBar actionBar = getSupportActionBar();
       if (actionBar != null) {
           actionBar.setDisplayHomeAsUpEnabled(true);
           actionBar.setTitle(getIntent().getStringExtra(ACTION_BAR_TITLE));
       }
   }

   @Override
   public boolean onCreateOptionsMenu(Menu menu) {
       getMenuInflater().inflate(R.menu.my_menu, menu);
       return true;
   }

   @Override
   public boolean onOptionsItemSelected(MenuItem item) {
       switch (item.getItemId()) {
           case R.id.action_camera:
               checkPermission(CAMERA);
               break;
           case R.id.action_gallery:
               checkPermission(WRITE_STORAGE);
               break;
       }
       return super.onOptionsItemSelected(item);
   }

   @Override
   public void onRequestPermissionsResult(int requestCode, @NonNull String[] permissions, @NonNull int[] grantResults) {
       super.onRequestPermissionsResult(requestCode, permissions, grantResults);
       switch (requestCode) {
           case CAMERA:
               if (grantResults.length > 0 && grantResults[0] == PackageManager.PERMISSION_GRANTED) {
                   launchCamera();
               } else {
                   requestPermission(this, requestCode, R.string.camera_denied);
               }
                  break;
           case WRITE_STORAGE:
                  if (grantResults.length > 0 && grantResults[0] == PackageManager.PERMISSION_GRANTED) {
                   selectPhoto();
               } else {
                   requestPermission(this, requestCode, R.string.storage_denied);
               }
               break;
       }
}

   public static void requestPermission(final Activity activity, final int requestCode, int message) {
         AlertDialog.Builder alert = new AlertDialog.Builder(activity);
         alert.setMessage(message);
         alert.setPositiveButton(android.R.string.ok, new DialogInterface.OnClickListener() {
             @Override
             public void onClick(DialogInterface dialogInterface, int i) {
                 dialogInterface.dismiss();
                 Intent intent = new Intent(Settings.ACTION_APPLICATION_DETAILS_SETTINGS);
                 intent.setData(Uri.parse("package:" + activity.getPackageName()));
                 activity.startActivityForResult(intent, requestCode);
           }
       });
       alert.setNegativeButton(android.R.string.cancel, new DialogInterface.OnClickListener() {
           @Override
           public void onClick(DialogInterface dialogInterface, int i) {
               dialogInterface.dismiss();
           }
       });
       alert.setCancelable(false);
       alert.show();
   }

   public void checkPermission(int requestCode) {
       switch (requestCode) {
           case CAMERA:
               int hasCameraPermission = ActivityCompat.checkSelfPermission(this, Manifest.permission.CAMERA);
               if (hasCameraPermission == PackageManager.PERMISSION_GRANTED) {
                   launchCamera();
               } else {
                   ActivityCompat.requestPermissions(this, new String[]{Manifest.permission.CAMERA}, requestCode);
               }
               break;
           case WRITE_STORAGE:
               int hasWriteStoragePermission = ActivityCompat.checkSelfPermission(this, Manifest.permission.WRITE_EXTERNAL_STORAGE);
               if (hasWriteStoragePermission == PackageManager.PERMISSION_GRANTED) {
                   selectPhoto();
               } else {
                   ActivityCompat.requestPermissions(this, new String[]{Manifest.permission.WRITE_EXTERNAL_STORAGE}, requestCode);
               }
               break;
       }
   }

   private void selectPhoto() {
       photoFile = MyHelper.createTempFile(photoFile);
       Intent intent = new Intent(Intent.ACTION_PICK, MediaStore.Images.Media.EXTERNAL_CONTENT_URI);
       startActivityForResult(intent, SELECT_PHOTO);
   }

   private void launchCamera() {
       photoFile = MyHelper.createTempFile(photoFile);
       Intent intent = new Intent(MediaStore.ACTION_IMAGE_CAPTURE);
       Uri photo = FileProvider.getUriForFile(this, getPackageName() + ".provider", photoFile);
       intent.putExtra(MediaStore.EXTRA_OUTPUT, photo);
       startActivityForResult(intent, TAKE_PHOTO);
   }
}
Creating a Helper class: Resizing images
Next, create a “MyHelper” class, where we’re we’ll resize the user’s chosen image:
import android.graphics.Bitmap;
import android.graphics.BitmapFactory;
import android.content.Context;
import android.database.Cursor;
import android.os.Environment;
import android.widget.ImageView;
import android.provider.MediaStore;
import android.net.Uri;

import static android.graphics.BitmapFactory.decodeFile;
import static android.graphics.BitmapFactory.decodeStream;

import java.io.File;
import java.io.FileNotFoundException;
import java.io.FileOutputStream;
import java.io.IOException;

public class MyHelper {

   public static String getPath(Context context, Uri uri) {
       String path = "";
       String[] projection = {MediaStore.Images.Media.DATA};
       Cursor cursor = context.getContentResolver().query(uri, projection, null, null, null);
       int column_index;
       if (cursor != null) {
           column_index = cursor.getColumnIndexOrThrow(MediaStore.Images.Media.DATA);
           cursor.moveToFirst();
           path = cursor.getString(column_index);
           cursor.close();
       }
       return path;
   }

   public static File createTempFile(File file) {
       File directory = new File(Environment.getExternalStorageDirectory().getPath() + "/com.jessicathornsby.myapplication");
       if (!directory.exists() || !directory.isDirectory()) {

           directory.mkdirs();
       }
       if (file == null) {
           file = new File(directory, "orig.jpg");
       }
       return file;
   }

   public static Bitmap resizePhoto(File imageFile, Context context, Uri uri, ImageView view) {
       BitmapFactory.Options newOptions = new BitmapFactory.Options();
       try {
           decodeStream(context.getContentResolver().openInputStream(uri), null, newOptions);
           int photoHeight = newOptions.outHeight;
           int photoWidth = newOptions.outWidth;

           newOptions.inSampleSize = Math.min(photoWidth / view.getWidth(), photoHeight / view.getHeight());
           return compressPhoto(imageFile, BitmapFactory.decodeStream(context.getContentResolver().openInputStream(uri), null, newOptions));
       } catch (FileNotFoundException exception) {
           exception.printStackTrace();
           return null;
       }
   }

   public static Bitmap resizePhoto(File imageFile, String path, ImageView view) {
       BitmapFactory.Options options = new BitmapFactory.Options();
       decodeFile(path, options);
       int photoHeight = options.outHeight;
       int photoWidth = options.outWidth;
       options.inSampleSize = Math.min(photoWidth / view.getWidth(), photoHeight / view.getHeight());
       return compressPhoto(imageFile, BitmapFactory.decodeFile(path, options));
   }

   private static Bitmap compressPhoto(File photoFile, Bitmap bitmap) {
       try {
           FileOutputStream fOutput = new FileOutputStream(photoFile);
           bitmap.compress(Bitmap.CompressFormat.JPEG, 70, fOutput);
           fOutput.close();
       } catch (IOException exception) {
           exception.printStackTrace();
       }
       return bitmap;
   }
}
Sharing files using FileProvider
I’m also going to create a FileProvider, which will allow our project to share files with other applications.
If your project doesn’t contain an “xml” directory, then:
- Control-click your project’s “res” directory and select “New > Android Resource Directory.”
- Open the “Resource type” dropdown and select “xml.”
- The directory name should change to “xml” automatically, but if it doesn’t then you’ll need to change it manually.
- Click “OK.”
Next, we need to create an XML file containing the path(s) our FileProvider will use:
- Control-click your “XML” directory and select “New > XML resource file.”
- Give this file the name “provider” and then click “OK.”
- Open your new provider.xml file and add the following:
<?xml version="1.0" encoding="utf-8"?>
<paths>

//Our app will use public external storage//

   <external-path name="external_files" path="."/>
</paths>
You then need to register this FileProvider in your Manifest:
<meta-data
           android:name="com.google.firebase.ml.vision.DEPENDENCIES"
           android:value="face" />

//Add the following block//

       <provider
           android:name="android.support.v4.content.FileProvider"

//Android uses “authorities” to distinguish between providers//

           android:authorities="${applicationId}.provider"

//If your provider doesn’t need to be public, then you should always set this to “false”//

           android:exported="false"
           android:grantUriPermissions="true">
           <meta-data
               android:name="android.support.FILE_PROVIDER_PATHS"
               android:resource="@xml/provider"/>
       </provider>

   </application>

</manifest>
Configuring the face detector
The easiest way to perform face detection, is to use the detector’s default settings. However, for the best possible results you should customize the detector so it only provides the information your app needs, as this can often accelerate the face detection process.
To edit the face detector’s default settings, you’ll need to create a FirebaseVisionFaceDetectorOptions instance:
FirebaseVisionFaceDetectorOptions options = new FirebaseVisionFaceDetectorOptions.Builder()You can then make all of the following changes to the detector’s default settings:
Fast or accurate?
To provide the best possible user experience, you need to strike a balance between speed and accuracy.
There’s several ways that you can tweak this balance, but one of the most important steps is configuring the detector to favour either speed or accuracy. In our app, I’ll be using fast mode, where the face detector uses optimizations and shortcuts that make face detection faster, but can have a negative impact on the API’s accuracy.
.setModeType(FirebaseVisionFaceDetectorOptions.ACCURATE_MODE)
.setModeType(FirebaseVisionFaceDetectorOptions.FAST_MODE)
If you don’t specify a mode, Face Detection will use FAST_MODE by default.
Classifications: Is the person smiling?
You can classify detected faces into categories, such as “left eye open” or “smiling.” I’ll be using classifications to determine whether a person has their eyes open, and whether they’re smiling.
.setClassificationType(FirebaseVisionFaceDetectorOptions.ALL_CLASSIFICATIONS)
.setClassificationType(FirebaseVisionFaceDetectorOptions.NO_CLASSIFICATIONS)
The default is NO_CLASSIFICATIONS.
Landmark detection
Since face detection and landmark detection occur independently, you can toggle landmark detection on and off.
.setLandmarkType(FirebaseVisionFaceDetectorOptions.ALL_LANDMARKS)
.setLandmarkType(FirebaseVisionFaceDetectorOptions.NO_LANDMARKS)
If you want to perform facial classification, then you’ll need to explicitly enable landmark detection, so we’ll be using ALL_LANDMARKS in our app.
Detect contours
The Face Detection API can also identify facial contours, providing you with an accurate map of the detected face, which can be invaluable for creating augmented reality apps, such as applications that add objects, creatures or Snapchat-style filters to the user’s camera feed.
.setContourMode(FirebaseVisionFaceDetectorOptions.ALL_CONTOURS)
.setContourMode(FirebaseVisionFaceDetectorOptions.NO_CONTOURS)
If you don’t specify a contour mode, then Face Detection will use NO_CONTOURS by default.
Minimum face size
This is the minimum size of faces that the API should identify, expressed as a proportion of the width of the detected face, relative to the width of the image. For example, if you specified a value of 0.1 then your app won’t detect any faces that are smaller than roughly 10% the width of the image.
Your app’s setMinFaceSize will impact that all-important speed/accuracy balance. Decrease the value and the API will detect more faces but may take longer to complete face detection operations; increase the value and operations will be completed more quickly, but your app may fail to identify smaller faces.
.setMinFaceSize(0.15f)If you don’t specify a value, then your app will use 0.1f.
Face tracking
Face tracking assigns an ID to a face, so it can be tracked across consecutive images or video frames. While this may sound like face recognition, the API is still unaware of the person’s identity, so technically it’s still classified as face detection.
It’s recommended that you disable tracking if your app handles unrelated or non-consecutive images.
.setTrackingEnabled(true)
.setTrackingEnabled(false)
This defaults to “false.”
Run the face detector
Once you’ve configured the face detector, you need to convert the image into a format that the detector can understand.
ML Kit can only process images when they’re in the FirebaseVisionImage format. Since we’re working with Bitmaps, we perform this conversion by calling the fromBitmap() utility method, and then passing the bitmap:
FirebaseVisionImage image = FirebaseVisionImage.fromBitmap(myBitmap);Next, we need to create an instance of FirebaseVisionFaceDetector, which is a detector class that locates any instances of FirebaseVisionFace within the supplied image.
FirebaseVisionFaceDetector detector = FirebaseVision.getInstance().getVisionFaceDetector(options);We can then check the FirebaseVisionImage object for faces, by passing it to the detectInImage method, and implementing the following callbacks:
- onSuccess. If one or more faces are detected, then a List<FirebaseVisionFace> instance will be passed to the OnSuccessListener. Each FirebaseVisionFace object represents a face that was detected in the image.
- onFailure. The addOnFailureListener is where we’ll handle any errors.
This gives us the following:
detector.detectInImage(image).addOnSuccessListener(new
OnSuccessListener<List<FirebaseVisionFace>>() {
           @Override

//Task completed successfully//

           public void onSuccess(List<FirebaseVisionFace> faces) {
//Do something//
           }
       }).addOnFailureListener(new OnFailureListener() {
           @Override

//Task failed with an exception//

           public void onFailure
                   (@NonNull Exception exception) {
//Do something//
           }
       });
   }
Analyzing FirebaseVisionFace objects
I’m using classification to detect whether someone has their eyes open, and whether they’re smiling. Classification is expressed as a probability value between 0.0 and 1.0, so if the API returns a 0.7 certainty for the “smiling” classification, then it’s highly likely the person in the photo is smiling.
For each classification, you’ll need to set a minimum threshold that your app will accept. In the following snippet, I’m retrieving the smile probability value:
for (FirebaseVisionFace face : faces) {
           if (face.getSmilingProbability() != FirebaseVisionFace.UNCOMPUTED_PROBABILITY) {
               smilingProbability = face.getSmilingProbability();
           }
Once you have this value, you need to check that it meets your app’s threshold:
result.append("Smile: ");
           if (smilingProbability > 0.5) {
               result.append("Yes \nProbability: " + smilingProbability);
           } else {
               result.append("No");
           }
I’ll repeat this process for the left and right eye classifications.
Here’s my completed MainActivity:
import android.graphics.Bitmap;
import android.os.Bundle;
import android.widget.ImageView;
import android.content.Intent;
import android.widget.TextView;
import android.net.Uri;

import android.support.annotation.NonNull;
import android.widget.Toast;

import com.google.firebase.ml.vision.FirebaseVision;
import com.google.firebase.ml.vision.face.FirebaseVisionFace;
import com.google.firebase.ml.vision.face.FirebaseVisionFaceDetector;
import com.google.firebase.ml.vision.face.FirebaseVisionFaceDetectorOptions;
import com.google.firebase.ml.vision.common.FirebaseVisionImage;
import com.google.android.gms.tasks.OnFailureListener;
import com.google.android.gms.tasks.OnSuccessListener;

import java.util.List;

public class MainActivity extends BaseActivity {

   private ImageView myImageView;
   private TextView myTextView;
   private Bitmap myBitmap;

   @Override
   protected void onCreate(Bundle savedInstanceState) {
       super.onCreate(savedInstanceState);
       setContentView(R.layout.activity_main);
       myTextView = findViewById(R.id.textView);
       myImageView = findViewById(R.id.imageView);

   }

   @Override
   protected void onActivityResult(int requestCode, int resultCode, Intent data) {
       super.onActivityResult(requestCode, resultCode, data);
       if (resultCode == RESULT_OK) {
           switch (requestCode) {
               case WRITE_STORAGE:
                   checkPermission(requestCode);
               case CAMERA:
                   checkPermission(requestCode);
                   break;
               case SELECT_PHOTO:
                   Uri dataUri = data.getData();
                   String path = MyHelper.getPath(this, dataUri);
                   if (path == null) {
                       myBitmap = MyHelper.resizePhoto(photoFile, this, dataUri, myImageView);
                   } else {
                       myBitmap = MyHelper.resizePhoto(photoFile, path, myImageView);
                   }
                   if (myBitmap != null) {
                       myTextView.setText(null);
                       myImageView.setImageBitmap(myBitmap);
                       runFaceDetector(myBitmap);
                   }
                   break;
                case TAKE_PHOTO:
                   myBitmap = MyHelper.resizePhoto(photoFile, photoFile.getPath(), myImageView);
                   if (myBitmap != null) {
                       myTextView.setText(null);
                       myImageView.setImageBitmap(myBitmap);
                       runFaceDetector(myBitmap);
               }
               break;
           }
       }
   }

   private void runFaceDetector(Bitmap bitmap) {

//Create a FirebaseVisionFaceDetectorOptions object//

       FirebaseVisionFaceDetectorOptions options = new FirebaseVisionFaceDetectorOptions.Builder()

//Set the mode type; I’m using FAST_MODE//

               .setModeType(FirebaseVisionFaceDetectorOptions.FAST_MODE)

//Run additional classifiers for characterizing facial features//

               .setClassificationType(FirebaseVisionFaceDetectorOptions.ALL_CLASSIFICATIONS)

//Detect all facial landmarks//

               .setLandmarkType(FirebaseVisionFaceDetectorOptions.ALL_LANDMARKS)

//Set the smallest desired face size//

               .setMinFaceSize(0.1f)

//Disable face tracking//

               .setTrackingEnabled(false)
               .build();

       FirebaseVisionImage image = FirebaseVisionImage.fromBitmap(myBitmap);
       FirebaseVisionFaceDetector detector = FirebaseVision.getInstance().getVisionFaceDetector(options);
       detector.detectInImage(image).addOnSuccessListener(new OnSuccessListener<List<FirebaseVisionFace>>() {
           @Override
           public void onSuccess(List<FirebaseVisionFace> faces) {
               myTextView.setText(runFaceRecog(faces));
           }
       }).addOnFailureListener(new OnFailureListener() {
           @Override
           public void onFailure
                   (@NonNull Exception exception) {
               Toast.makeText(MainActivity.this,
                      "Exception", Toast.LENGTH_LONG).show();
           }
       });
   }

   private String runFaceRecog(List<FirebaseVisionFace> faces) {
       StringBuilder result = new StringBuilder();
       float smilingProbability = 0;
       float rightEyeOpenProbability = 0;
       float leftEyeOpenProbability = 0;

       for (FirebaseVisionFace face : faces) {

//Retrieve the probability that the face is smiling//

           if (face.getSmilingProbability() !=

//Check that the property was not un-computed//

FirebaseVisionFace.UNCOMPUTED_PROBABILITY) {
                smilingProbability = face.getSmilingProbability();
           }

//Retrieve the probability that the right eye is open//

           if (face.getRightEyeOpenProbability() != FirebaseVisionFace.UNCOMPUTED_PROBABILITY) {
                 rightEyeOpenProbability = face.getRightEyeOpenProbability ();
           }

//Retrieve the probability that the left eye is open//

           if (face.getLeftEyeOpenProbability() != FirebaseVisionFace.UNCOMPUTED_PROBABILITY) {
               leftEyeOpenProbability = face.getLeftEyeOpenProbability();
           }

//Print “Smile:” to the TextView//

           result.append("Smile: ");

//If the probability is 0.5 or higher...//

           if (smilingProbability > 0.5) {

//...print the following//

           result.append("Yes \nProbability: " + smilingProbability);

//If the probability is 0.4 or lower...//

           } else {

//...print the following//

                result.append("No");
           }

           result.append("\n\nRight eye: ");

//Check whether the right eye is open and print the results//

           if (rightEyeOpenProbability > 0.5) {
               result.append("Open \nProbability: " + rightEyeOpenProbability);
           } else {
               result.append("Close");
           }

           result.append("\n\nLeft eye: ");

//Check whether the left eye is open and print the results//

           if (leftEyeOpenProbability > 0.5) {
               result.append("Open \nProbability: " + leftEyeOpenProbability);
           } else {
               result.append("Close");
           }
               result.append("\n\n");
           }
           return result.toString();
   }

       }
Testing the project
Put your app to the test by installing it on your Android device, and then either selecting an image from your gallery, or taking a new photo.
As soon as you’ve supplied an image, the detector should run automatically and display its results.
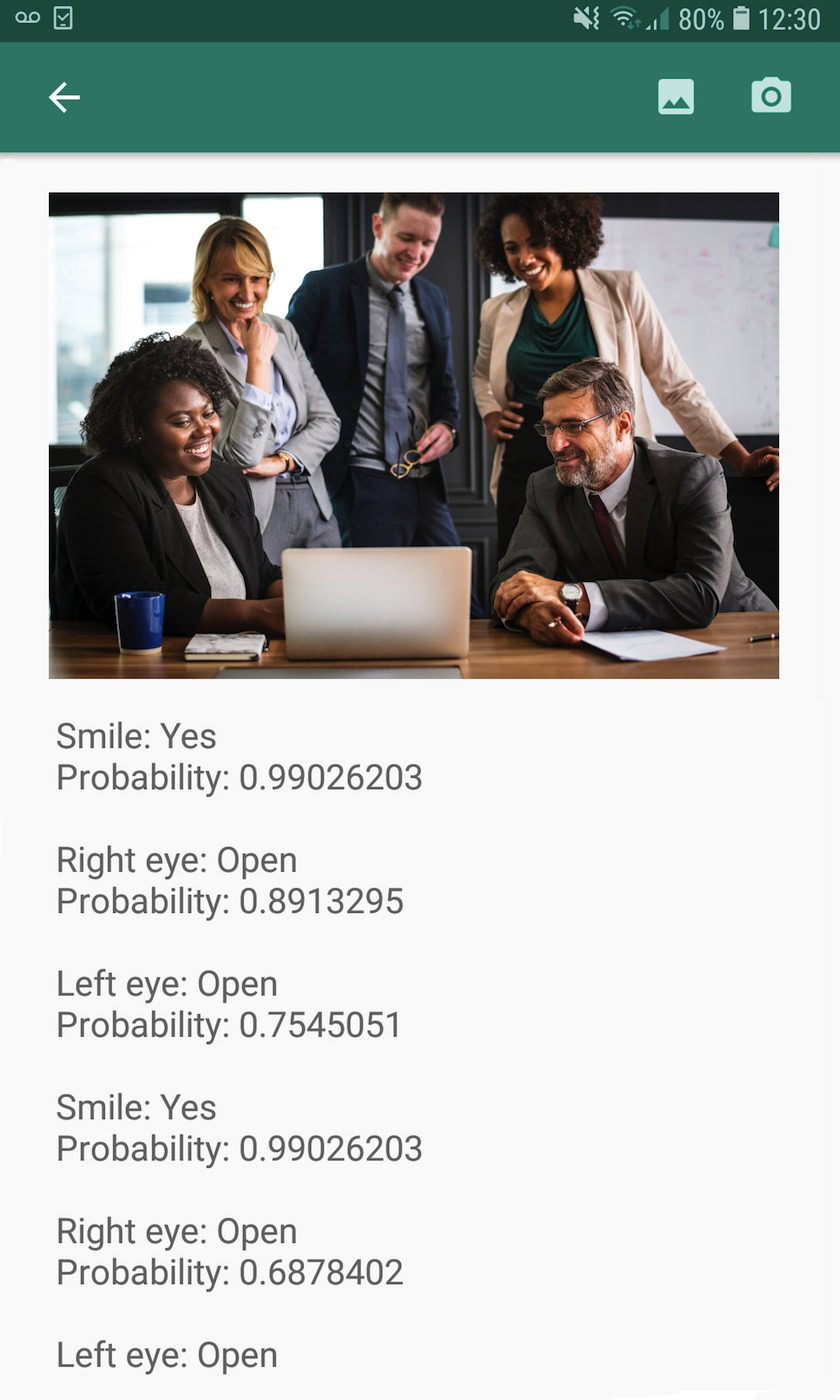
You can also download the completed project from GitHub.
Wrapping up
In this article, we used ML Kit to detect faces in photographs, and then gather information about those faces, including whether the person was smiling, or had their eyes open.
Google already have more APIs planned for ML Kit, but what machine learning-themed APIs would you like to see in future releases? Let us know in the comments below!