Affiliate links on Android Authority may earn us a commission. Learn more.
How to: start your own free Cloud Storage server
Published onMarch 18, 2013
I’m the first to admit that I’m very lazy when it comes to sorting out and backing up my photos. I can spend months taking pictures, but I rarely actually bother to backup them up on my PC or cloud storage service as I go.
When I finally get around to doing it I often end up spending a fair amount of time browsing through endless folders figuring out what I need to backup, waiting for tedious broadband upload speeds, and painstakingly slow Bluetooth connections. And it takes even longer if I want to move my pictures and other files over to my tablet afterwards.
There are a few solutions when it comes to syncing your pictures and videos across your various smartphones, tablets, PCs, and laptops. Dropbox, Picasa, and even Google Photosync are all viable solutions for certain scenarios, but aren’t ideal when you need super fast transfer speeds for large files, or if you want to sync pictures across multiple accounts and platforms.
In the age of speedy, wireless technologies there’s surely an easier solution for the forgetful photographer. This is where your very own automated FTP server comes in handy. You can setup automatic syncing across an unlimited array of devices using any number of individual user accounts, access much faster Wi-Fi transfer speeds, and avoid those pesky storage limits by using your PC as your own cloud storage system.
For my home setup I have the photos from my smartphone scheduled to upload to my PC’s external hard drive once a week, so even if my PC fails I won’t lose them. All of these files are then automatically synced to my tablet as well, so that I can flick through them at leisure whilst sitting on my sofa with a cup of tea. I can also access my FTP folder over my 3G data connection whilst I’m out and about, providing that my PC is left on.
It’s very convenient, so let me show you how to set it all up.
What you’ll need
- A configurable wireless router
- Windows XP, Vista, or 7 based PC or laptop with some free space
- A folder location on your PC or external hard drive where you want to sync pictures to and from
- FileZilla Server application installed on your Windows machine
- An Android smartphone and/or tablet with FolderSync Lite installed
Installing the Server
Start by downloading and installing the Filezilla Server on your PC – just pick the standard installation options. You’ll probably want the service to start up automatically so that you can transfer files whenever you need to, so stick with the default option there as well, unless you want to start up your sever manually.
Once the server application starts up you’ll be presented with a box asking for a server address, port and password. Leave everything as it is but pick a password and tick the “always connect to this server” option, unless you’re planning on running multiple FTP servers.
So now your server should be up and running, but you won’t be able to connect to it from any other devices yet. This next step requires you to setup users and assign which folders they can have access too. You can create multiple users and different folders if you want to segregate some of your files.
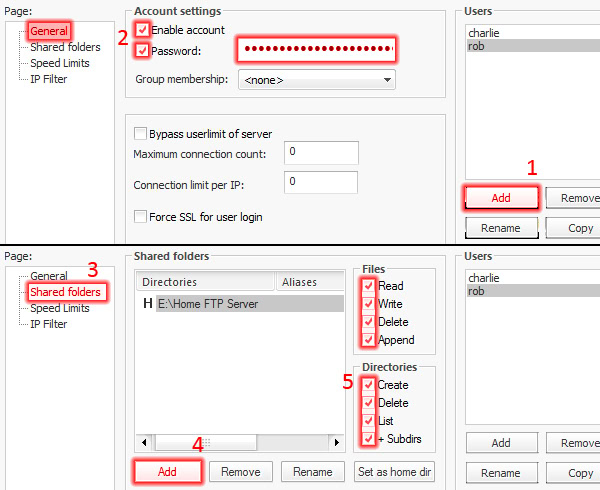
Click “Edit” then “Users,” and a screen like the one above will appear. Proceed to press “Add” and then enter the user name. Make sure that “enable account” is checked, and I recommend setting a password so that it’s harder for unauthorized people to gain access to your files.
You can then move to the shared folders page and select the directory where you wish to sync your entire picture collection too. Give yourself all the permissions as well, marked 5, so that you can create folders and new files if needed. You can add multiple sharing locations and adjust the upload and download speed limits if you don’t want these file transfers to max out your Wi-Fi bandwidth. Once you’re done click OK.
Your server is setup and ready to go.
Windows Firewall
Firewalls are the bane of the FTP server’s existence, but as we are only focusing on setting up a Wi-Fi network at the moment, you shouldn’t run into too many problems.
You’ll need to set Filezilla as an exception in the Windows Firewall program. You can find the firewall settings under your computer’s control panel. From there you’ll need to add a program to the exceptions list by browsing to the Filezilla server installation folder, which is something like C:\Program Files\FileZilla Server\FileZilla server.exe.
If you have any anti-virus software acting as a firewall it might also be wise to allow Filezilla access there as well. Once that’s done you can move on to testing out the connection.
Setting up your mobile
Now for the fun part: install FolderSync Lite from the Google Play store, as this will allow you to access and sync files over your FTP sever. It also works with a ton of other cloud storage servers if you want to integrate with other accounts.
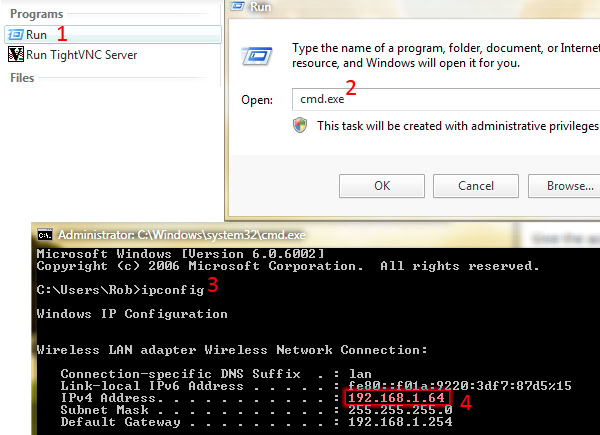
You’ll need to know the WLAN IP address of your host PC, so run the command window and type “ipconfig”. Follow the image below for a step by step.
Back on your Android device, open up the FolderSync app and click on the accounts option, then the add icon at the bottom of the screen. Select FTP and you’ll move on to the screen where you can input the required settings.
Give the account a name, I used “Home Server WiFi”, and then enter the IP address you obtained from the steps above. Leave everything else blank except the username and password you created earlier. Once that’s filled in you can test the connection, you should receive a message confirming that the connection was accepted. Click the save icon in the top right corner to confirm these settings.
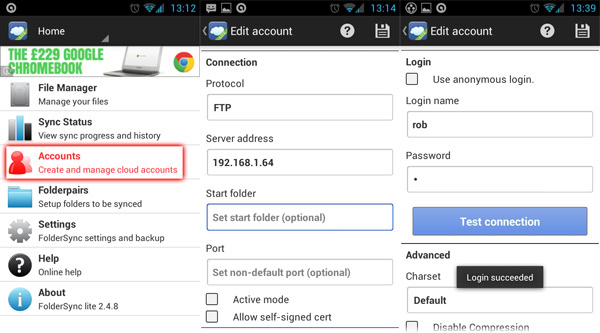
If you’re running into errors you can try manually entering the port information (port 21 is the default), and try adjusting the port settings using the server interface. If you’re still running into issues, double check your Firewall settings and try reading the official network configuration guide.
Syncing and viewing files
The “file manager” option on the home screen will allow you to browse, open, and download any files located in your shared folders on your FTP server. But if you want to setup automatic syncing then you’ll need to use the “Folderpairs” option.
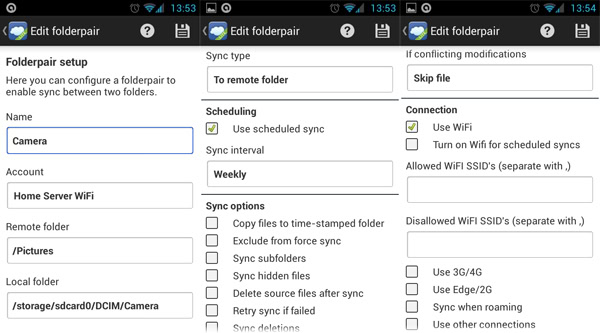
Use the account you created to sync via Wi-Fi, and then pick the remote folder you wish to connect to on your PC. The local folder is the folder you want to send or receive files from on your smartphone/tablet. The sync type is probably the most important field here, you can either send data to the remote server only (upload to your cloud), receive data to the local folder only (download data from your cloud), or have the folder work both ways, where any data added to one folder is automatically added to the other. For my camera syncing I picked “to remote folder,” so that my pictures are automatically sent to the FTP server.
You can then specify regular intervals for syncing if you desire, as well as whether or not to use Wi-Fi, 3G, or roaming connections. I recommend turning off old file overwriting to cut down on syncing times.
The option to copy files to a time-stamped folder is a great touch if you want to keep things organized automatically. Every time the files sync any new pictures will be automatically sorted by date. But beware of the sync deletions option, as using this in two-way mode means that deleting something on your server will also delete it from your phone and vice versa. It’s a nice feature for managing files, but wait until you’re comfortable that everything is set up correctly before using it.
Hit the save button in the top right when you’re done, then you can click the refresh option to force sync the two folders and see that everything is working.
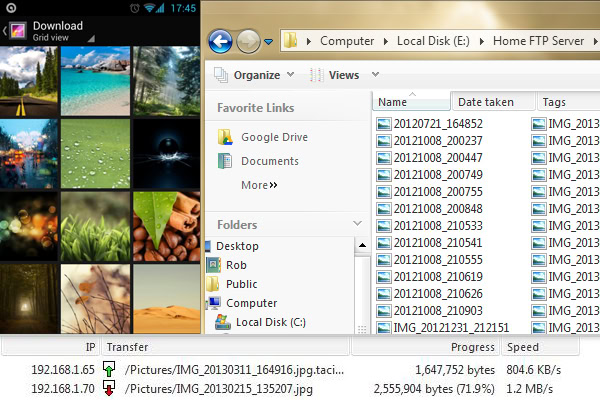
Feel free to setup multiple paired folders to different sync files and folders at different intervals. The possibilities are almost limitless. And don’t forget that you don’t have to sync automatically, you can simply manage your cloud data through the file manager if you prefer.
That’s all there is to it, now you can automatically transfer files wirelessly in your own home, and never have to bother dragging pictures from folder to folder ever again.
Configuring for Internet usage
So hopefully by this stage you’ve synced up a few folders between your smartphone and PC, but what if you want to access your cloud storage system whilst you’re out and about? Well, you can do this too just by tweaking a few settings, but be forewarned that some routers aren’t very friendly when it comes to allowing Internet connections through their firewalls.
If you have a dedicated IP then this will be a little easier, if not then you’ll have to ask Google what your IP address is, but remember that this will likely change when you restart your router. You can try to connect to your server again via your internet IP, rather than LAN, by creating a new account in FolderSync.
If you can’t connect then there are a couple of things to try, firstly by bypassing your router’s firewall. You’ll need to access your routers settings, which can usually be done through your browser by typing in something like 192.168.X.XXX. Check the bottom of your router as the details can usually be found there.
You can either attempt to mess around with port forwarding if you know what you’re doing, or alternatively you should be able to locate something called DMZ. Assign this to your PC host server and it will place it outside the protection/hindrance of your router’s firewall.
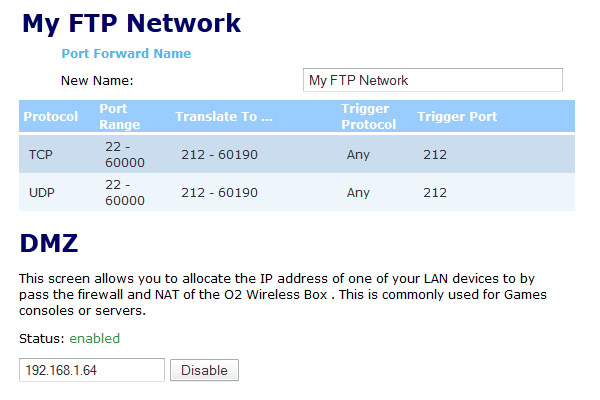
Secondly, you can avoid some problems with routers blocking certain ports by reassigning the default port in the Filezilla server options. Use “edit”, “settings” and change the port field to something above 21. I found that 212 worked just fine for me. You’ll have to adjust these settings in your accounts on FolderSync, but just edit the accounts you created earlier and manually enter the port number.
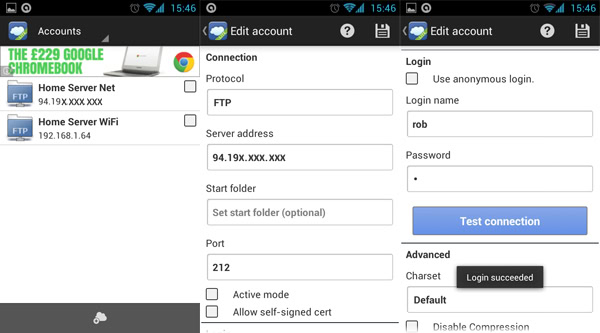
Connecting over the Internet rather than Wi-Fi works in exactly the same way, and if you want to setup automatic syncing then you use the same steps as before, but chose your internet IP rather than Wi-Fi account. Although I wouldn’t recommend syncing larger folders automatically, as you could easily use up your monthly data allowance. Instead this is probably most suited for file managing and access on demand.
If you’re still struggling to achieve a working Internet connection, but Wi-Fi connectivity was working fine, then the problem is most likely something to do with your firewall settings. Of course I can’t account for the hundreds of different routers you will all have, so keep browsing through the options until you find something similar to my example above or perhaps consult this port forwarding guide for your specific router.
Security
If you are planning on making your files available over the web then you’ll no doubt want additional security. Standard FTP connections aren’t encrypted, so technically someone could monitor the connection and pick out your password. The odds are slim, but it’s always better to be safe than sorry.
Fortunately Filezilla and FolderSync will work with SSL/TSL encryptions, which prevent eavesdropping on your connection. Setting this up is very simple, just go into Filezilla’s setting and click on the SSL/TSL field. You’ll need to generate a new certificate and save it somewhere safe, click generate at the bottom and input your 2 digit country code, city, and email. You can find your country code from here.
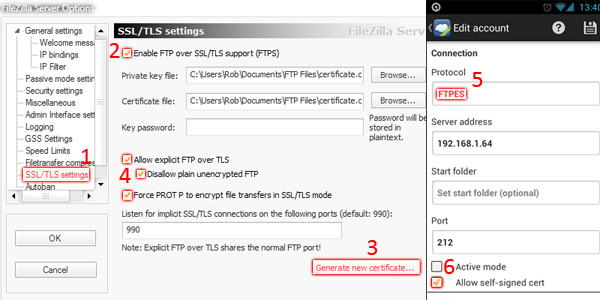
Click browse at the bottom to pick where to save your certificate and then hit generate. Great, now the only thing left to do is prevent non encrypted connections by checking “disallow plain unencrypted FTP” and forcing PROT P.
Finally, go back into FolderSync and click accounts again. Change the protocol to FTPES and check the “allow self-signed cert” box and re-test your connection. You’ll need to apply these settings to WiFi and internet connections, but now your own cloud server is much better protected against unwanted users.
Is home FTP for you?
I must make it clear that there are definitely distinct pros and cons between local and other cloud storage solutions. Firstly, as I’ve already stated, the main benefit from using your own Wi-Fi network is that transfer speeds are fast, and syncing between multiple devices is almost instantaneous. Whereas uploading and downloading from cloud storage services takes a fair bit longer. You also have total control over the content which stays on the server, can set up daily or weekly sync schedules, and best of all, you no longer need to deal with USB cables, dragging and dropping files, or irritating software suites like Samsung’s Kies.
However, transfers speeds are obviously severely reduced when you’re away from home, defeating much of the point of using a Wi-Fi-based storage system. You have to factor in the additional expense of leaving your PC on all the time if you want to use your FTP server as an anywhere cloud storage solution, in which case you might be better off sticking with Dropbox. FTPs are also not as ideal for sharing content with others, as you still have to upload your files via email or a social media site anyway.
And of course, if your computer ever ceases to function you won’t be able to rely on re-downloading your files from the web, but if you’ve synced between two or more devices then this shouldn’t be a major problem.
I’m a fan of having my own cloud computing system, and I doubt that I’ll be using Google Drive as much anymore. If you’re looking for a convenient wireless syncing solution, or are fed up with hitting cloud storage limits, then it’s certainly worth putting an hour aside to set one up for yourself. If you run into any problems, leave a comment below and I’ll try my best to help you out.