Affiliate links on Android Authority may earn us a commission. Learn more.
Exploring Android Q: Adding bubble notifications to your app
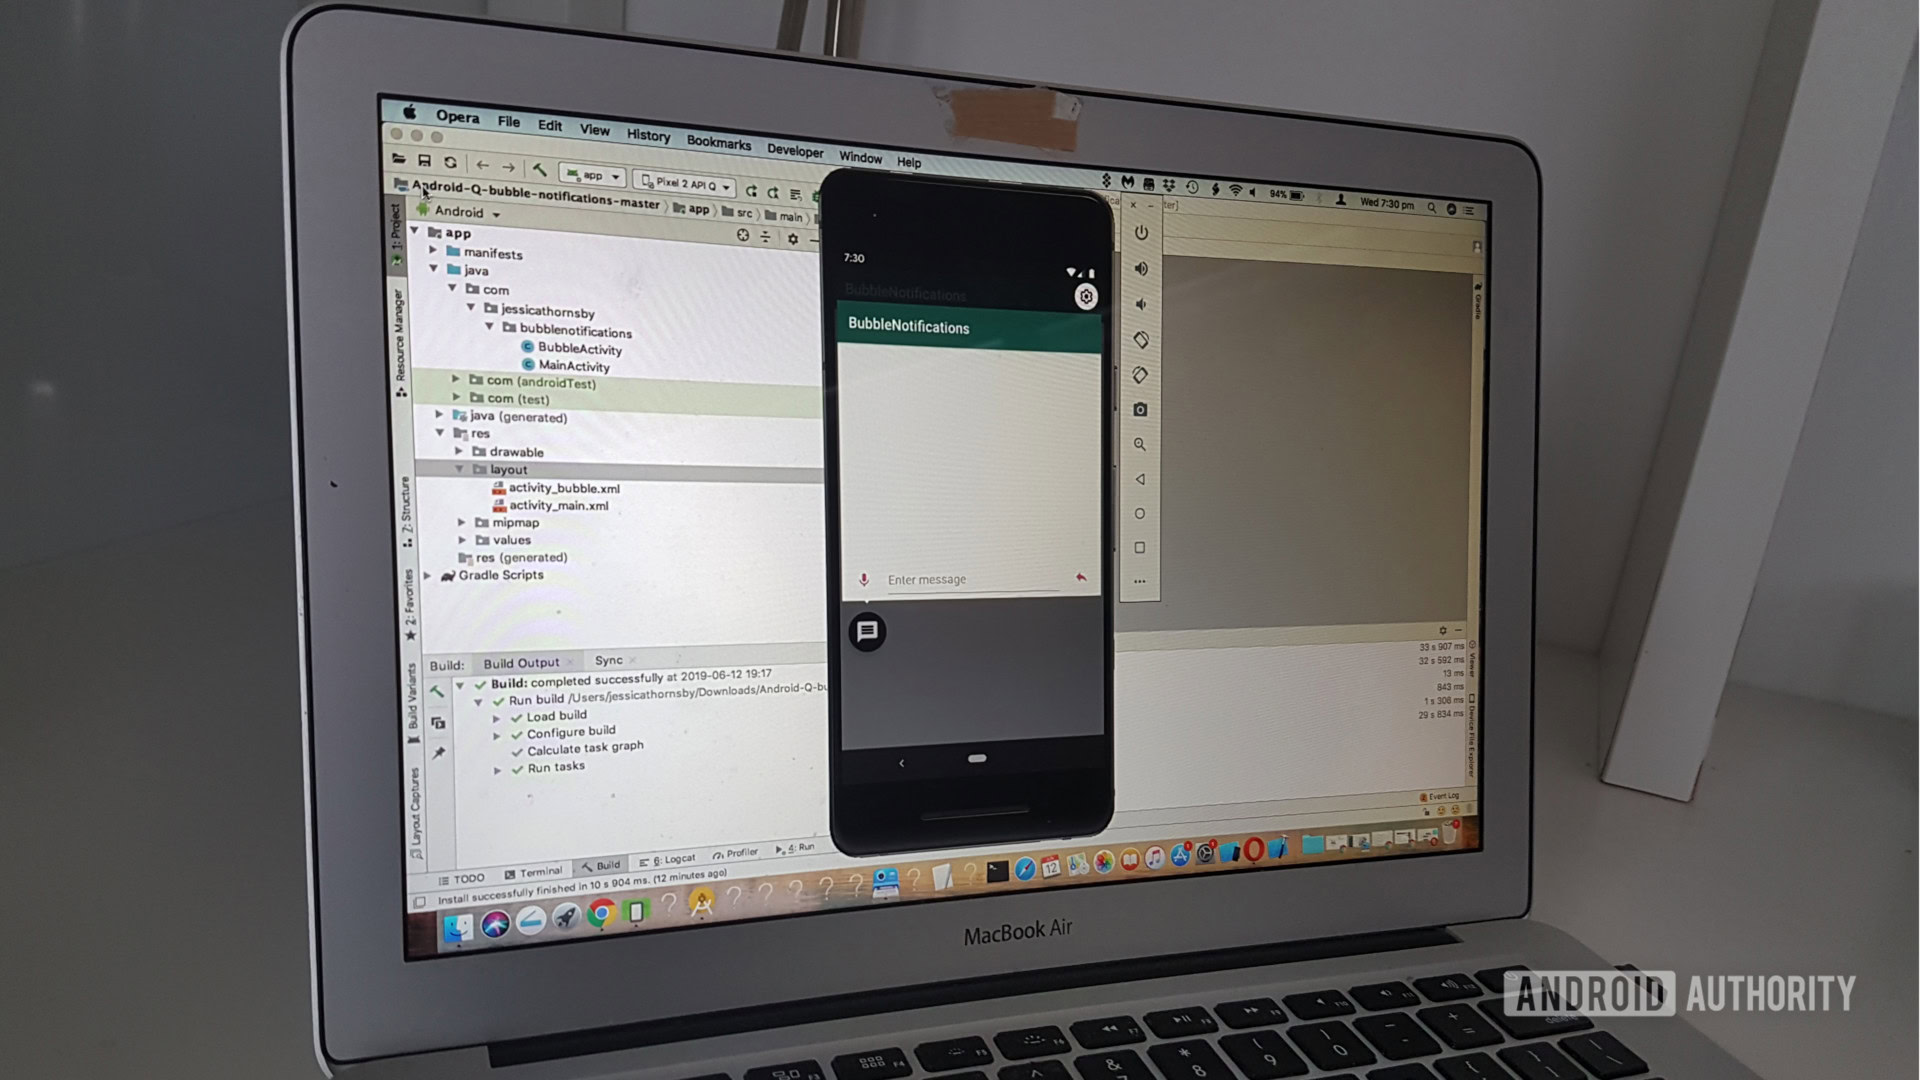
In 2018, Google added a new “chat head” feature to its iPhone application, which displayed the caller’s avatar as a floating bubble-style notification. When tapped, this bubble expanded to reveal a strip of controls that allowed the user to perform tasks directly from the notification, including putting the caller on speaker phone and hanging up.
In Android Q, Google is making “chat head” notifications an official part of the Android platform, with the introduction of the Bubble API. These bubbles can contain useful information about events that are happening elsewhere in your app, but they can also contain custom actions. These actions allow the user to interact with your app, even when they’re viewing another Activity, application, or they’re located in an unrelated part of the Android operating system.
In this article, I’ll share everything you need to know about this upcoming Android Q feature, including what bubbles have to offer the developer and the end-user, best practices, and some limitations you need to be aware of, before you start using bubbles in your own Android apps.
By the end of this article, you’ll be up to speed with this new Android Q feature, and will have created an Android app that features its own bubble notifications.
What are Android Q’s bubbles?
Bubbles display your app’s content in a window that appears to “float” above the existing foreground Activity.
In its collapsed state, a bubble notification is represented by a small icon. These icons are plain white by default, but you can customize them with an image, for example you might use your app’s icon, or the avatar of the person who’s associated with this notification.
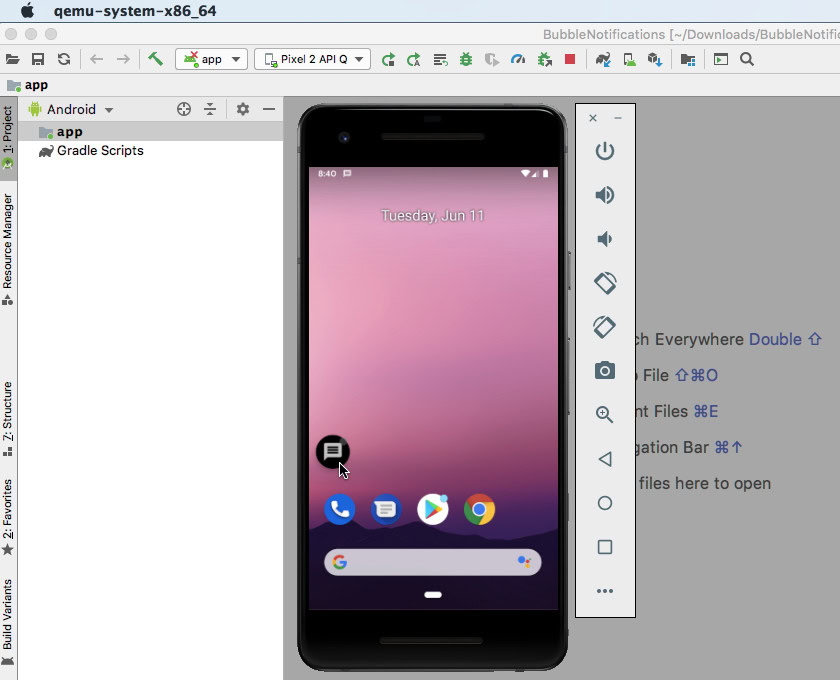
When the user taps a collapsed bubble, an intent will be invoked and your bubble will be displayed in its expanded state, which typically contains additional information and may also provide access to some related functionality.
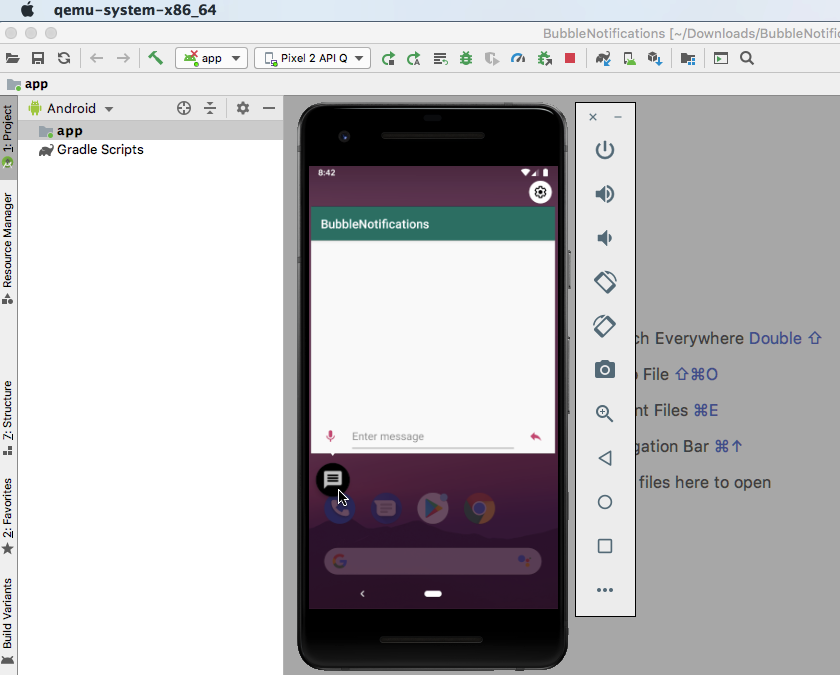
When a bubble is expanded, the associated application becomes the foreground process, if it isn’t already.
Users can interact with a bubble without having to navigate away from their current Activity, which makes bubbles a powerful way to re-engage users, and potentially draw them back to your app.
Even if the user is already inside your app, a bubble can help them quickly and easily respond to important events that are happening elsewhere in your application. For example, imagine you’ve developed a messaging app, and the user receives a message from Contact B, when they’re midway through drafting a message to Contact A. Rather than forcing them to navigate to the Activity where this event occurred, you can present Contact B’s message as a bubble notification, and the user can then read and respond to that message without having to navigate away from their draft.
Unless the user explicitly dismisses a bubble by dragging it offscreen, that bubble will remain visible even if the user navigates between different applications and areas of the operating system. Since bubbles are a persistent part of the Android user interface (UI), they can provide a convenient place to store notes or manage ongoing tasks, for example you might store the user’s To Do list or travel itinerary inside a bubble, so it’s always within easy reach.
You could even use bubbles as reminders, for example your app might generate a bubble when it’s time for the user to log into a meeting, send an important email, or perform some other time-sensitive task.
Haven’t Facebook been using bubble notifications for years?
Floating bubble-style notifications aren’t a new concept for Android, as they’ve long been available in third party apps, most notably in Facebook Messenger. However, previously it was the developer’s responsibility to design and implement their own bubble notifications.
Creating a custom feature is always more time-consuming than leveraging classes and APIs that are already built into the Android platform, so now that bubbles are officially part of Android it should be much easier for developers to use this notification style. This official support will also provide a more consistent experience for users, as all bubbles should now have exactly the same behaviour, regardless of the application that generated them.
Android Q bubbles: What are the restrictions?
Bubbles are displayed on top of whatever content the user is currently viewing. If your app generates a large number of bubbles, or it creates unnecessary bubble notifications, then users are quickly going to lose patience with your app.
Someone who feels bombarded by bubbles may choose to disable the bubble feature for your application, or they may even uninstall your app entirely.
To safeguard the user experience, your bubble notifications will only be displayed if they meet at least one of the following criteria:
- Your application is in the foreground when the notification is sent.
- The notification has a Person added. If there are multiple people associated with a notification, then you must also mark this conversation as a group, using setGroupConversation(boolean).
- The notification is from a call to Service.startForeground, has a Person added, and falls into the CATEGORY_CALL notification category, which indicates this is a synchronous communication request, such as a voice or video call.
If none of these conditions are met, then your bubbles will be displayed as a standard notification instead. If the device is locked or its always-on display is active, then your bubbles will again only appear as standard notifications.
You should also be aware that at the time of writing, bubbles were an optional feature. When your application first tries to generate a bubble, the user will be presented with a permissions dialog and they’ll have the option to disable bubbles for your application. If the user disables the bubble feature, then your app’s bubbles will always be displayed as standard notifications, even if they fulfil all of the above criteria.
What we’ll be creating
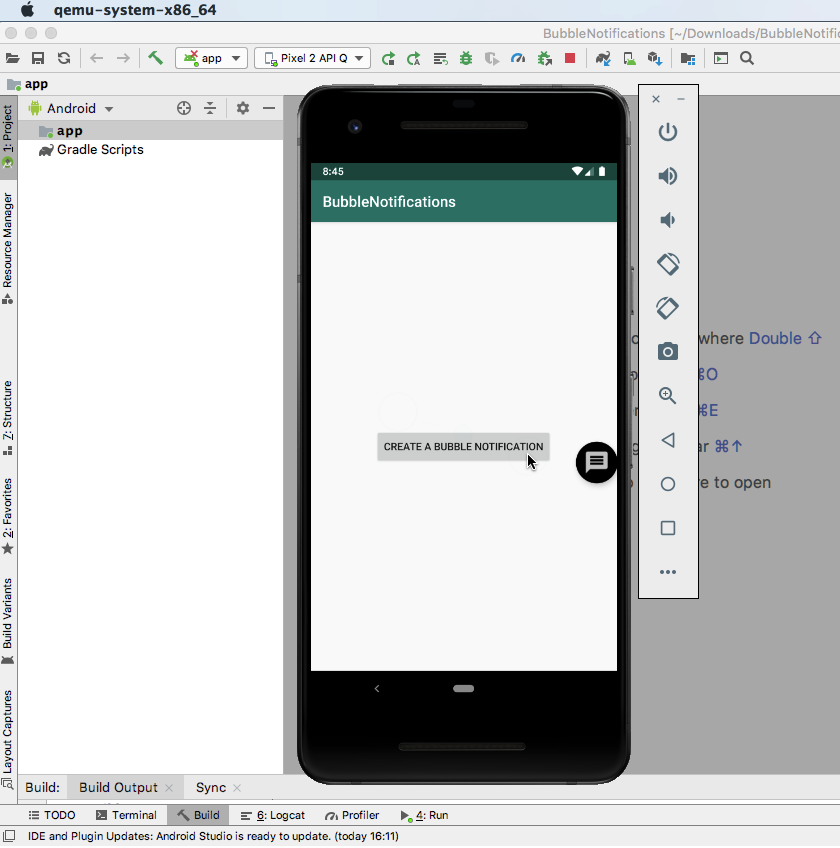
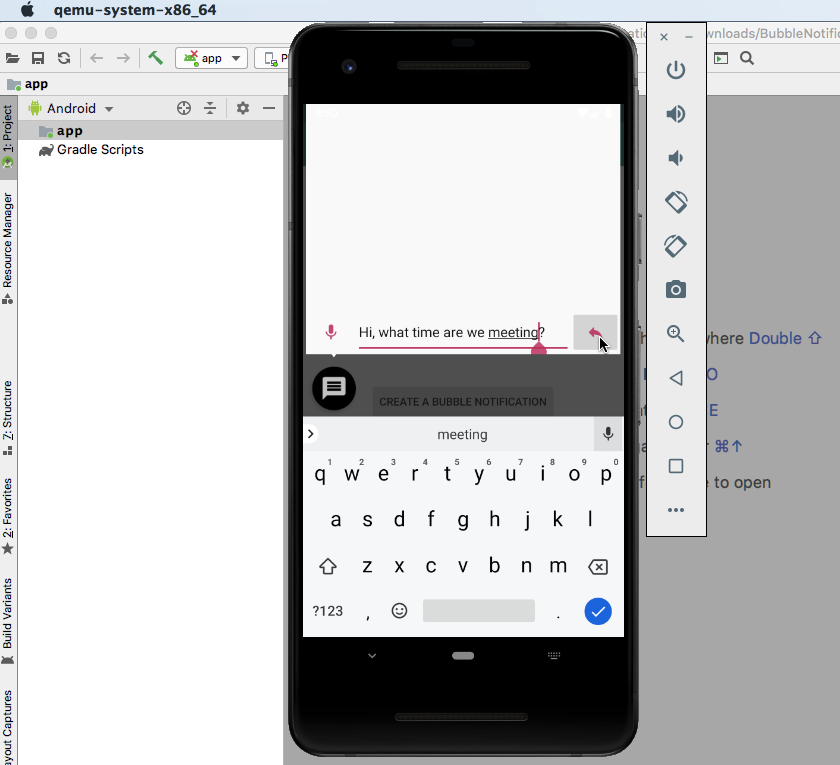
In this article, we’ll build an application that uses Android Q’s new bubble notifications feature. To make our app easier to test, it’ll feature a button that generates a bubble notification every time its tapped.
Since chat applications are the most obvious choice for bubbles, our app will simulate the user receiving a new message, similar to the Facebook Messenger app. When expanded, this bubble will include a space where the message would be displayed, plus two actions that the user can perform: call this contact, or send them a text response.
To experiment with this new feature, you’ll need the latest preview of Android Studio 3.5. You’ll find the latest version over at the Preview Release website.
You’ll also need the Android Q preview SDK and Android SDK Build-Tools 28, or higher:
- Select “Tools > SDK Manager” from the Android Studio toolbar.
- In the subsequent window, select the “SDK Platforms” tab.
- Select the latest release of “Android Q Preview.”
- Switch to the “SDK Tools” tab.
- Select “Android SDK Build-Tools 28,” or higher.
- Click “OK” to install these components.
Note that the following tutorial was created using Android Q Beta 2, when bubble notifications were still considered an experimental feature. If you’re using a later version of Android Q, then you may encounter some minor differences.
Building our Android Q app
To get started, create a new Android project using the “Empty Activity” template, and when prompted make sure your app is targeting the latest version of Android Q.
If you’re adding bubbles to an existing application, then you’ll need to open your project’s build.gradle file and upgrade compileSdkVersion, minSdkVersion and targetSdkVersion to “android-Q.”
android {
   compileSdkVersion 'android-Q'
   defaultConfig {
...
       minSdkVersion 'Q'
       targetSdkVersion 'Q'
...
   }
...
}
Next, open your build.gradle file and add the latest version of the Material Components for Android library to your “dependencies” block:
dependencies {
   implementation fileTree(dir: 'libs', include: ['*.jar'])
   implementation 'androidx.appcompat:appcompat:1.0.2'
   implementation 'androidx.constraintlayout:constraintlayout:1.1.3'

//Add the following//

   implementation 'com.google.android.material:material:1.1.0-alpha07'
   testImplementation 'junit:junit:4.12'
   androidTestImplementation 'androidx.test.ext:junit:1.1.0'
   androidTestImplementation 'androidx.test.espresso:espresso-core:3.1.1'
}
Creating the main user interface
Our project will eventually need two layouts: one for the main application, and one that defines the layout of our expanded bubble.
Open your project’s activity_main.xml file, and let’s create the button that’ll generate our bubble notification:
<?xml version="1.0" encoding="utf-8"?>
<LinearLayout xmlns:android="http://schemas.android.com/apk/res/android"
   android:layout_width="match_parent"
   android:orientation="vertical"
   android:gravity="center"
   android:layout_height="match_parent">

   <Button
       android:id="@+id/createBubble"
       android:layout_width="wrap_content"
       android:layout_height="wrap_content"
       android:text="Create a bubble notification" />

</LinearLayout>
Building a bubble notification
Next, we need to create the bubble notification. Android Q’s bubbles are built on top of Android’s existing notification system, so if you have any previous experience of working with Android notifications, then creating a bubble should feel instantly familiar.
You create an Android Q bubble, by completing the following steps:
1. Create at least one notification channel
Android 8.0 introduced the concept of notification channels, where all notifications that are posted to the same channel have the same behaviour.
Since our application is targeting Android 8.0 or higher, all of our notifications must be assigned to a notification channel, including bubbles.
To create a notification channel, you need to construct a NotificationChannel object and pass it:
- An ID, which must be unique to your package.
- The channel’s name, which will be displayed to the user via the channel’s settings screen.
- An importance level. In Android Oreo and higher you can no longer set the priority level for individual notifications. Instead, you must specify the channel’s importance level, which is then applied to every notification that’s posted to that channel. Bubble notifications must be assigned a level of IMPORTANCE_HIGH, as this ensures the bubble will appear onscreen, regardless of what the user is currently doing.
Android Q also introduces a setAllowBubbles() method, which allows you to specify that this channel supports bubbles (“true”). The setAllowBubbles() value will be ignored for channels that have an importance level of IMPORTANCE_DEFAULT or lower, so you must mark you channel as setAllowBubbles(true) and IMPORTANCE_HIGH.
In the following snippet, we’re creating our notification channel. This is also your chance to specify any additional desired behavior, such as whether notifications posted to this channel should cause the device’s LEDs to flash.
CharSequence name = "My new channel";
       String description = "Description";
       int importance = NotificationManager.IMPORTANCE_HIGH;

//Create the channel object//

      channel = new NotificationChannel("1", name, importance);
      channel.setDescription(description);
      channel.setAllowBubbles(true);
You can then submit this NotificationChannel object to the NotificationManager, using the createNotificationChannel() method:
notificationManager.createNotificationChannel(channel);2. Create the bubble intent
Later in this tutorial, we’ll create a BubbleActivity that’ll launch every time the user interacts with the bubble icon.
In the following snippet, we’re creating a PendingIntent, which specifies the Activity that’ll be displayed inside our expanded bubble:
Intent target = new Intent(MainActivity.this, BubbleActivity.class);
               PendingIntent bubbleIntent =
                       PendingIntent.getActivity(MainActivity.this, 0, target, PendingIntent.FLAG_UPDATE_CURRENT /* flags */);
3. Create the BubbleMetaData
Next, you need to create a BubbleMetadata object, which will encapsulate all the data required to display our notification bubble.
You create a BubbleMetadata object by calling the Notification.BubbleMetadata.Builder constructor. We can then use setIntent() to specify the target bubble intent, which will run every time the user interacts with this bubble.
Notification.BubbleMetadata bubbleData =
                       new Notification.BubbleMetadata.Builder()
...
...
...
                            .setIntent(bubbleIntent)
                            .build();
When building a BubbleMetadata object, we also need to set the icon that’ll represent this bubble in its initial, collapsed state, using the Notification.BubbleMetadata.Builder.setIcon(Icon) method. You must provide an icon for every bubble that your application creates, and this icon should be representative of the bubble’s content.
The shape of the bubble icon is adaptive, and can be modified to match the device’s theme. Note that if your icon is bitmap-based, then you’ll need to use createWithAdaptiveBitmap, which will ensure your icon is generated according to the design guidelines defined in the AdaptiveIconDrawable class, or <adaptive-icon> tags.
We can also set a desired height for the bubble’s content, although this value will be ignored when there isn’t enough onscreen space available.
This gives us the following:
Notification.BubbleMetadata bubbleData =
                       new Notification.BubbleMetadata.Builder()
                               .setDesiredHeight(600)
                               .setIcon(Icon.createWithResource(MainActivity.this, R.drawable.ic_message))
                               .setIntent(bubbleIntent)
                               .build();
4. Add the metadata to the bubble
Next, we need to attach the BubbleMetadata object to our notification.
Android Q adds a new setBubbleMetaData() method to the notification builder class. This method takes an instance of BubbleMetadata, which is used to display your bubble’s content when it’s in an expanded state.
.setBubbleMetadata(bubbleData);The completed MainActivity
After completing all the above steps, your MainActivity should look something like this:
import androidx.appcompat.app.AppCompatActivity;
import android.app.Notification;
import android.app.NotificationChannel;
import android.app.NotificationManager;
import android.app.PendingIntent;

import android.content.Context;
import android.content.Intent;
import android.graphics.drawable.Icon;
import android.os.Bundle;
import android.widget.Button;
import android.view.View;

public class MainActivity extends AppCompatActivity implements View.OnClickListener {

   Button createBubble;

   Notification.Builder builder;
   NotificationManager notificationManager;
   NotificationChannel channel;

   @Override
   protected void onCreate(Bundle savedInstanceState) {
       super.onCreate(savedInstanceState);
       setContentView(R.layout.activity_main);

       createBubble = findViewById(R.id.createBubble);

       notificationManager = (NotificationManager) getSystemService(Context.NOTIFICATION_SERVICE);

       CharSequence name = "My new channel";
       String description = "Description";
       int importance = NotificationManager.IMPORTANCE_HIGH;

//Create the channel object//

       channel = new NotificationChannel("1", name, importance);
       channel.setDescription(description);
       channel.setAllowBubbles(true);

       createBubble.setOnClickListener(this);
   }

   @Override
   public void onClick(View view) {

       switch (view.getId()) {
           case R.id.createBubble:

//The Activity that’ll be displayed inside our expanded bubble//

              Intent target = new Intent(MainActivity.this, BubbleActivity.class);

//Create a PendingIntent//

               PendingIntent bubbleIntent =
      PendingIntent.getActivity(MainActivity.this, 0, target, PendingIntent.FLAG_UPDATE_CURRENT /* flags */);

//Create a BubbleMetadata object//

               Notification.BubbleMetadata bubbleData =
                       new Notification.BubbleMetadata.Builder()

//Specify the bubble’s desired height//

              .setDesiredHeight(600)

//Specify the bubble’s icon//

             .setIcon(Icon.createWithResource(MainActivity.this, R.drawable.ic_message))

//Specify the target bubble intent//

                               .setIntent(bubbleIntent)
                               .build();

               builder = new Notification.Builder(MainActivity.this, channel.getId())
                      .setSmallIcon(R.drawable.ic_message)

//Add the BubbleMetadata object//

                      .setBubbleMetadata(bubbleData);

//Submit the NotificationChannel to NotificationManager//

               notificationManager.createNotificationChannel(channel);
               notificationManager.notify(1, builder.build());
               break;

       }

   }
}
Creating the bubble icon
Our MainActivity references a “ic_message” drawable, which will be used to represent our bubble in its initial, collapsed state. Let’s create this icon now:
- Select “File > New > Image Asset” from the Android Studio toolbar.
- Open the “Icon Type” dropdown and select “Action Bar and Tab Icons.”
- Make sure the “Clip Art” button is selected.
- Give the “Clip Art” button a click.
- Choose the image that’ll represent your bubble notification; I’m opting for “message.”
- Click “OK.”
- In the “Name” field, enter “ic_message.”
- Click “Next.” Read the onscreen information, and if you’re happy to proceed then click “Finish.”
While we’re here, let’s create the other image assets that we’ll be using throughout this tutorial. Our expanded bubble will eventually use two icons to represent two distinct actions: calling the contact, and sending them a text response.
To create these drawables, repeat the above steps, but this time:
- Select an image that’ll represent the bubble’s “call” action. I’m using the “mic” resource and naming it “ic_voice.”
- Select an image that’ll represent the bubble’s “reply to message” action. I’m using the “reply” drawable, and naming it “ic_reply.”
Building the bubble Activity
Next, we need to create the Activity that’ll be displayed to the user every time they interact with our bubble.
- Select “File > New > Java Class” from the Android Studio toolbar.
- In the subsequent window, name this class “BubbleActivity.”
- Click “OK.”
We’ll use this class to define the bubble’s content, including any actions the user can perform by interacting with the expanded bubble. To help keep our code straightforward, I’ll simply display a toast every time the user triggers the bubble’s “sendMessage” and “voiceCall” actions.
Open your BubbleActivity class, and add the following:
import androidx.appcompat.app.AppCompatActivity;
import android.os.Bundle;
import android.widget.ImageButton;
import android.widget.Toast;
import android.view.View;

public class BubbleActivity extends AppCompatActivity implements View.OnClickListener {

   @Override
   protected void onCreate(Bundle savedInstanceState) {
       super.onCreate(savedInstanceState);
       setContentView(R.layout.activity_bubble);
       ImageButton voiceCall = (ImageButton) findViewById(R.id.voice_call);
       voiceCall.setOnClickListener(this);
       ImageButton sendMessage = (ImageButton) findViewById(R.id.send);
       sendMessage.setOnClickListener(this);
   }

   @Override
   public void onClick(View v) {
       switch (v.getId()) {

           case R.id.voice_call:
               Toast.makeText(BubbleActivity.this, "Calling contact", Toast.LENGTH_SHORT).show();
               break;
           case R.id.send:
Toast.makeText(BubbleActivity.this, "Sending message", Toast.LENGTH_SHORT).show();
               break;
       }
   }
}
Designing the expanded bubble layout
Now, we need to create a corresponding layout for our BubbleActivity. This layout will consist of:
- A RecylerView. In a real-world messaging app, this is where we’d display the newly-received message, plus any previous messages.
- An EditText. This will enable the user to type their response directly into the bubble notification.
- Two ImageButtons. These will display icons that the user can tap, in order to send a text response or call the person who sent this message.
Create a new layout file named “activity_bubble,” by Control-clicking your project’s layout directory and then selecting “New > Layout resource file” from the Android Studio toolbar.
Open your “activity_bubble.xml” file, and add the following:
<?xml version="1.0" encoding="utf-8"?>
       <LinearLayout
       xmlns:android="http://schemas.android.com/apk/res/android"
       xmlns:app="http://schemas.android.com/apk/res-auto"
       android:id="@+id/newMessage"
       android:layout_width="match_parent"
       android:layout_height="match_parent"
       android:orientation="vertical">

       <androidx.recyclerview.widget.RecyclerView
           android:id="@+id/messages"
           android:layout_width="match_parent"
           android:layout_height="0dp"
           android:layout_weight="1"
           android:scrollbars="vertical" />

       <LinearLayout
           android:id="@+id/input_bar"
           android:layout_width="match_parent"
           android:layout_height="?attr/actionBarSize"
           android:orientation="horizontal">

           <ImageButton
               android:id="@+id/voice_call"
               style="?attr/buttonBarNeutralButtonStyle"
               android:layout_width="wrap_content"
               android:layout_height="match_parent"
               android:onClick="onClick"
               android:tint="?attr/colorAccent"
               app:srcCompat="@drawable/ic_voice" />

           <EditText
               android:id="@+id/input"
               android:layout_width="0dp"
               android:layout_height="match_parent"
               android:layout_weight="1"
               android:hint="Enter message"
               android:inputType="textCapSentences" />

           <ImageButton
               android:id="@+id/send"
               android:onClick="onClick"
               style="?attr/buttonBarNeutralButtonStyle"
               android:layout_width="wrap_content"
               android:layout_height="match_parent"
               android:tint="?attr/colorAccent"
               app:srcCompat="@drawable/ic_reply" />

      </LinearLayout>

      </LinearLayout>
Multi-window and document UI: Updating the Manifest
If Android is going to recognize BubbleActivity as an expanded bubble, then we need to open our Manifest and make a few changes to its “BubbleActivity” declaration.
1. Add multi-window support
Start by specifying that your BubbleActivity supports Android’s multi-window display:
android:resizeableActivity="true"2. Enable allowEmbedded
Bubbles are displayed inside a container that’s owned by another Activity, so our next task is declaring that BubbleAtivity can be launched as the embedded child of another Activity:
android:allowEmbedded="true"3. Allow multiple instances
Sometimes, your application may need to display multiple bubbles of the same type.
Since we’re creating a chat application, there’s a chance the user may receive multiple messages from different people simultaneously. To avoid confusion, it’s important we represent each conversation as its own bubble, even if that means having multiple bubbles visible onscreen.
If you want your application to display multiple bubbles of the same type, then it must be capable of launching multiple instances.
To give your app the ability to create multiple instances, add the following to your “BubbleActivity” declaration:
android:documentLaunchMode="always"The completed Manifest
After performing all of the above steps, your Manifest’s “BubbleActivity” section should look something like this:
<activity
       android:name=".BubbleActivity"
       android:label="@string/title_activity_bubble"
       android:allowEmbedded="true"
       android:documentLaunchMode="always"
       android:resizeableActivity="true"
       android:theme="@style/AppTheme.NoActionBar"/>
</application>
Testing your Android Q bubbles
To test your bubble notifications, you’ll need either a physical device that’s running the Android Q preview or higher, or an Android Virtual Device (AVD) that’s configured to support Android Q.
To create a compatible AVD:
- Select “Tools > AVD Manager” from the Android Studio toolbar.
- Select “Create Virtual Device…”
- Choose the device definition that you want to use, and then click “Next.”
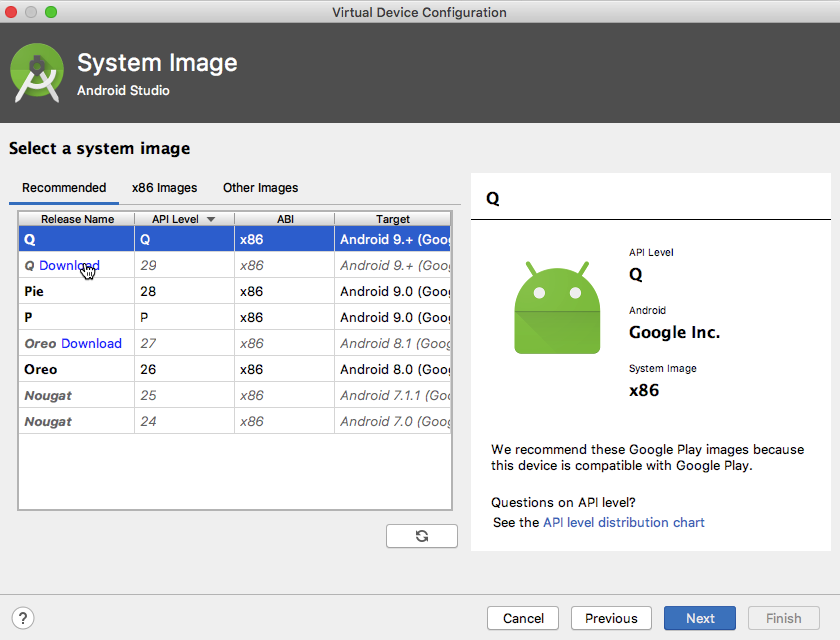
- On the “Select a system image” screen, choose the latest “Q” system image. If you haven’t already downloaded Android Q, then click its accompanying “Download” link and wait for the system image to be downloaded to your machine.
- Give your AVD a name, and then click “Finish.”
To put your application to the test:
- Launch your app on a compatible AVD or physical Android device.
- Give the “Create a bubble notification” button a tap. A bubble should now appear onscreen.
- Give the bubble icon a click, to view it as an expanded bubble.
- If prompted, grant your application permission to display bubbles, by tapping “Allow.”
- Give the bubble’s “call” action a click, and a “Calling contact” toast should appear.
- Try clicking the “reply” action; a “Sending message” toast should now appear.
You can download the completed project from GitHub.
Creating automatically-expanded bubbles
Currently, all of our application’s bubbles appear in a collapsed state, and will only be expanded if the user interacts with them. However, it’s possible to create bubbles that launch in their expanded state automatically.
Typically, you should only configure a button to appear in an expanded state, if the user performs an action that directly results in that bubble, such as tapping a button to launch a new chat window, or create a new document.
You can create an expanded bubble, by adding setAutoExpandBubble(true) to your BubbleMetadata object.
Just be aware that this bubble will only be posted in an expanded state, if its related application is in the foreground. If the app that created this bubble isn’t in the foreground, then the setAutoExpandBubble() method will be completely ignored.
In the following snippet, we’re declaring that the bubble’s contents should be expanded automatically:
Notification.BubbleMetadata bubbleData =
       new Notification.BubbleMetadata.Builder()
               .setDesiredHeight(600)

//Add the following line//

               .setAutoExpandBubble(true)
               .setIcon(Icon.createWithResource(MainActivity.this, R.drawable.ic_message))
               .setIntent(bubbleIntent)
               .build();
Install the updated project on your AVD or Android device, and give the “Create a bubble notification” button a tap. Instead of the bubble icon appearing onscreen, your bubble should now launch in its expanded state automatically.
Getting the most out of bubbles: Best practices
As with every new feature, bubbles come with their own set of best practices.
When adding bubble notifications to your Android apps, it’s important to bear the following in mind:
1. Don’t overwhelm the user
Bubbles take up a significant amount of screen real estate, and have the potential to interrupt whatever the user is currently doing.
If you bombarb the user with bubbles, then in the best case scenario they’ll block your application from issuing any bubbles, and in the worst case scenario they may even uninstall your app entirely.
To avoid alienating your users, you should only issue bubble notifications for events that are important enough to warrant the user’s immediate attention.
2. Focus on simplicity
All processes that are launched from a bubble are housed within that bubble’s container, which can often be considerably smaller than a regular Activity.
To provide a good user experience, you should avoid the temptation to pack your bubbles full of information and features, and instead create bubbles that are as lightweight and straightforward as possible.
3. Test your bubbles as regular notifications
There are circumstances where your bubbles will be presented to the user as a standard notification, for example if the device is locked or the always-on display is active.
To ensure a good user experience regardless of how your bubble is presented, you should test how each of your bubbles appears and functions when it’s displayed as a bubble notification and as a regular notification.
Wrapping up
In this article, we saw how you can start using Android Q’s bubbles feature today. Over the course of this article, we’ve created an application that triggers collapsed and expanded bubbles on-demand, and populated the expanded bubble with Views and custom actions.
What other Android Q features are you looking forward to trying? Let us know in the comments below!