Affiliate links on Android Authority may earn us a commission. Learn more.
How to map a network drive in Windows 10 and 11
If you have a lot of files that you frequently share across multiple computers in a local area network, then getting a network drive is a good solution for shared storage. Once your network drive is set up, you can map your network drive on Windows to quickly access it as if it was a local drive on your computer itself. On both Windows 10 and Windows 11, you can very easily map a network drive. Here’s how you do it.
QUICK ANSWER
Once you have "Network discovery and file sharing" turned on, open File Explorer and right-click on This PC. Click on Map Network Drive and follow the prompts to map the drive.
JUMP TO KEY SECTIONS
What is a network drive?
A network drive is essentially a hard drive that is only accessible over a network, unlike your local drive, which is connected physically to your computer. Local drives usually remain accessible to the user of that particular computer, while the primary purpose of a network drive is to enable multi-computer local sharing.
Once set up, any network user with the right credentials will be able to use the shared space on the network drives for data storage. This is incredibly useful for scenarios where multiple people or computers on the same network need to frequently access a similar set of files. Network drives can take the form of NAS (Network Attached Storage), though NAS usually ships with its own simplified OS, while not all network drives come with their own OS and system resources.
What does “mapping a network drive” mean?
Network drives are usually accessible by entering their network path. But entering the network path again and again can get tedious. Windows lets you “map” the network drive by assigning it an alphabet in a fashion similar to what you see for your local drives. This acts as a shortcut for your network drive, saving you from the hassle of remembering the path for every minor access. Since network drives are usually set up across multiple computers and are usually used by many users who may not all have the same level of expertise, the convenience of mapping the network drive adds up over time. You can access it with the same ease as accessing any file stored on your computer.
How to map a network drive in Windows 11
Prerequisite: Turn on Network Discovery and File Sharing
Windows ships with Network Discovery and File Sharing switched off by default. So we need to enable this setting before we are presented with an option to map a network drive. We advise doing this only when you are connected to a trusted network, like your home or business LAN.
- On your Windows 11 computer, go to Settings > Network & internet > Advanced network settings > Advanced sharing settings > File and printer sharing.
- Enable this option to allow others on the network to access shared files and printers.
Map the drive
Once you have turned on File and printer sharing, you can map a network drive by following these steps:
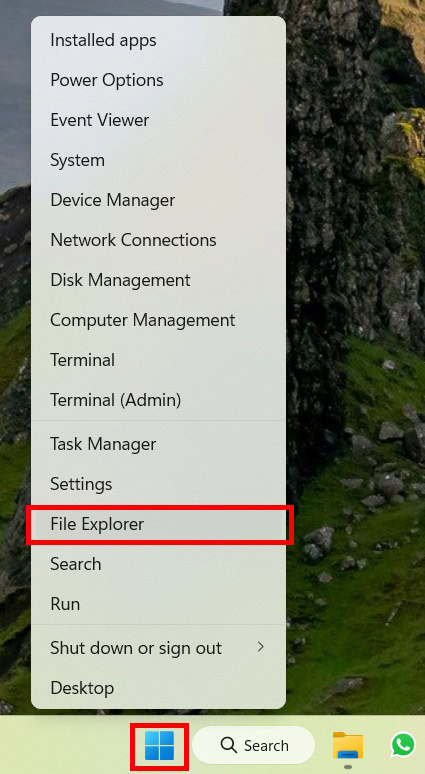
- Open the File Explorer app on Windows. To do so, you can right-click on the Start Menu and select File Explorer.

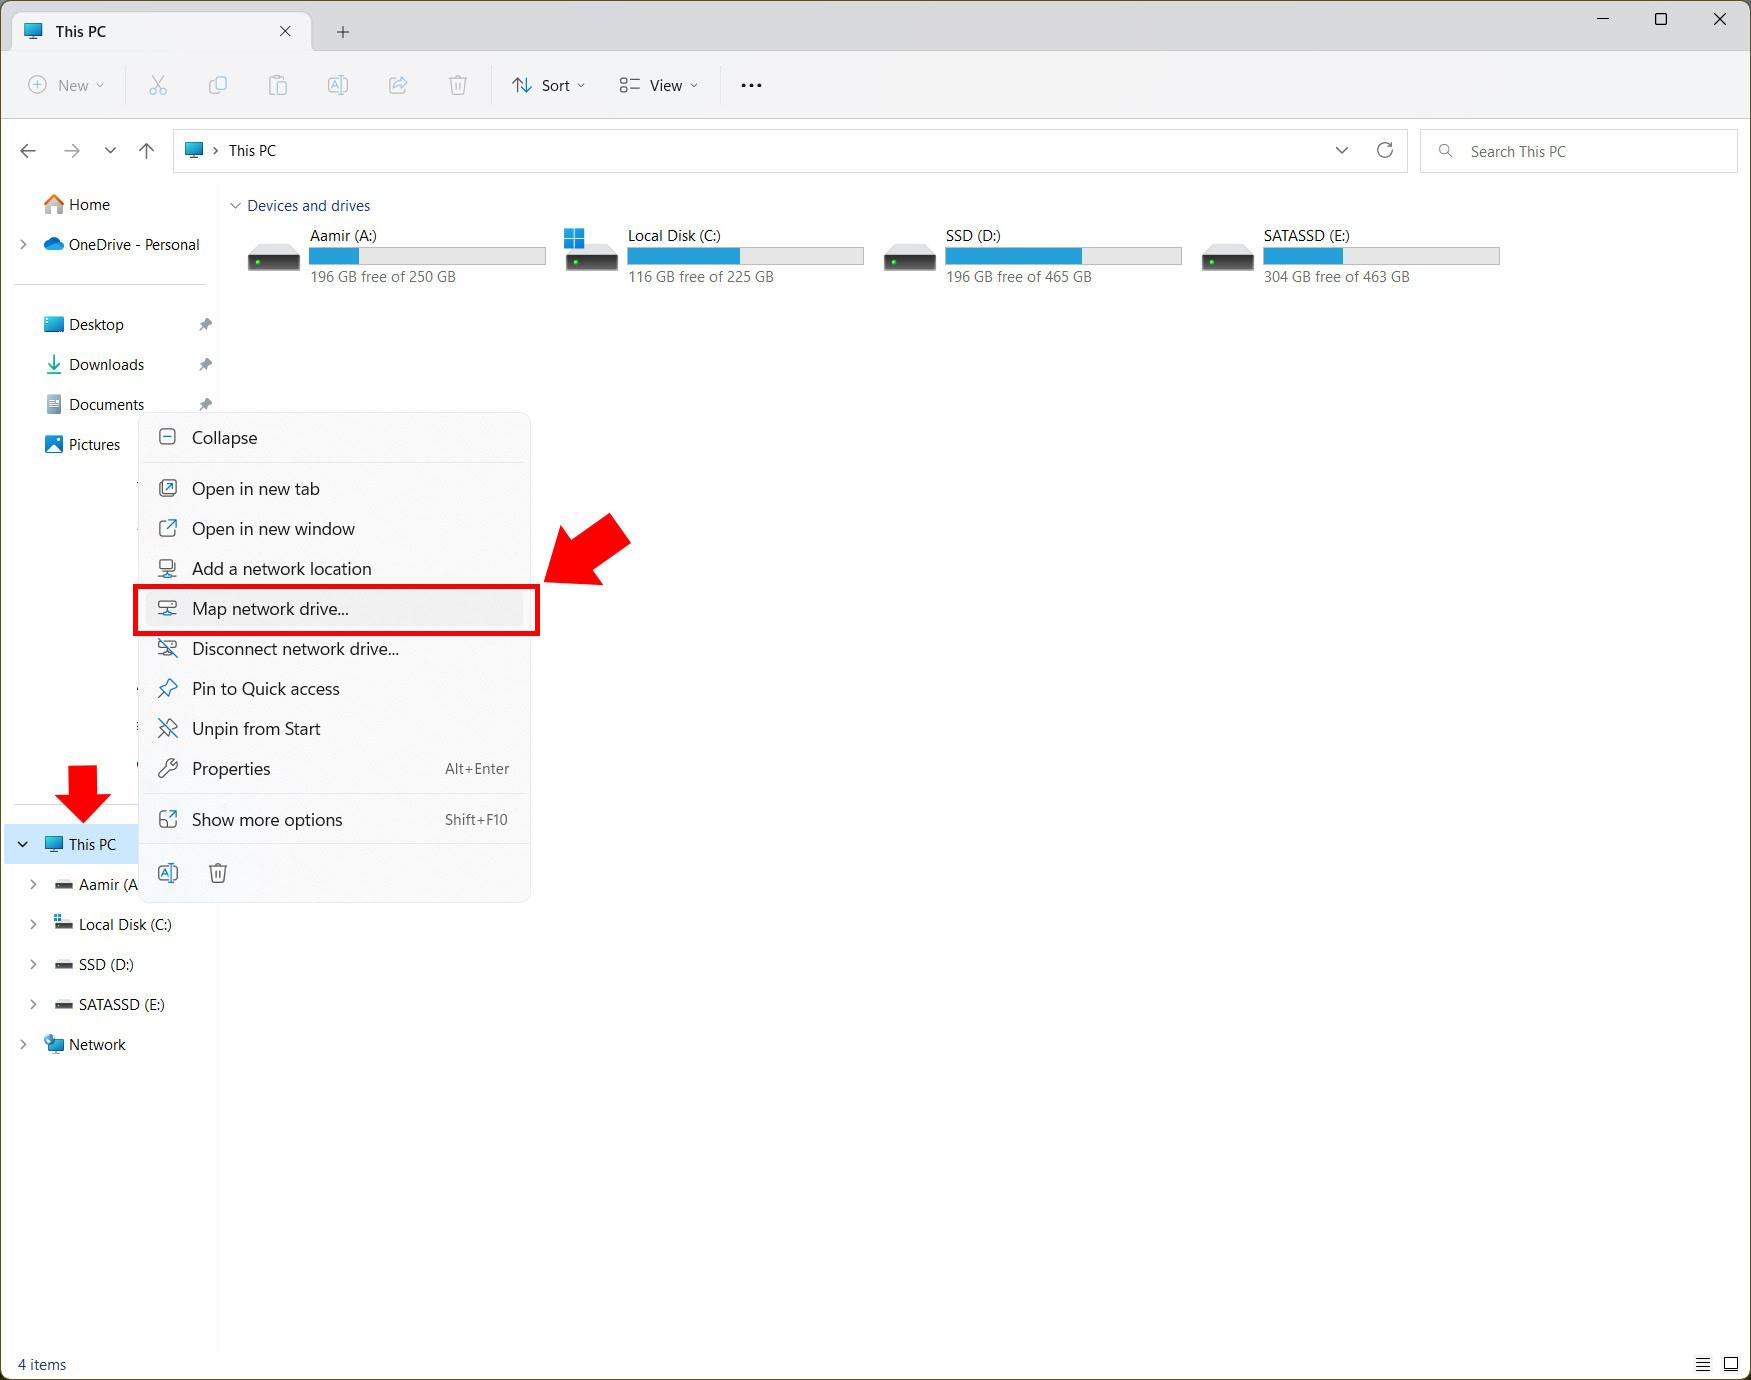
- Open “This PC” to view the screen which shows all your local drives.
- Right-click on “This PC” to show the option to “Map network drive.” On older versions of Windows 11, this option may also be present on the three-dot icon present in the top toolbar.

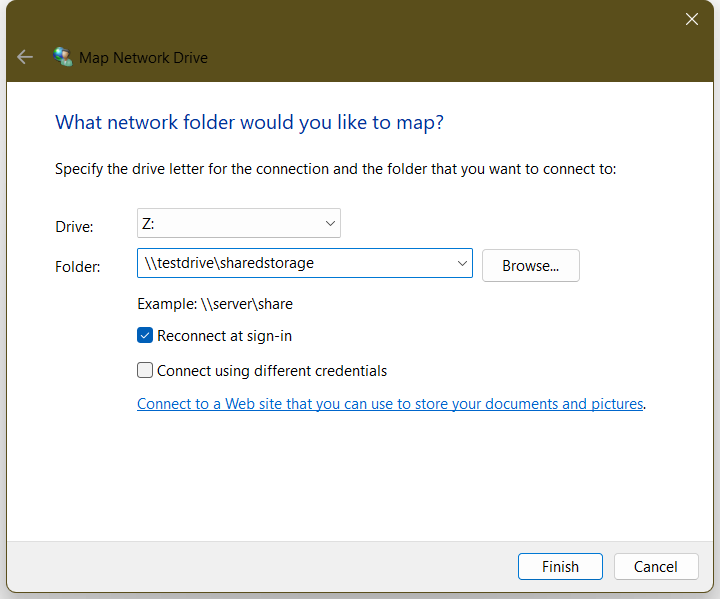
- Windows will open the wizard for the Map Network Drive function. Here, you can specify the drive letter that you want to use for the connection, as well as the actual location of the network drive folder that you want to connect to. In the following image, the location of the network drive folder \sharedstorage is at \\testdrive.

- If you want this drive to become available every time you sign back into your computer, choose the “Reconnect at sign-in” option.
- If you have set up access credentials for the network drive, you need to choose the “Connect using different credentials” option.
- Once you click Finish, Windows 11 will try to connect to the network drive. If you have authentication set up for your drive, you will get a Windows Security prompt to enter your credentials. Enter your username and password for the network drive on this screen.
- And that’s it! After this stage, you should see the network drive show up under “This PC” with the assigned letter that you mapped it to. Clicking on the icon will take you straight to the folder location that you set.
How to disconnect and unmap a network drive in Windows 11
Disconnecting and unmapping a network drive is even simpler than the mapping process.
- Open the File Explorer app on Windows. To do so, you can right-click on the Start Menu and select File Explorer.
- Open “This PC” to view the screen which shows all your local drives.
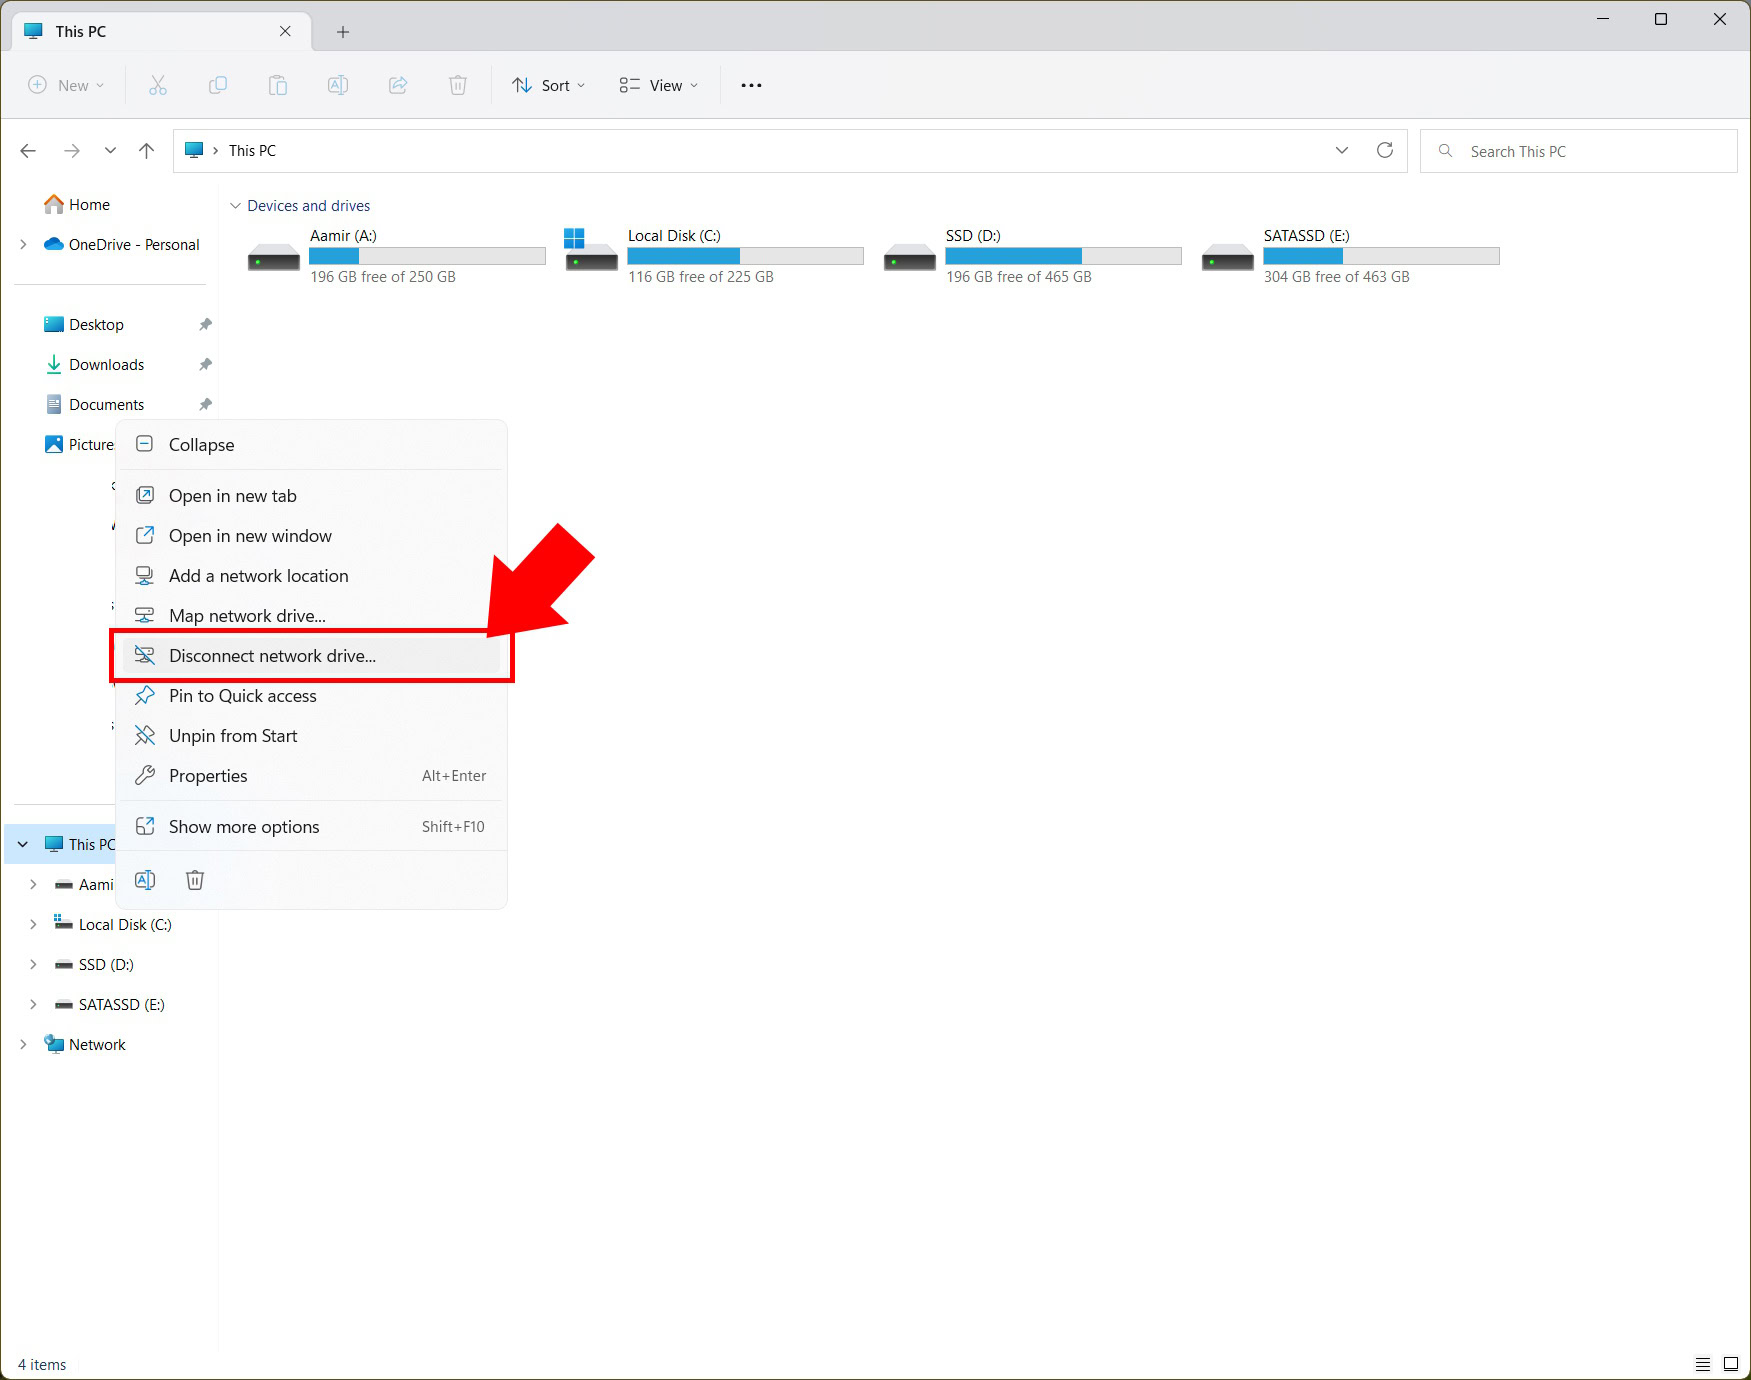
- Right-click on “This PC” to show the option to “Disconnect network drive.” On older versions of Windows 11, this option may also be present on the three-dot icon present in the top toolbar.

- Select the network drives you want to disconnect from, and click Ok. This will disconnect you from the mapped drive.
- To unmap and delete the drive, simply right-click on the drive icon and click on the trash icon for deleting. The mapped drive’s location will be deleted, and you will free up the assigned letter.
How to map a network drive in Windows 10
Prerequisite: Turn on Network Discovery and File Sharing
Much like Windows 11, you have to first turn on Network Discovery and File Sharing.
- On your Windows 10 computer, go to Control Panel > View Network Status and Tasks > Change Advanced Sharing Settings.
- Toggle Turn on network discovery to enable network discovery.
- Click on Save Changes to save your settings.
Map the drive
- Open the File Explorer app on Windows. To do so, you can right-click on the Start Menu and select File Explorer.
- Open “This PC” to view the screen which shows all your local drives.
- You will find the Map Network Drive option on the toolbar.
- Windows will open the wizard for the Map Network Drive function. Here, you can specify the drive letter that you want to use for the connection, as well as the actual location of the network drive folder that you want to connect to.
- If you want this drive to become available every time you sign back into your computer, choose the “Reconnect at sign-in” option.
- If you have set up access credentials for the network drive, you need to choose the “Connect using different credentials” option.
- Once you click Finish, Windows 11 will try to connect to the network drive. If you have authentication set up for your drive, you will get a Windows Security prompt to enter your credentials. Enter your username and password for the network drive on this screen.
- And that’s it! After this stage, you should see the network drive show up under “This PC” with the assigned letter that you mapped it to. Clicking on the icon will take you straight to the folder location that you set.
How to disconnect and unmap a network drive in Windows 10
- Open the File Explorer app on Windows. To do so, you can right-click on the Start Menu and select File Explorer.
- Open “This PC” to view the screen which shows all your local drives.
- You will find the Disconnect network drive option on the toolbar. Click on it.
- Select the network drives you want to disconnect from, and click Ok. This will disconnect you from the mapped drive.
- To unmap and delete the drive, simply right-click on the drive icon and click on the trash icon for deleting. The mapped drive’s location will be deleted, and you will free up the assigned letter.
FAQs
Mapping a network drive is the first step in making the drive available to access on a computer. It is an easy and straightforward way to initialize sharing on that specific computer. Hence, it is necessary if you wish to set up network drive access on that computer.
If you’re having issues with a network drive, you can disconnect, delete, and then remap the drive.
Yes, you can plug in a pen drive to your router for network drive storage. However, there are more setup steps needed to initialize the thumb drive from your router. Once initialized, you can then follow the steps above to map the network drive to the computer of choice and make the thumb drive freely accessible in the local network.
A network drive doesn’t have its own resources like CPU, OS, etc, with set up and control taking place through your phone or PC via a router. On the other hand, a NAS has its own CPU and OS, and can be connected to any device on your network.