Affiliate links on Android Authority may earn us a commission. Learn more.
7 Gmail tips and tricks you should know
Practically all of us use Gmail regularly or have used it at one point in our lives. The email service from Google is preloaded on most good Android phones sold outside of China, and a Google account is also recommended to enjoy your Android experience. If you’ve already made a Gmail account for yourself, why not make the best use of it? Here are seven Gmail tips and tricks that you should know about!
1. Infinite email aliases with the Plus (+) modifier
My favorite lesser-known Gmail trick is using the plus sign in your email address to facilitate tracking and organization.
Gmail ignores everything after a plus sign (+) in your email address until you reach the “@gmail.com” ending. This means that yourname@gmail.com and yourname+xyz@gmail.com both point to the same primary inbox. You don’t even have to follow any special steps to begin using this trick, as you get practically infinite email aliases from your single Gmail address right out of the box.
This trick is of great help in keeping your email organized and tracking whether a service has shared your data with another.
For example, you can add “+websitename” whenever you sign up for a newsletter on a website. If the website passes on your email address to a spam marketer, you can easily identify which website shared your information by looking at the email address it arrived on!
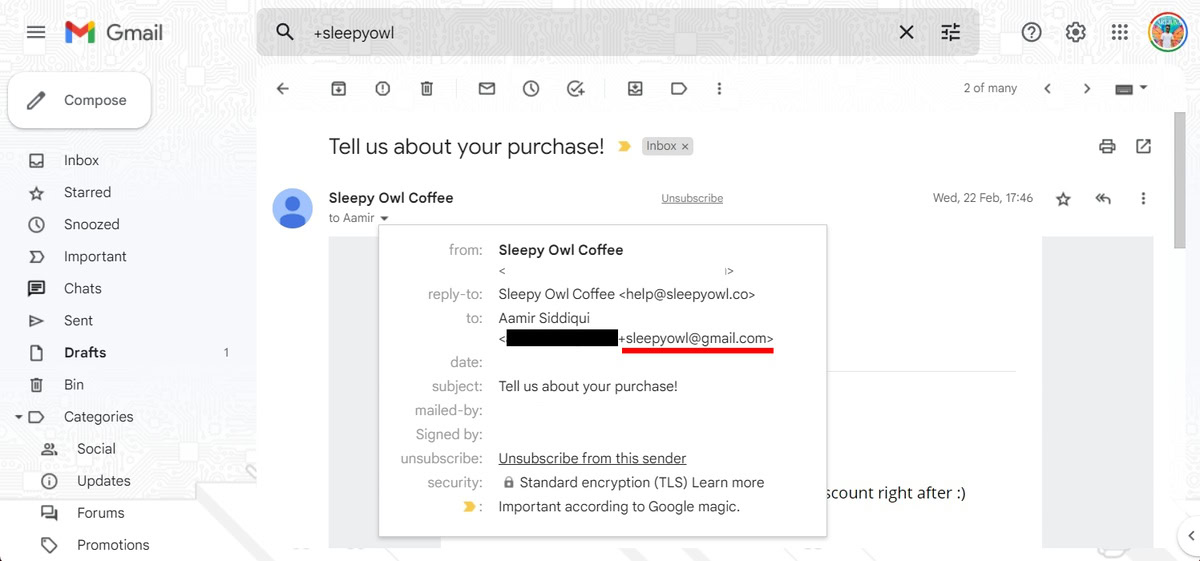
I’ve used the plus trick to create some advanced filters as well. When hiring people at a previous job, I would ask applicants to email “myemail+hiring@gmail.com.” To filter all the job applications received, I used the “to:(myemail+hiring@gmail.com)” search argument in the search bar to create a very specific filter that presented a clean list of job applications received without showing any of the hundred other emails in the inbox.
You can further pair it up with filtering and forwarding rules in Gmail to create an amazingly organized inbox!
Note that some websites have begun rejecting the plus modifier present in an email field. Unfortunately, the trick will not work in such situations, even though the address itself would work.
2. Filtering emails
One of the better ways to keep your email organized is to use filters to automatically sort your email and carry out various tasks on them, like applying labels, forwarding them to another address, archiving them, or even deleting them.
Setting up filters
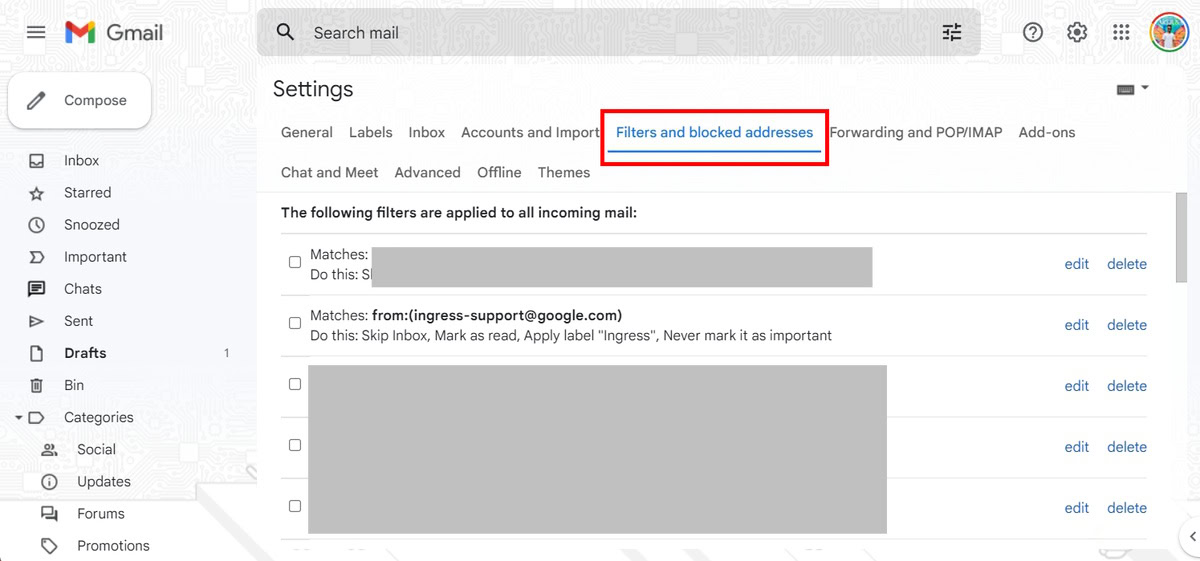
To set up filters, follow these steps:
- Open Gmail on a desktop.
- Click on the cogwheel icon on the top right to open settings.
- Click on See all settings to expand to the full settings page.
- Navigate to the Filters and blocked addresses tab, and select Create a new filter.
Available search filters
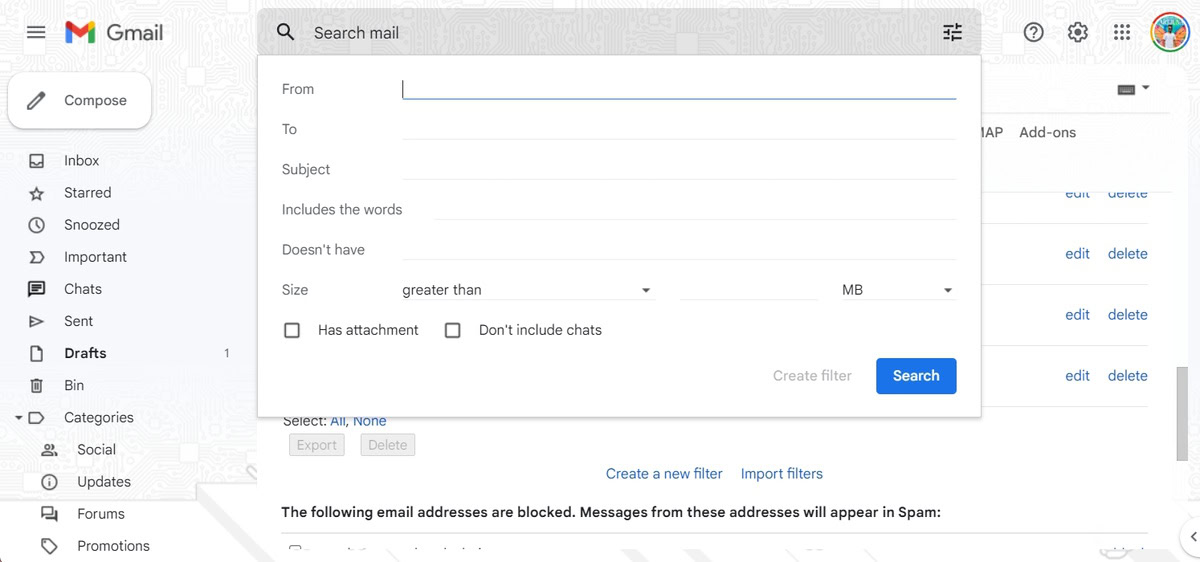
Gmail then presents you with the various search filters available. These include:
- From: Filter emails sent from a specific email address.
- To: Filter emails sent to a particular email address.
- Subject: Filter emails that use a specific subject line.
- Has the words: Filter emails that contain specific keywords.
- Doesn’t have: Filter emails that don’t contain specific keywords.
- Size: Filter emails larger or smaller than a specific size.
- Has attachment: Filter emails that include an attachment.
- Don’t include chats: For separating Hangouts chats from the search results.
Search operators
In the fields that accept text input, you can also make use of the following search operators to craft complex filtering recipes:
- OR: Match any of the specified inputs.
- AND: Match all of the specified inputs.
- – : The minus sing (-) operator excludes keywords.
- ” “: The quotation marks (” “) operator matches exactly the keyword or phrase. Note that this is not case-sensitive.
- ( ): You can use brackets ( ) to club various operators above that need to operate together.
- *: The asterisk symbol (*) is the wildcard operator.
Email actions
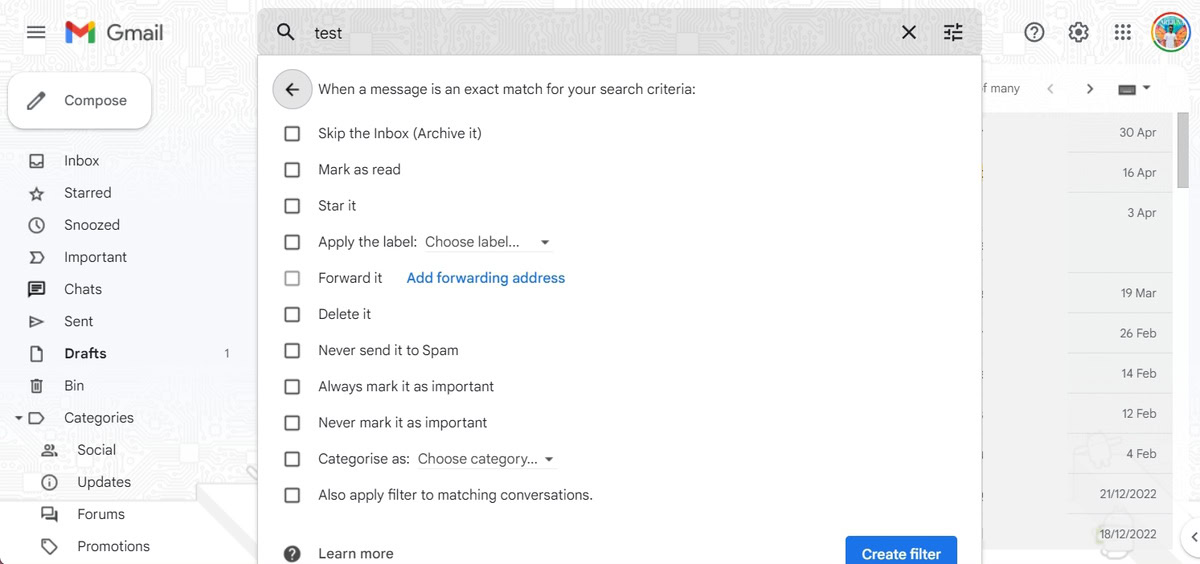
Once you figure out the search filters, you can set up the following actions:
- Skip the Inbox (Archive it): Archive the email so it doesn’t appear in your inbox.
- Mark as read: Have the email appear as an already-read item in your inbox.
- Star it: Star the email.
- Apply the label: Add a specific label to the email.
- Forward it: Send the email to another address (this needs a forwarding address added).
- Delete it: Send the email to the trash.
- Never send it to Spam: Prevent Gmail from tagging the email as spam.
- Always/Never mark it as important: Label the email as important/not important, respectively.
- Categorize as: Add the email to an existing category.
- Also apply filter to matching conversations: Apply the selected filter conditions to every matching email in your account.
Usage examples
All of this information is great, but here are some ways you can use them!
You can use the above to archive all incoming newsletter emails in your inbox automatically. To do so, create a filter using the “Has the words” search filter, use the word “unsubscribe” as a keyword (since most newsletters will give you the option to unsubscribe), and then add the “Skip the Inbox (Archive it)” option to the filter. The next newsletter you receive will straightaway be archived without disturbing the peace of your inbox, though you should consider just unsubscribing to the newsletter.
Continuing the example of hiring used in the Plus (+) email address modifier trick above, I used a filter for the “To” field, used “myemail+hiring@gmail.com” as the keyword, and then had Gmail apply a new Label called “Hiring” to those emails. This way, I can quickly access the Hiring label and see an uncluttered view of all the job applications I received at that email address. I could also filter the label with different keywords for job roles.
To make the best use of filters, identify actions you repeatedly do in your inbox on a type of email. So if you frequently delete your Amazon shipping notifications, you can create a filter that does it automatically for you.
3. Sort emails by file size
Do you keep running out of storage on your Gmail account? One trick you can try is to clean out emails with very large file attachments. Cleaning just a handful of these will open up hundreds of MBs in your inbox, and it’s a quick solution to your storage woes if you don’t want to pay for Google One.
Sorting emails by file size is done using the abovementioned filters. You can use the same filters in the search field present in your inbox for one-time searches.
In addition to the filters mentioned above, there are some more filters available for one-time searches:
- Date within: Specify the age of the email.
- Search: Search specific folders/labels within your Gmail.
To sort large emails, use the size filter. You can add “larger:10M” to your search field to filter emails larger than 10MB.
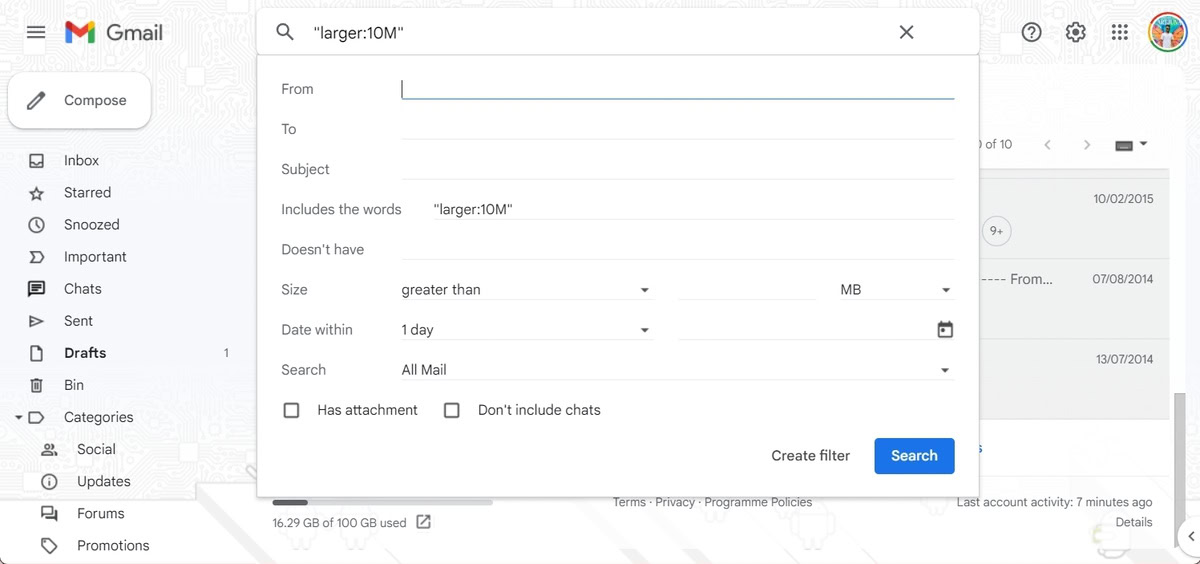
If you want to, you can use the “before:YYYY/MM/DD” and “after:YYYY/MM/DD” as date modifiers to look for really old emails. This will present you with a list of old and large emails, and you can assess if you want to delete them.
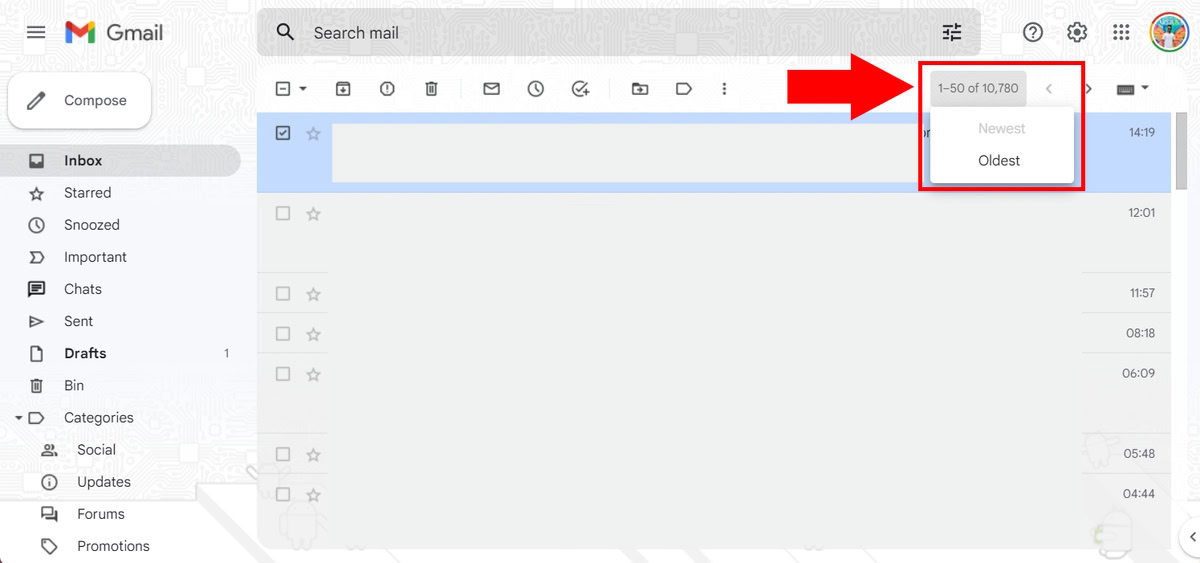
Bonus tip: You can also sort emails by “Oldest” first if you want to clean up old emails that are no longer relevant. Just locate where Gmail displays “1 of 50 of xx,” and click on it to change the default sorting from Newest to Oldest.
4. Changing Undo Send timer
Gmail has a nifty “Undo Send” feature that lets you undo an email you just sent. This comes in handy if you frequently operate on muscle memory and spot a mistake right after you hit the send button. But some people may be slower at spotting this mistake, so you can increase the timer for the “Undo Send” feature.
- Open Gmail on a desktop.
- Click on the cogwheel icon on the top right to open settings.
- Click on See all settings to expand to the full settings page.
- Navigate to the General tab, and locate the Undo Send option.
- You can change the send cancellation period from five seconds to 10, 20, or 30 seconds.
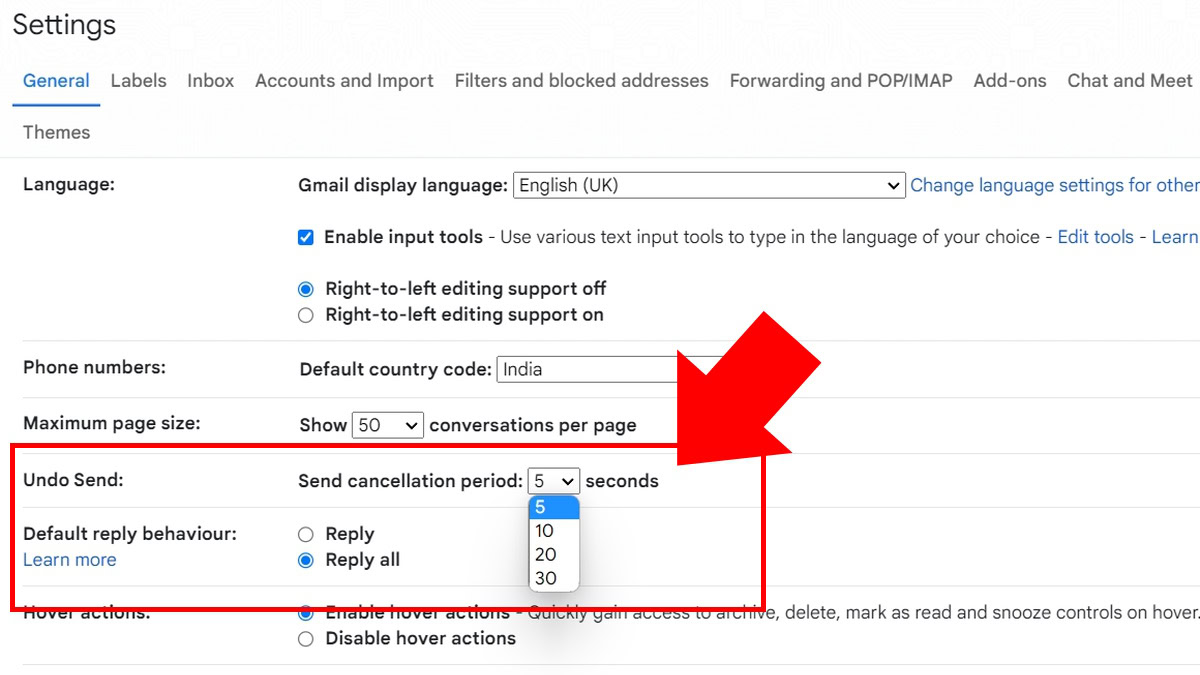
Note that undo send holds back your email until the timer expires. It does take away a few seconds from “instant” email, but that should not be an issue for most people.
5. Schedule Send on Gmail
Gmail’s Schedule Send feature is very handy if you are at your most productive during odd hours. It lets you schedule emails to be sent out in the future at a time that you can specify.
To use the Schedule Send feature on Gmail:
- Draft your email and add an email address for the recipient (required).
- You will notice a dropdown on the Send button that opens to the Schedule Send button.
- Choose from the suggested times, or specify your own time for sending the email.
You don’t need to have Gmail open when sending, as the service will send out the email automatically at the time you choose.
As I often work late at night, I extensively use this feature to have my email arrive in inboxes right after the next work day begins. This lets me complete my work when I am comfortable while ensuring my email is at the top of the email queue when the recipient is at their desk.
I also use it to schedule reminder emails when I know I need to send a reminder (freelancers and small business owners will relate to this). So rather than scheduling a reminder task for myself, I draft the email and schedule it to be sent in the future. If the situation changes, I can cancel the email until the last minute.
6. Confidential Mode to send expiring emails
Gmail has a neat feature wherein you can send emails that expire after a set time. This comes in handy if you are sending, say, some documents or information to an agent that you do not want sticking around in their inbox forever.
When you send emails in Gmail’s confidential mode, the options to copy, paste, download, print, and forward the message text and attachments will be disabled. You can also set an option to require an SMS passcode to open the email if you want to be doubly sure the intended recipient is only viewing it.
Do note that the recipient can still screenshot the email and its attachments. So exercise due caution when using this feature. Confidential emails also cannot be scheduled for some reason.
To send a confidential email in Gmail:
- When composing the email, click on the padlock-timer icon.
- Choose the duration for expiry. It can be one day, a week, a month, three months, or five years. Your email will automatically expire after this duration, but you can also manually revoke access after the email is sent.
- You can choose from No SMS passcode (which defaults to sending an email passcode if the recipient is not using Gmail and automatically opens the email if they are) or SMS passcode.
7. Let someone else access your inbox without sharing a password
Gmail lets you open up access to the email inbox without sharing the password of that account. This is handy if you want to let someone else read your emails without letting them change any associated account settings.
For example, suppose you are running a small business and want to create a helpdesk email. In that case, you can delegate access to assistants who can monitor and react to emails without having the authority to change account settings.
To share access to your inbox, follow these steps:
- Open Gmail on a desktop.
- Click on the cogwheel icon on the top right to open settings.
- Click on See all settings to expand to the full settings page.
- Navigate to the Accounts and Import tab, and locate the Grant access to your account option.
- Click on Add another account and follow the process.
- You can change setting such as leaving conversations unread when others open them or letting Gmail show who sent the email on your behalf.
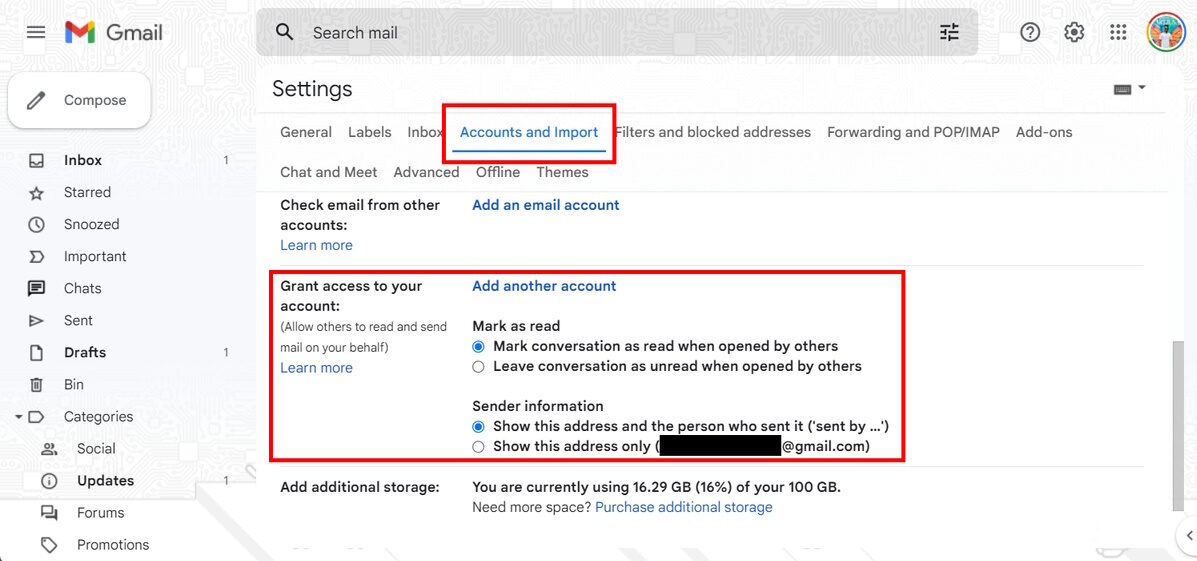
Note that the added account must end in the same domain name as yours.
Bonus Gmail tip: Gmail ignores periods in your email address
Yes, Gmail ignores the periods present in your email. So yourname@gmail.com is the same email address as your.name@gmail.com and the same as y.o.u.r.name@gmail.com and all other period variations thereof. This lets you use the same email address in different variations, some of which are easier for humans to read than others.
The most practical way to use this is to print a more readable version of your email while distributing it offline. As a freelancer or small business owner, you can have brand.name@gmail.com as your email, which you can print on your business card. It is marginally easier to read than brandname@gmail.com and can help you disambiguate if your branding has an unintentional innuendo.
We hope you found these Gmail tips and tricks helpful and that you learned something new today. If you’re interested in learning more, check out these 20 Chrome tips and tricks and the things you can do on Facebook Messenger.