Affiliate links on Android Authority may earn us a commission. Learn more.
Using the Awareness API in your Android app
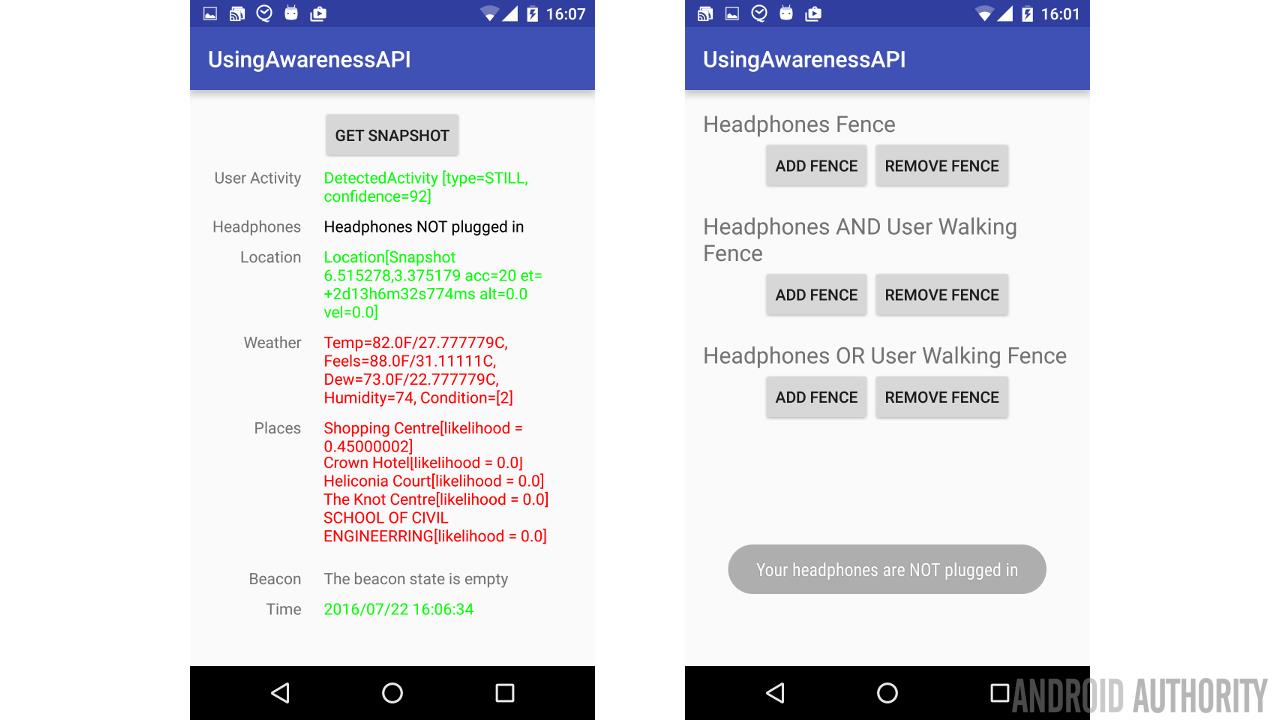
The Awareness API was introduced at Google I/O 2016, and is a new way of engaging users in specific situations, by either checking their current device context/state or by creating virtual fences around specific conditions. When these conditions are met, your app is notified by the OS.
Via the Awareness API an app can get data about what Android has inferred about what is going on. That way an app can tell when a person is in a moving vehicle, when a person is in a vehicle moving through a given area, when a person is in a vehicle moving through a given area at a given time, when a person is in a vehicle moving through a given area at a given time with their headphones on… You get the picture.
Using the Awareness API helps your app react intelligently, and in a battery efficient way. Rather than multiple apps polling the user’s context to find if any given set of conditions are met, the API allows apps define their fence conditions, and then get a notification when the device current state matches the defined conditions.
Be aware that while some uses of the Awareness API can make your app feel smart, delightful and intuitive, too much use, or usage in an unexpected way can have the opposite effect and make your app users uncomfortable, and your app feel creepy. Remember, similar to great power, with great APIs, comes great responsibility. Use at your own discretion.
Context Types
The Awareness API offers 7 different context types as at the time of this article, but there is no reason why this can’t be expanded in the future. The current seven contexts include
- Local time
- Location (longitude/latitude/elevation)
- User activity (walking, running, in vehicle, etc)
- Headphone State (plugged in or not)
- Weather conditions
- Place description
- Beacons
Most of the above tasks can be accomplished with other previously existing APIs. However, the power of the Awareness API is
- How simple it makes it to retrieve this data, with just a few lines of code
- The data has already been processed by the OS, and it’s pretty accurate already
- The API is highly optimized, and doesn’t cause more drain on the battery
Awareness APIs
There are two sets of APIs available under the Awareness API family.
- The Snapshot API, which allows applications take a snapshot of the current context states.
- The Fence API, which allows applications define a set of conditions, and when the operating system determines that the conditions have been met, alerts the app.
Preparation
The awareness API is a part of Google Play Services, and to use it, your application must be set up to use Google Mobile Services (com.google.android.gms). So, you need to setup GMS via the Google developer Console, and also on the application.
On Google Developer Console
To setup GMS on the cloud, navigate to the developer console and follow these steps:
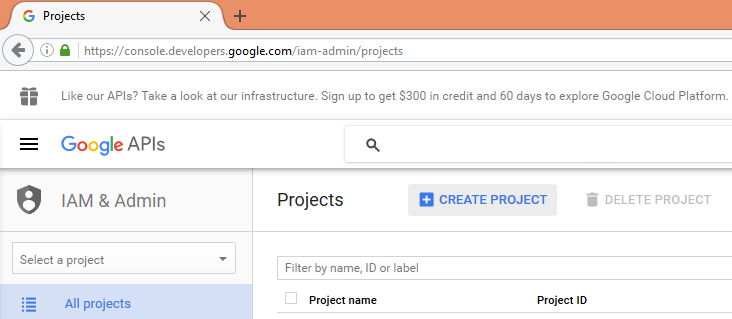
1. Create a project.
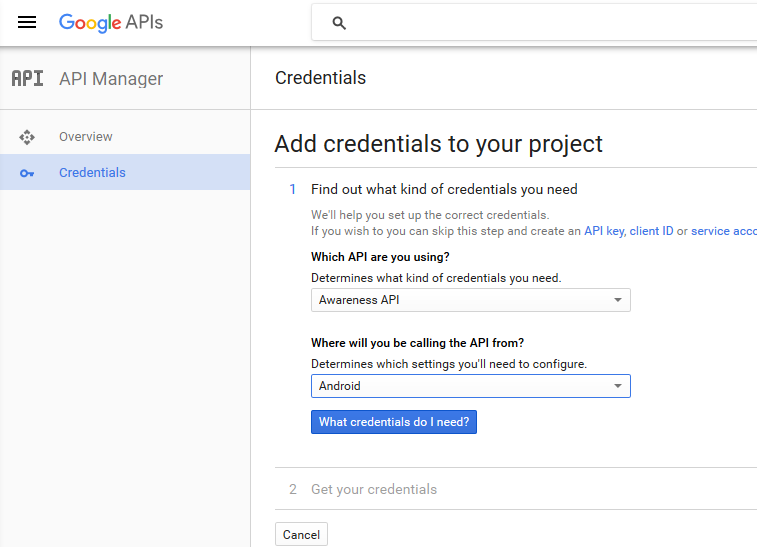
2. Go to the API Manager page, select the Awareness API and Enable it.
3. Go to the Credentials tab, and Create credentials. What you want to do here is create an Android API key, so select Create credentials – API key – Android Key. Enter a key name, and click Add package name and fingerprint. For help creating a key, check out the Google support page.
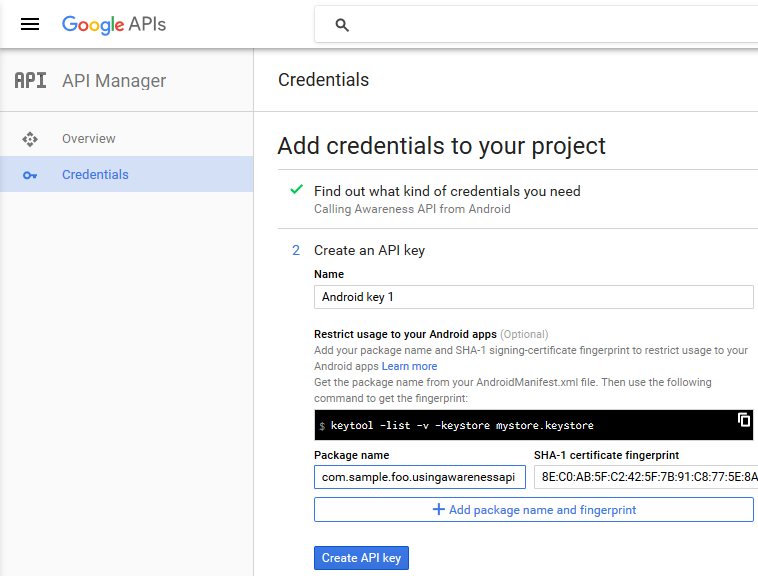
5. A key is generated for you. Copy this key, because we are going to need it when calling the Awareness API from our application.
On Android Studio
1. Ensure Google Play Services is up to date on your Android SDK Manager.
2. Create a new project, and make sure the package name matches the package name used in step four in the section above.
3. Add the Awareness API dependency to your app build.gradle file
dependencies {
	...
    compile 'com.google.android.gms:play-services-contextmanager:9.2.1'
}
4. Add the following permissions to the <manifest> tag in the AndroidManifest.xml file
<manifest>
    <uses-permission android:name="android.permission.ACCESS_FINE_LOCATION" />
    <uses-permission android:name="com.google.android.gms.permission.ACTIVITY_RECOGNITION" />
	...
</manifest>
The ACCESS_FINE_LOCATION permission is used to access Location data, used by Location, Places, Weather and Beacon. The ACTIVITY_RECOGNITION permission, as you must have guessed, is used to detect a user’s current activity. Detecting headphone plug in status doesn’t require any extra permission, neither does getting device time (Imagine if apps needed user permission to fetch device time).
5. Add the following <meta-data> tags to the AndroidManifest.xml <application> tag
<application>
        <meta-data
            android:name="com.google.android.awareness.API_KEY"
            android:value="YOUR_API_KEY" />
        <meta-data
            android:name="com.google.android.geo.API_KEY"
            android:value="YOUR_API_KEY" />
        <meta-data
            android:name="com.google.android.nearby.messages.API_KEY"
            android:value="YOUR_API_KEY" />
		...
    </application>
Replace ‘YOUR_API_KEY’ in the code snippet above with the key generated from step five of the previous section.
At this point, your app should be ready to begin using the Awareness APIs.
The Sample App
For our sample app, we have implemented three Activities:
- The MainActivity – Pretty boring. Its a simple activity that links to the other interesting Activities.
- The SnapshotActivity – The Activity contains a button, that when clicked, requests for a Snapshot of all the contexts.
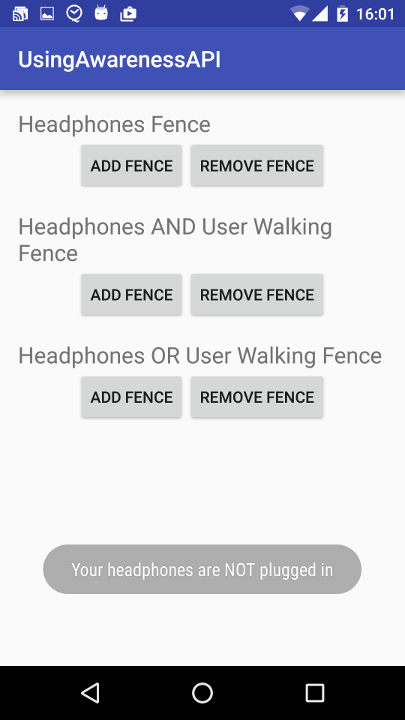
- The FenceActivity – We have implemented three different fences in this Activity, which can be added and removed from the apps fences by tapping the appropriate buttons.
The SnapshotActivity
The SnapshotActivity has a single button, which when clicked, fetches a Snapshot of the user’s current context across all seven contexts.
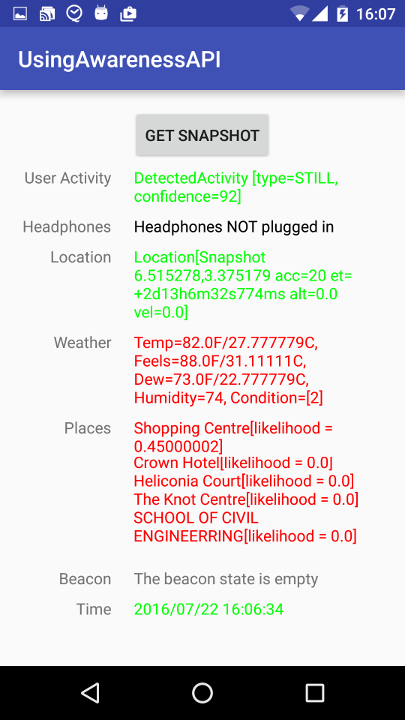
The first thing we do in the SnapshotActivity is to build a GoogleApiClient client object, and add the Awareness API, by calling addApi(Awareness.API).
@Override
    protected void onCreate(Bundle savedInstanceState) {
        super.onCreate(savedInstanceState);
        setContentView(R.layout.activity_snapshot);

        mGoogleApiClient = new GoogleApiClient.Builder(SnapshotActivity.this)
                .addApi(Awareness.API)
                .build();
        mGoogleApiClient.connect();
	}
When the button is clicked, the only action performed is a method call to getSnapshots();
mSnapshotButton.setOnClickListener(new View.OnClickListener() {
            @Override
            public void onClick(View view) {
                getSnapshots();
            }
        });
Get DetectedActivity
The sample code below is how we fetch the DetectedActivity on the device. While developing, this would most likely be STILL. Some other possible Activities include WALKING, IN_VEHICLE and RUNNING among others.
Awareness.SnapshotApi.getDetectedActivity(mGoogleApiClient)
        .setResultCallback(new ResultCallback() {
            @Override
            public void onResult(@NonNull DetectedActivityResult detectedActivityResult) {
            if (!detectedActivityResult.getStatus().isSuccess()) {
                mUserActivityTextView.setText("--Could not detect user activity--");
               return;
            }
            ActivityRecognitionResult arResult = detectedActivityResult.getActivityRecognitionResult();
            DetectedActivity probableActivity = arResult.getMostProbableActivity();
            Log.i(TAG, probableActivity.toString());
            mUserActivityTextView.setText(probableActivity.toString());
           mUserActivityTextView.setTextColor(Color.GREEN);
        }
    });
That is all! Simply call getDetectedActivity() on Awareness.SnapshotApi, and define a ResultCallback, that gets called when the User Activity has been detected. ActivityRecognitionResult also has a method to return a list of ProbableActivities using getProbableActivities(). In the snippet above, we simply get the most probable activity and display that.
Headphone State
This is also very straightforward, and incredibly similar to the UserActivity snippet above. Actually, all the Awareness APIs are quite similar.
Awareness.SnapshotApi.getHeadphoneState(mGoogleApiClient)
                .setResultCallback(new ResultCallback() {
                    @Override
                    public void onResult(@NonNull HeadphoneStateResult headphoneStateResult) {
                        if (!headphoneStateResult.getStatus().isSuccess()) {
                            mHeadphonesTextView.setText("Could not detect headphone state");
                            return;
                        }
                        HeadphoneState headphoneState = headphoneStateResult.getHeadphoneState();
                        if (headphoneState.getState() == HeadphoneState.PLUGGED_IN) {
                            mHeadphonesTextView.setText("Headphones plugged in");
                        } else {
                            mHeadphonesTextView.setText("Headphones NOT plugged in");
                        }
                    }
                });
To get the HeadphoneState, call the getHeadphoneState() method. The callback expects a HeadphoneStateResult, and the contained HeadphoneState is either HeadphoneState.PLUGGED_IN or HeadphoneState.UNPLUGGED.
Time
For time, we simply fetch the device time. This doesn’t require any special APIs.
Calendar calendar = Calendar.getInstance();
        mTimeTextView.setText(new SimpleDateFormat("yyyy/MM/dd HH:mm:ss").format(calendar.getTime()));
Location
For all the Location dependent Awareness contexts, we must check the user has granted permission to the ACCESS_FINE_LOCATION permission, before we attempt to fetch the device location. Also, you might want to check if the device’s location setting is turned on, before making the calls.
Sample code to check for device permission:
if (ContextCompat.checkSelfPermission(this,
                Manifest.permission.ACCESS_FINE_LOCATION)
                != PackageManager.PERMISSION_GRANTED) {

            Log.e(TAG, "Fine Location Permission not yet granted");

            ActivityCompat.requestPermissions(this,
                    new String[]{Manifest.permission.ACCESS_FINE_LOCATION},
                    MY_PERMISSIONS_REQUEST_ACCESS_FINE_LOCATION);

        } else {
            Log.i(TAG, "Fine Location permission already granted");

			// Awareness API code goes here
	}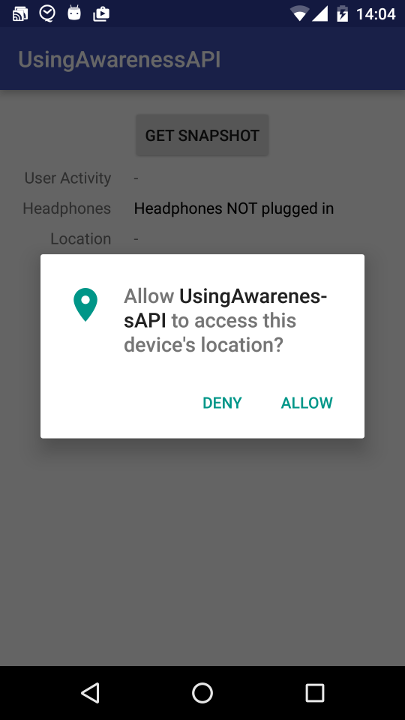
For more details, Google has good documentation on Requesting Permissions at Run Time.
Using the Awareness API to get Location information is shown below:
Awareness.SnapshotApi.getLocation(mGoogleApiClient)
                    .setResultCallback(new ResultCallback() {
                        @Override
                        public void onResult(@NonNull LocationResult locationResult) {
                            if (!locationResult.getStatus().isSuccess()) {
                                Log.e(TAG, "Could not detect user location");
                                mLocationTextView.setText("Could not detect user location");
                                mLocationTextView.setTextColor(Color.RED);
                                return;
                            }
                            Location location = locationResult.getLocation();
                            mLocationTextView.setText(location.toString());
                            mLocationTextView.setTextColor(Color.GREEN);
                        }
                    });
Weather
To get the Weather conditions, use the code snippet below
Awareness.SnapshotApi.getWeather(mGoogleApiClient)
                    .setResultCallback(new ResultCallback() {
                        @Override
                        public void onResult(@NonNull WeatherResult weatherResult) {
                            if (!weatherResult.getStatus().isSuccess()) {
                                Log.e(TAG, "Could not detect weather info");
                                mWeatherTextView.setText("Could not detect weather info");
                                return;
                            }
                            Weather weather = weatherResult.getWeather();
                            mWeatherTextView.setText(weather.toString());
                        }
                    });
While we simply display the Weather using toString(), there are other more useful means of getting information from the Weather object, including getTemperature(), getFeelsLikeTemperature(), getHumidity(), getConditions() among others.
Places
To get places around a user, you have to enable the Google Places API for Android on the Developer Console for your project.
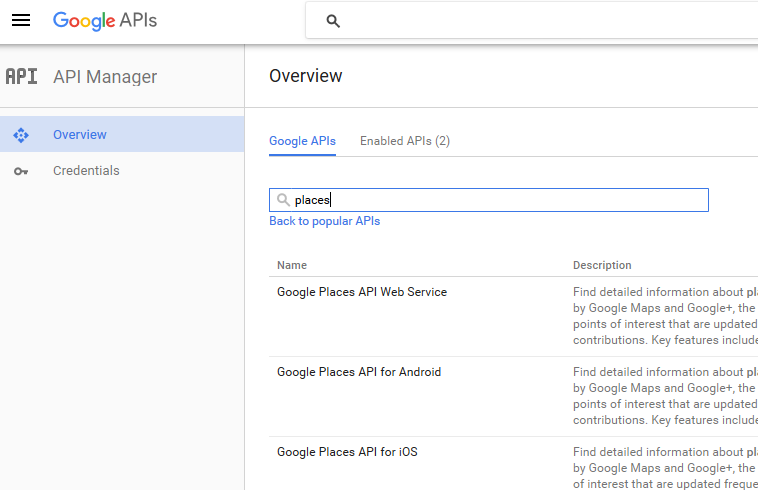
To fetch the places around a user, use the following code snippet
Awareness.SnapshotApi.getPlaces(mGoogleApiClient)
                    .setResultCallback(new ResultCallback() {
                        @Override
                        public void onResult(@NonNull PlacesResult placesResult) {
                            if (!placesResult.getStatus().isSuccess()) {
                                Log.e(TAG, "Could not get places list");
                                mPlacesTextView.setText("Could not get places list");
                                return;
                            }
                            List placeLikelihoods = placesResult.getPlaceLikelihoods();
                            if (placeLikelihoods != null) {
                                StringBuilder places = new StringBuilder();
                                for (PlaceLikelihood place :
                                        placeLikelihoods) {
                                    Log.i(TAG, place.getPlace().getName().toString() +
                                            "[likelihood = " + place.getLikelihood() + "]");
                                    places.append(place.getPlace().getName().toString() +
                                            "[likelihood = " + place.getLikelihood() + "]\n");
                                }
                                mPlacesTextView.setText(places.toString());
                            } else {
                                Log.e(TAG, "There is no known place");
                                mPlacesTextView.setText("There is no known place");
                            }
                        }
                    });
Using this API, we can get a list of Places, along with a likelihood score (a number indicating the inferred likelihood that the device is at that place). The Place object returned also contains information including Address, Latitude/Longitude, phone number, and ratings among others. The Places returned with this API is backed by the same database used by both Google+ and Google Maps. It features up to 100 million businesses and points of interest worldwide (at least according to Google).
Beacon
Beacons are Bluetooth low energy devices, that can be deployed, say in a store or other locations, to provide some contextual and engaging experience. For a more in depth explanation of beacons, check out the Beacon Google Developer page. For your app to get information about beacons, you have to enable the Nearby Messages API on the Developer Console for your app.
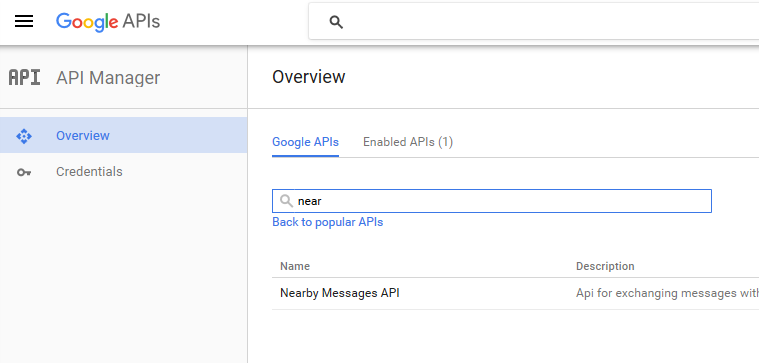
You must define a list of the beacon types you want to fetch data for. You must have already added these beacons to your Beacon Dashboard.
List MY_BEACON_TYPE_FILTERS = Arrays.asList(
                    BeaconState.TypeFilter.with(
                            "my.beacon.com.sample.usingawarenessapi",
                            "my-attachment-type"),
                    BeaconState.TypeFilter.with(
                            "com.androidauthority.awareness",
                            "my-attachment-type"));
The implementation is pretty consistent with the other API methods.
Awareness.SnapshotApi.getBeaconState(mGoogleApiClient, MY_BEACON_TYPE_FILTERS)
                    .setResultCallback(new ResultCallback() {
                        @Override
                        public void onResult(@NonNull BeaconStateResult beaconStateResult) {
                            if (!beaconStateResult.getStatus().isSuccess()) {
                                Log.e(TAG, "Could not get beacon state");
                                mBeaconTextView.setText("Could not get beacon state");
                                mBeaconTextView.setTextColor(Color.RED);
                                return;
                            }
                            BeaconState beaconState = beaconStateResult.getBeaconState();
                            if(beaconState != null) {
                                List beacons = beaconState.getBeaconInfo();
                                if (beacons != null) {
                                    StringBuilder beaconString = new StringBuilder();
                                    for (BeaconState.BeaconInfo info :
                                            beacons) {
                                        beaconString.append(info.toString());
                                    }
                                    mBeaconTextView.setText(beaconString.toString());
                                } else {
                                    mBeaconTextView.setText("There are no beacons available");
                                }
                            }
                            else {
                                mBeaconTextView.setText("The beacon state is empty");
                            }
                        }
                    });
The FenceAPI
The Fence API allows an application define certain conditions for user contexts, and when the conditions are satisfied, the app receives an alert through a PendingIntent. There are many different ways to build and handle a PendingIntent, but for the purpose of this tutorial and for brevity, we will use a BroadcastReceiver to handle it.
The FenceActivity
There are many different ways to combine Fence conditions. Multiple conditions can be combined using the logic structures AND, OR and NOT. We are going to create three different simple Fences:
- When the user plugs in Headphones
- When the user plugs in headphones, AND is walking
- When the user has either plugged in headphones OR is walking.
All three will be handled with the same BroadcastReceiver.
The BroadcastReceiver
We define a class called FenceBroadcastReceiver.
public class FenceBroadcastReceiver extends BroadcastReceiver {
    private static final String TAG = "FenceBroadcastReceiver";

    @Override
    public void onReceive(Context context, Intent intent) {
        FenceState fenceState = FenceState.extract(intent);

        Log.d(TAG, "Received a Fence Broadcast");

        if (TextUtils.equals(fenceState.getFenceKey(), FenceActivity.HEADPHONE_FENCE_KEY)) {
            switch (fenceState.getCurrentState()) {
                case FenceState.TRUE:
                    Log.i(TAG, "Received a FenceUpdate - Headphones are plugged in.");
                    Toast.makeText(context, "Your headphones are plugged in",
                            Toast.LENGTH_LONG).show();
                    break;
                case FenceState.FALSE:
                    Log.i(TAG, "Received a FenceUpdate - Headphones are NOT plugged in.");
                    Toast.makeText(context, "Your headphones are NOT plugged in",
                            Toast.LENGTH_LONG).show();
                    break;
                case FenceState.UNKNOWN:
                    Log.i(TAG, "Received a FenceUpdate - The headphone fence is in an unknown state.");
                    break;
            }
        }
        else if (TextUtils.equals(fenceState.getFenceKey(),
                FenceActivity.HEADPHONE_AND_WALKING_FENCE_KEY)) {
				...
        }
        else if (TextUtils.equals(fenceState.getFenceKey(),
                FenceActivity.HEADPHONE_OR_WALKING_FENCE_KEY)) {
				...
		}
	}
}
The FenceBroadcastReceiver is pretty straightforward. In the onReceive() method, we get the FenceState from the parsed Intent. We expect three possible Fence Keys, HEADPHONE_FENCE_KEY, HEADPHONE_AND_WALKING_FENCE_KEY or HEADPHONE_OR_WALKING_FENCE_KEY.
We simply show a Toast when we get a Fence update. You will most likely want to do something much more advanced.
FenceActivity
public class FenceActivity extends AppCompatActivity {
    private static final int MY_PERMISSIONS_REQUEST_ACCESS_FINE_LOCATION = 10001;
    private static final String MY_FENCE_RECEIVER_ACTION = "MY_FENCE_ACTION";
    public static final String HEADPHONE_FENCE_KEY = "HeadphoneFenceKey";
    public static final String HEADPHONE_AND_WALKING_FENCE_KEY = "HeadphoneAndLocationFenceKey";
    public static final String HEADPHONE_OR_WALKING_FENCE_KEY = "HeadphoneOrLocationFenceKey";

    private GoogleApiClient mGoogleApiClient;

    private FenceBroadcastReceiver mFenceReceiver;

    @Override
    protected void onCreate(Bundle savedInstanceState) {
        super.onCreate(savedInstanceState);
        setContentView(R.layout.activity_fence);

        mGoogleApiClient = new GoogleApiClient.Builder(FenceActivity.this)
                .addApi(Awareness.API)
                .build();
        mGoogleApiClient.connect();

        mFenceReceiver = new FenceBroadcastReceiver();

		...
    }

    @Override
    protected void onStart() {
        super.onStart();
        registerReceiver(mFenceReceiver, new IntentFilter(MY_FENCE_RECEIVER_ACTION));
    }

    @Override
    protected void onStop() {
        super.onStop();
        unregisterReceiver(mFenceReceiver);
    }
}
Add Headphone Fence
To add a fence to detect when the user either plugs in or unplugs his headphones, we implement an addHeadphoneFence() method, shown below
private void addHeadphoneFence() {
        Intent intent = new Intent(MY_FENCE_RECEIVER_ACTION);
        PendingIntent mFencePendingIntent = PendingIntent.getBroadcast(FenceActivity.this,
                10001,
                intent,
                0);

        AwarenessFence headphoneFence = HeadphoneFence.during(HeadphoneState.PLUGGED_IN);
        Awareness.FenceApi.updateFences(
                mGoogleApiClient,
                new FenceUpdateRequest.Builder()
                        .addFence(HEADPHONE_FENCE_KEY, headphoneFence, mFencePendingIntent)
                        .build())
                .setResultCallback(new ResultCallback() {
                    @Override
                    public void onResult(@NonNull Status status) {
                        if (status.isSuccess()) {
                            Log.i(TAG, "Fence was successfully registered.");
                        } else {
                            Log.e(TAG, "Fence could not be registered: " + status);
                        }
                    }
                });
    }
Note that MY_FENCE_RECEIVER_ACTION and HEADPHONE_FENCE_KEY are both constants defined in the FenceActivity class. The Fence that monitors the Headphone plug in state is created with the HeadphoneFence.during() method call. The subsequent lines are used to register the headphoneFence with the API, and set the Fence’s key and PendingIntent.
Congrats. Your application is now ready to receive alerts whenever the user plugs in or unplugs headphones from the device.
Deleting a Fence
To remove a Fence, we implemented the removeFence() method below
private void removeFence(final String fenceKey) {
        Awareness.FenceApi.updateFences(
                mGoogleApiClient,
                new FenceUpdateRequest.Builder()
                        .removeFence(fenceKey)
                        .build()).setResultCallback(new ResultCallbacks() {
            @Override
            public void onSuccess(@NonNull Status status) {
                String info = "Fence " + fenceKey + " successfully removed.";
                Log.i(TAG, info);
                Toast.makeText(FenceActivity.this, info, Toast.LENGTH_LONG).show();
            }

            @Override
            public void onFailure(@NonNull Status status) {
                String info = "Fence " + fenceKey + " could NOT be removed.";
                Log.i(TAG, info);
                Toast.makeText(FenceActivity.this, info, Toast.LENGTH_LONG).show();
            }
        });
    }
For example, to remove the Headphone Fence added above, we simply call
removeFence(HEADPHONE_FENCE_KEY);Combining Fences
In the example above, we created the HeadphoneFence using HeadphoneFence.during(…). In the same vein, we can create UserActivity Fences using DetectedActivityFence.during(…). The Fence classes include:
- HeadphoneFence
- DetectedActivityFence
- LocationFence
- BeaconFence
- TimeFence
To combine HeadphoneFence and DetectedActivityFence for example, we create both fences with the parameters we are interested in, and combine them using AwarenessFence.and() or AwarenessFence.or().
AwarenessFence headphoneFence = HeadphoneFence.during(HeadphoneState.PLUGGED_IN);
        AwarenessFence activityFence = DetectedActivityFence.during(DetectedActivityFence.WALKING);

        AwarenessFence orFence = AwarenessFence.or(headphoneFence, activityFence);
        Awareness.FenceApi.updateFences(
                mGoogleApiClient,
                new FenceUpdateRequest.Builder()
                        .addFence(HEADPHONE_OR_WALKING_FENCE_KEY,
                                orFence, mFencePendingIntent)
                        .build())
                .setResultCallback(new ResultCallback() {
                    @Override
                    public void onResult(@NonNull Status status) {
                        if (status.isSuccess()) {
                            Log.i(TAG, "Headphones OR Walking Fence was successfully registered.");
                        } else {
                            Log.e(TAG, "Headphones OR Walking Fence could not be registered: " + status);
                        }
                    }
                });
Conclusion
There are so many different possible combinations using the Awareness Fence API. You are really limited only by your imagination (and coding ability :P).
Remember, the Awareness API is one of those APIs that when used well, can result in really magical apps, but when used poorly will feel creepy and jarring. As usual, the complete source for the sample project developed for this article is available on github for all. Happy coding