Affiliate links on Android Authority may earn us a commission. Learn more.
Fragments 101: building better user interfaces
Android is an exciting platform to develop for, but it does have one major limitation: you can only display a single Activity onscreen at any one time (true, the upcoming Multi-Window mode does seem set to shake things up a bit, but we’ll get to that shortly).
That’s where fragments come in.
Ever since Android 3.0, fragments have given developers a way of dividing their app’s user interface into multiple, self-contained blocks, and then displaying these blocks in the way that makes sense for the user’s current screen configuration.
When you include fragments in your application, your app can either display these fragments:
- One at a time in separate activities, in what’s known as single-pane mode.
- Side-by-side in a single Activity, in what’s known as multi-pane mode.
For example, if you use fragments your app may choose to display a single fragment on a handset that’s held in portrait mode, and then display two fragments side-by-side on a tablet-sized device – or, it may even switch to multi-pane mode when the user tilts that aforementioned handset from portrait mode, into landscape mode.

This is where the real value of fragments lie: they give you a way of designing a single UI that’s flexible enough to adapt to a wide range of different screen configurations. Thanks to the magic of fragments, you can sleep soundly at night knowing that your app is providing a good user experience, regardless of the kind of device it winds up on.
So what is a fragment, exactly?
Let’s look at an example. Imagine you have a single Activity (the imaginatively-titled Activity A) and two fragments (Fragment 1 and Fragment 2).
Fragment 1 displays a list of nearby tourist attractions the user might want to visit. When the user selects an item from this list, Fragment B displays information about the currently-selected attraction.
Depending on the current screen configuration, your app may display these fragments in the following ways:
- If the user’s screen is large enough, Activity A will display Fragment 1 and Fragment 2 side-by-side, in a multi-pane layout.
- If there isn’t enough room to accommodate both fragments, the app displays each fragment separately. In this scenario, Activity A displays Fragment 1 only. When the user selects an item from Fragment 1, the app creates a new Activity (let’s call it Activity B) whose sole purpose in life is to host Fragment B.
Where does Multi-Window mode fit into all of this?
At this point you may be wondering: what’s the difference between fragments and Nougat’s Multi-Window mode?
Android 7.0 seems set to address some of the platform’s one-Activity-at-a-time limitations, but there’s a crucial difference between fragments and Multi-Window:
- Multi-Window will allow Android users to view Activities from different applications side-by-side.
- Fragments give developers a way of displaying different content within a single application, depending on the user’s current screen configuration.
What you need to know before using fragments
When used correctly, fragments are a powerful tool in the Android developer’s arsenal, but if you’re going to get the most out of fragments there’s a couple of things you need to bear in mind:
1. A fragment is closely tied to its host Activity
A fragment may have its own behaviour, user interface and (to a certain extent) its own lifecycle, but it can only ever exist inside a host Activity. In fact, let me clarify that point about a fragment’s lifecycle: you can only add and remove fragments when the host Activity is in its resumed state. This means that even though a fragment does have a distinct lifecycle, that lifecycle is dependent on the lifecycle of its host Activity.
For the sake of keeping this tutorial (relatively) punchy, I’m only going to look at how to add a fragment to an Activity declaratively, as this is the quickest and easiest way of getting started with fragments. The downside to this particular method, is that you won’t be able to add and remove this fragment at runtime – if this is your end goal, then you’ll need to delve into your application’s code (and the official Android docs has lots of useful info on this).
2. Backwards compatibility
If you want your app to connect with the largest possible audience (and who wouldn’t want that?) then it has to be compatible with as many different versions of the Android operating system as possible. The good news is that, even though fragments didn’t find their way into Android until Honeycomb, you can use fragments in your project while remaining backwards compatible with Android 1.6 and higher, thanks to the Android Support Library v4.
To add this Support Library to your project, launch the Android SDK Manager, select the ‘SDK Tools’ tab and download the ‘Android Support Repository.’
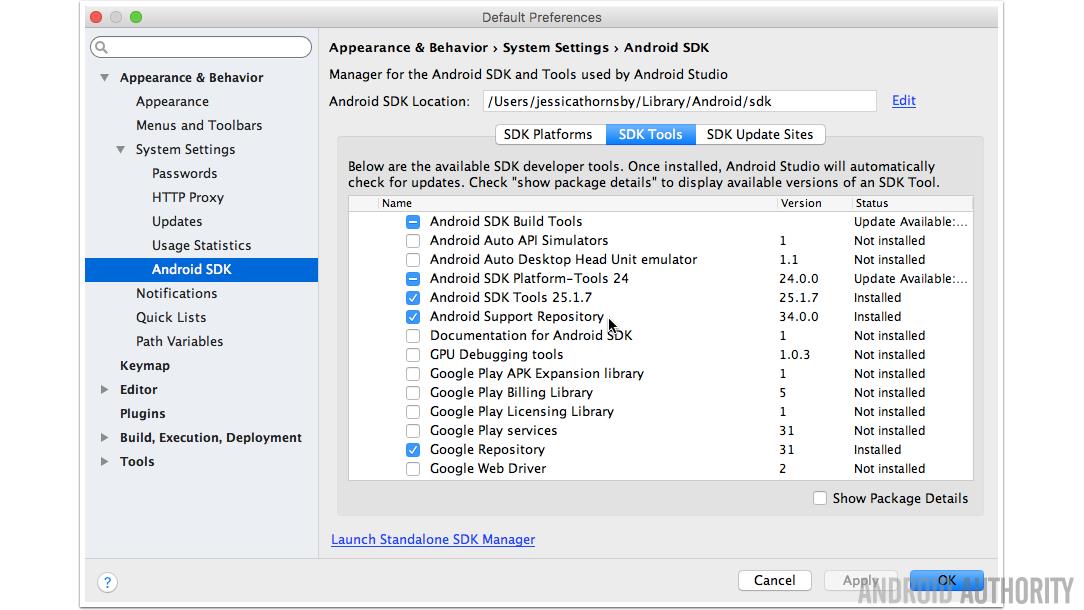
Next, add the library to your project by opening its module-level build.gradle file and adding the following to its dependencies section:
dependencies {
………
………
………
   compile 'com.android.support:appcompat-v7:24.0.0'
}
This is all you need to do for now, but just be aware that when you come to create your host Activity you’ll need to do the following:
- Extend FragmentActivity, instead of the usual Activity class.
- Import the android.support.v4.app.Fragment class.
I’ll come back to both of these points when we’re looking at how to create your first Android fragment – which conveniently, just-so-happens to be the subject of our next section.
Creating a Fragment
Although you can create ‘invisible’ fragments that contribute background behaviour but don’t contribute a UI component, most fragments do have a user interface, so I’m going to kick things off by defining my fragment’s UI.
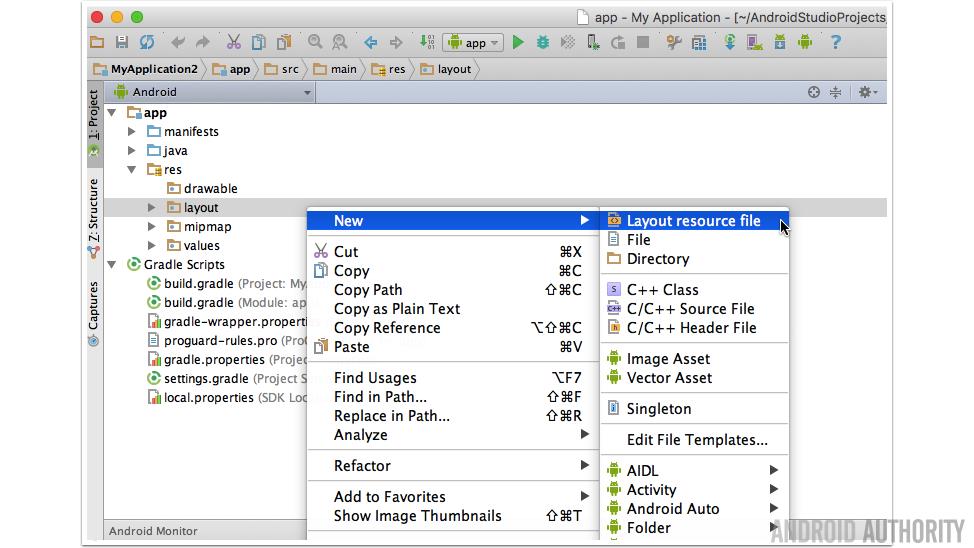
In Android Studio, create a new layout file by opening your project’s ‘app/res’ folder, and then right-clicking the ‘layout’ folder and selecting ‘New,’ followed by ‘Layout resource file.’
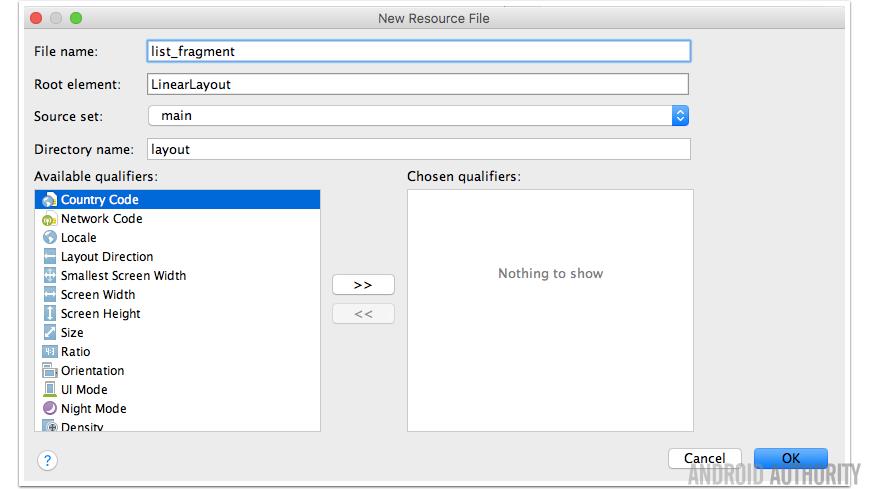
<?xml version="1.0" encoding="utf-8"?>
    <LinearLayout xmlns:android="http://schemas.android.com/apk/res/android"
        android:orientation="vertical" android:layout_width="match_parent"
        android:layout_height="wrap_content"
        android:background="#CCCCCC">

    <TextView
        android:layout_width="wrap_content"
        android:layout_height="wrap_content"
        android:textSize="30sp"
        android:textStyle="bold"
        android:textColor="#ffffff"
        android:text="This is the contents of my list_fragment.xml"
        android:id="@+id/textView2"
        android:layout_gravity="center_horizontal" />
</LinearLayout>
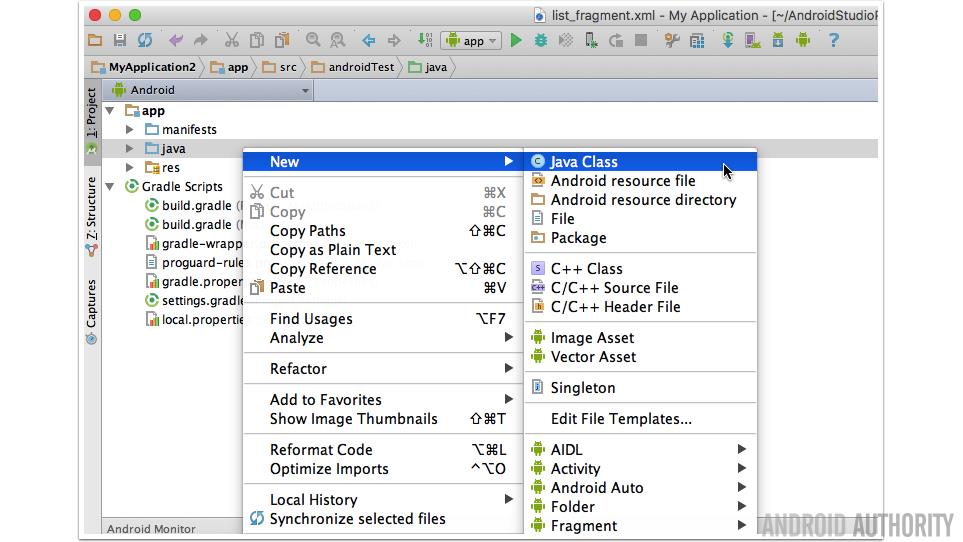
As well as a UI component, you need to have a class associated with your fragment. To create a new class, open your project’s ‘app/Java ‘folder, right-click its package name and select ‘New,’ followed by ‘Java Class.’
import android.os.Bundle;

//If you want your app to be compatible with devices running Android 1.6 and earlier,
//you need to import the fragment class from the v4 support library//

import android.support.v4.app.Fragment;
import android.view.LayoutInflater;
import android.view.View;
import android.view.ViewGroup;

//Since I’m targeting devices running Android 1.6 and higher,
//I’m going to extend FragmentActivity, rather than the usual Activity class//

public class ListFragment extends FragmentActivity {
    @Override
    //onCreateView() must return a View, which is the root of your fragment's layout//
    public View onCreateView(LayoutInflater inflater, ViewGroup container,

    //If the fragment is being resumed, savedInstanceState will pass data
    //about the previous instance of the fragment//
    Bundle savedInstanceState) {

        //Inflate the fragment’s layout resource file//
        return inflater.inflate(R.layout.list_fragment, container, false);
   }
}
The final step is adding this fragment to your Activity. As already mentioned, there are two ways of doing this, but in this article I’m only going to look at adding the fragment declaratively by embedding it in the host Activity’s layout resource file.
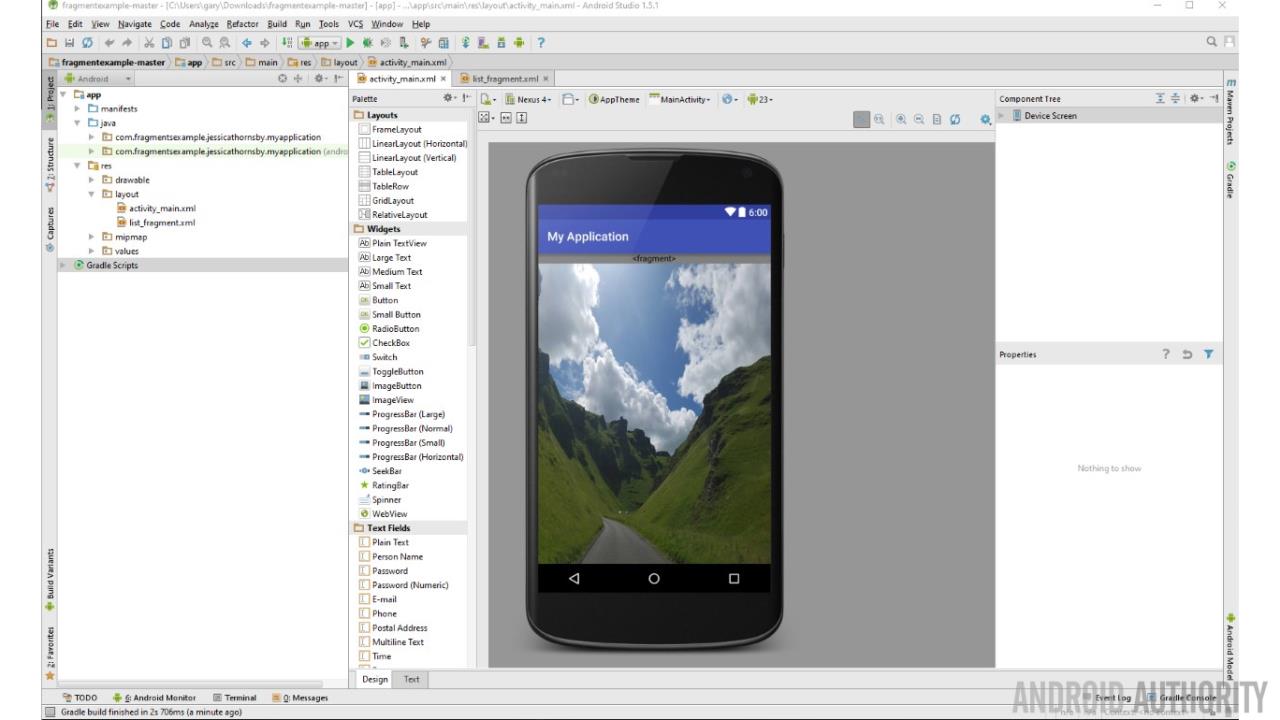
To add a fragment to an Activity, simply open that Activity’s corresponding layout resource file and declare the fragment you want to use, in exactly the same way you’d declare a View. So you have no problems distinguishing between the portion of the finished UI that’s contributed by the activity_main.xml file, and the portion that’s contributed by the fragment, I’m going to set activity_main to display an image:
<?xml version="1.0" encoding="utf-8"?>
<RelativeLayout xmlns:android="http://schemas.android.com/apk/res/android"
    xmlns:tools="http://schemas.android.com/tools"
    android:layout_width="match_parent"
    android:layout_height="match_parent"
    android:background="@drawable/background"
    tools:context="com.fragmentsexample.jessicathornsby.myapplication.MainActivity">

//Add your fragment//
<fragment android:name="com.fragmentsexample.jessicathornsby.myapplication.ListFragment"
    android:id="@+id/list_fragment"
    android:layout_width="match_parent"
    android:layout_height="wrap_content" />
</RelativeLayoutLayout>
Wrap-up
And that’s it! The full source code for the demo app can be found on GitHub. How have you used fragments in your own Android app projects? Let us know in the comments.